Showing posts with label bead embroidery. Show all posts

12/31/2013

Fancy fans

Here are the last four fans.  I had problems with both paddle fans keeping their shape but I can adjust that when I attach them to the quilt.


And here are all twelve together

And here's the list of tips:
1.  Use a double thread as it attaches the beads more securely.
2. After you attach a row of seed beads  run your thread back and forth through it a couple times to aline the beads.
3. When adding a row of irregular beads such as flowers, sequins, spacers etc., start in the center and work to either side. (See example on left)  That way if it doesn't quite come out even you have the same odd space on each end to fiddle with.
4. Insert you initial knot about 1/2" toward the center and weave your thread to the edge.  It is easy to snip a knot near the edge when cutting you fan out.
5. Every few beads secure on the back side with a knot. The more often you knot, the more even and secure your bead design will be...
6. Size 15 beads are the best for filling in difficult areas.


Morris really prefers 5 pillows and one blanket.  Friday will be moving day for my mother... from the nursing facility back to assisted living.  I'm holding my breath that she can handle it... I will probably spend the nights with her  to help with the transition.  Lots of stitching time.

12/29/2013

Here are the second batch of fans (still untrimmed)


And here are all eight together


And I have the bases attached for the final four..  Remember when I erroneously said I was going to keep the embellishment understated.... LOL these fans will put it over the top..


Today is the Audubon Society's annual Christmas bird count.  DH and countless other are wandering about the countryside siting birds for the count.  I am home counting the ones at the feeders... Here are a few this morning patiently waiting for the feckless fellow who fetches the seed!

6/15/2010

Why Around My Neck.....

Susan asked a good question and I should have explained....."why do you find it's best to keep your supplies around your neck rather than in a hussif?" I guess I'd first ask "How many times are you searching for your scissors? Losing my scissors, tools, and pins etc. is a pain (especially working in the car) and I can't lose them if they are attached to my body...

We used to travel A LOT... by car and by plane and I always did needlework... Just recently on my trip to Alaska I was able to stitch on the plane because there not much room for a hussif on a airline tray and it isn't easy to pick it up if it falls off.... The same goes for the auto shop, doctor's office and even if I stitch in the park while at summer events. I can move from place to place instantly and there's nothing to gather up and put away... When I was visiting Cathy last winter I was able to work in a tiny area across from her because I was "wearing" my supplies....what fun we had...


But even at home I have no "room" as such to work in... I have a hospital tray table by a window in the living room and the surface is only about 16" by 24" so wearing my tools is a great space saver here also.....When not in use it hangs on a lamp by my work area.....ever ready.... So if you always stitch at home and have everything at hand or if you always have space to lay your supplies or hussif on, I suppose there would be no advantage.

I also have a hussif (in fact two) and occasionally use it also... but years ago I figured out those stitchers in earlier days had a great idea so I just adapted it.... and it works for me.....

3/14/2010

The peacocks

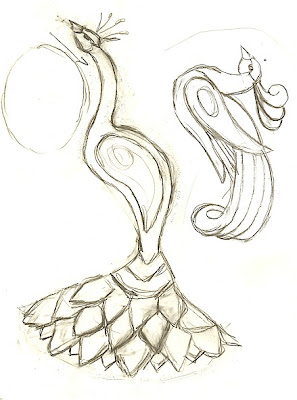
While the photoshop is fun for quick design work, when I have specific shapes and elements in mind, it is back to the pencil and paper...

Such is the case for the peacocks for the 2010 challenge block. I intentially chose peacock colors for this landscape block... Peacocks will be the focal point and the success of the block depends on the them so I spent a lot of time with a pencil and even more with the eraser. But I have the designs now.. I wanted them stylized and the neck of the peacock to echo the shape of the silkie as they are close together. I wanted the tail to be fan shaped (January) rather than long and flowing. Finally I wanted the wings shaped so I could do them in a paisley design... The standing peacock will be done in sections as I use small hoops.

Since the whole purpose of the challenge block is to try new things, I look for every opportunity to try something different. I'm playing with the whole flowing art nouveau thing and also anything goldwork...

I love the way Lauri B. fills in with chain stitching and I am going to do that with the resting peacock... I will also show how I use a cut-away technique to transfer designs when I can't trace or use transfer papers...

3/08/2010

Goldfinch - April BJP

While I was waiting for Rita's CQ RR blocks to arrive I was able to get a good start on my bird for the Bead Journal Project for April. All I have left to do is the background and I have some really odd, but nice, peachy matte beads for that. I have no idea where I got them...in some grab bag or whatever but they will work great on this block...

This goldfinch is from the same drawing I did for the Daffodil CQ block, just reversed. It was interesting to work up the same design with two different mediums. I think I'll do the same with the bluebird/morning glory drawing.

I have the birds chosen for the first 6 months but the list for the last six months changes every day or so... This week the Rufous-sided Towhees arrived and now I want them on the list. They are wildly funny to watch as they can scratch for seeds with BOTH feet at the same time..

3/06/2010

More bird garden progress photos

Remember this photo of the dreaded house the day I arrived... This (southeast corner) was the second area to be mulched and planted and here are a few photos over the years of this area... Among other things in this area there are wild roses, native plums, elderberry, bird cherry, mountain ash, junipers, pyracantha, black walnut, 3 spruce, 1 pine, willows, Clavey's Dwarf Honeysuckle (one of my very favorite shrubs) and species clematis...


This was a small floorless tack shed that was in terrible condition. I used the wood from the old corral to make a floor and gradually took off the side walls and added railings. After each wall was removed I expected it to collapse but it has lasted all these years... You can barely see it in the last photo in the progression and is a favorite shady spot on hot sunny days... In this area are lots of species roses, 1 spruce, several large maples. junipers, species clematis, and dozens of bird cherry trees.

This was the last area to be mulched and planted... I sacrificed a body part here....left index finger My husband always tells people his wife was not so skillful with the skill saw. Behind this area is where the forest is planted (5,246 trees). In this area is a flowering quince, a small-fruited crab apple, a long hedge of Clavey's dwarf honeysuckle shrubs, 1 acorn tree, bird cherry trees, lots of hip-producing species and Alba roses, honeysuckle vines and species clematis.
This is just 3 of 7 "zones" I planted... Besides the shrubs and trees mentioned are many, many drought-tolerant perennials... I wish I could say that this rose bower is still in good shape and standing. Last year we had 10 feet of snow and it collapsed. We were so busy keeping snow off the roofs of the buildings that this was not on the "to save" list.... Now it is a huge mound of lumber, roses and vines... Someone else will have to deal with it after I'm gone....
See Installment 3 below...

2/10/2010

March Nuthatch for BJP

I'm posting everything I can find today as my mouse keeps freezing and I had to restart the computer 4 times to get it to work... Will try to get another mouse when I go to post office tomorrow....if not ..enjoy 3 posts in one day...... a new record.
I'm really focusing on getting more texture in my bead embroidery and the bark on this tree was fun. I just kept layering and weaving lots of colors and several kinds of beads and I'm happy with it except the feet of the nuthatch got lost and I'm not sure what to do about that??? Maybe Robin can give me some advice...
I did not like the green beads I had so a stop at the bead store fixed that.... I love all these "foresty" colors of green for the background... I seem to have a inner sense when I'm close to $50 as that is usually near my total bill. and it's such a little bag....

1/28/2010

Installment One - The Purchase

Installment One - The Purchase
On a trip to Spokane in April 1980, my husband bought the farm. . . literally! "What's it like?" I asked on his return to Anchorage, Alaska. . . "Well," he replied, "the road to it is impassable, the land is overworked, and the house is so bad we'll probably have to tear it down." And that was the good news.

So in May after quitting our jobs and selling our house, we are driving to the farm and, because I'm a clever girl and an eternal optimist, I'm thinking I can probably salvage the house and I'll have a fabulous garden with lush perennials beds, tons of hybrid roses and a verdant lawn (gardening in Alaska wasn't the most exciting.)

Then he casually mentions there's a little problem with the well. "Whatta ya mean...a problem??" I ask with a fair amount of tension in my voice. He hesitantly admits there's only about a gallon-a-minute. If you've ever lived on a well you know that is barely adequate for a house let alone a garden.

Besides Spokane only gets 14" of moisture a year and that is in the wintertime....hardly boding well for the garden of my dreams. The house was indeed dismal and everything around it was dead... everything that wasn't buried in broken-down equipment and junk. Well there was one old apple tree living, but not a songbird to be seen. There was a pheasant and a killdeer. But as it turns out, being ground nesters, their habitat was under constant assault with chemicals...fertilizers, herbicides and pesticides. In fact so many chemicals had been poured on the land over the years that it had seeped down to the water level of aforementioned well.

After I finished weeping and wailing, I began pulling at the duct tape which was holding up the peeling wallpaper in this dismal house built in 1906. I resolved I would have a garden by damn and there would be birds to sing for my bird-loving husband and never again would there be a single drop of chemicals on this land in my lifetime.


Photo taken in May 1980


Photo taken in May 2009 standing in the same spot -
There is a very small pond on the right where you can barely see the little bridge. It provides water for the larger wildlife.
Addendum for scrapbook: The Dismal House
The house (built in 1906) definitely lived down to my husband's expectations. As you can see there were real problems with the foundation.. I should say what foundation as only half the house had a foundation... the rest was sitting on rocks... not a rock foundation... just rocks. The lovely stuff you see on the outside of the house was asphalt material with a brick pattern. It was peeling and rotting. I'm sorry I don't have early pictures of the inside but the outside was grand by comparison.. My husband was right...we should have torn it down. The tree on the right was dead and the tree on the left was dying.
p.s. I am still working with the assemblage of this piece. I adored all Robin's little openings in her work. I started with felt and didn't like it so will go to town to get ultrasuede. It's also hard to condense the text to fit so there will be expanded text in the scrapbook which I am doing at the same time since I have all the photos out....

1/24/2010

A Garden for the Birds in Twelve Installments


First I wanted to do the birds and then tell the story and then finally figured how to attach the story to the birds. If you follow this story you'll learn how a 20 acre garden for the birds turned my life upside down…

The sign is about 18X24" and has a place of honor in our garden. You’ll find out how I started this garden in May 1980 in a Zone 4 arid region with next to no water and how having no water turned into a blessing.

How this garden which I simply started to attract birds for my husband led to :

-a collection of hundreds of old-fashioned roses
-a nursery specializing in plants for the birds.
-the sale 10s of thousands of plants using no plastic pots
-thousands of people visiting the garden learning to attract birds and conserve water
-eroded land turned into a forest
-being featured in a one book and in Better Homes and Gardens
-sending rootstock to David Austin’s breeding program
-speaking engagements around the world
-hugs from former customers who still bring me pictures of their gardens. …
-a wonderful wild garden full of birds and wildlife that started with this dead tree…..


I should have the installment one attached by the end of the week...
 

1/23/2010

BJP

I'm busy working on my new January piece (the magpie will be Feb) and am soooooooo excited because I finally can see how I can do the journal pieces and incorporate the story as well. I'm off today to the hardware store for some metal tubing and Michaels for matte board and the fabric store for felt...

I chose the birds theme because this May is the 30th anniversary of a personal commitment which took me on a wild journey....

1/12/2010

Bead Journal Progress

I set the quail aside and beaded the little nuthatch. We have both the pygmy and the red-breasted nuthatches. I chose the latter because it is so much more colorful. They are such busybodies and such fun to watch... We have several dozen all the time.

Then I decided to put all the designs I have sketched so far on the muslin so I could see them all together. The quail is kinda static but I'm happy with the rest. I decided I don't want blue backgrounds on all of them so will try other colors. I even tried alcohol dyes on some beads today with an interesting result.

I want to try to get more and more texture into the beading and maybe a little more whimsy. The goldfinch is the same design that I already did in embroidery. It will be interesting to see the two different treatments on the same design. I did add the robin family and mama will have a bug in her beak. Also added a bluebird who will be nestled in blue morning glory vines..

1/10/2010

March Bead Journal Project

This is the first time I've been in a group effort such as the BJP and ideally we're supposed to do one a month and I can't do that. I'm having the ideas NOW and want to do what's in my head... This is the red-breasted nuthatch and it can walk head first down on the side of a tree. Actually they look like they're going down head first but their feet are side stepping. I don't want the white muslin to show through behind the beads so I dye the foundation muslin in colors close to what beads will be used.

I have designs done for the goldfinch, robin and bluebird and will probably bead on all of them concurrently as the muse moves me. First I'll do all the birds....it's like eating dessert first as the birds are the most fun.

1/07/2010

Second Bead Journal Project

This bird is in the final stages and they're all 15s...the back and the rest of the wheat. Because the quail are a year-round bird, I chose to add the wild roses of spring and the wheat of the fall. I had planned to use some brown crystal for the wheat berries but they're not going to work will have to rethink that.

I'm already thinking ahead to the next bird which will be a red-breasted nuthatch. There will be considerable bark and pine needles on that one so should be able to try some new things. Stopped at the bead store after physical therapy on Monday and left with a very small bag...$50...

I had said I would limit this BJP to year-round birds but woke up at 3am and realized that was silly because as soon as the robins and bluebirds arrived I'd want to do them also.... So I got up at 3am and make some notes and sketches or I wouldn't be able to go back to sleep.

size: 3 1/2 x 5 inches

1/04/2010

Beaded fan on felt

What a treat to bead on felt after struggling with the wire.  I'm happy with this fan and it is ready to cut out when I get the silky printed.. The nice thing about doing motifs on a hoop is it's so much easier than trying to bead or satin stitch over seams...  I've never been one to keep my motifs nice and tidy in a patch. 

I used up some of the beads in my tray to make some mini-fans...  I can tuck them in somewhere and add a handle to them.   There's always a spot on a block that needs a little something.  In fact I kinda like the idea of a group of mini fans and may try that on one of the encrusted DYOB blocks coming..  AND I'm thinking some of the smaller fans would make pretty cool earrings.

Wish I could stay home and stitch today but after being sick for a week and the holidays, I need to get out to the library, post office, physical therapy, bead store, and of course.......it's 99 cent tag day at my favorite thrift store.

Am I missing something?  I can't find a spell check on the new blogger upgrade...  I will miss that!

1/03/2010

Beaded fan on felt

This  morning I started to bead a fan on felt..  This fan will be part of the framing of the silkie. When I try to make an arch with bugle beads I have a problem keeping them from going off kelter for me.  To help with this problem I make guide lines  and then I start in the center and work out...   I'm really getting into the fan groove now...  The base  of the fan is a vintage earring and isn't it just perfect???   And how can one go wrong with peacock colors?
I have a few neat odd beads in my stash ...  Not enough for a large fan so will make a few mini fans with them at the top of the hoop.  They might be fun to tuck into a flower bed, etc... 

1/02/2010

Celestial Fan on wire


It's just the look I wanted...  elegant and transparent.. but wasn't as easy as I thought it would be.. Would I do it again? Yes, if that's the look I wanted... but am I going to do it often ...NO!

My tips if you try this...
  • You'll find out immediately you need to fold edges back or tape them so your threads don't snag.
  • Use cotton thread instead of nylon beading thread as it is easier to handle
  • It's really only works well if you lay beads across in  rows and then only about 3 at a time.
  • I then couched AND then ran another stablelizing thread through the row in addtion...
  • The wire does stretch and morph in shape but I got used to that...
  • Stop and knot threads often...
  • See previous blog for information on wire.
I wanted a fan of stars in the night sky and I think it works... It doesn't show as well in photo but you can actually see the "sky" through the crystals...

Good day to experiment..

I have been down with a terrible chest cold (complements of my DH) for 2 days and am finally going to live. Thought it would be a good day to get blocks ready to mail Monday and do a little experiment...

Several weeks back Susan made a jeweled crown by beading on mesh.... I thought this was a super idea and went in search of mesh. She used WireForm but the closest I could find is the Acti-wire mesh at Michaels. It is very fine and pliable. You can go to her blog and read her entry http://tinyurl.com/ye9harc and see more photos near the bottom of the page...These are Susan's crowns on the left - one on fabric and one on mesh. I was amazed at how much more elegant the one on mesh was...I want to do a jeweled fan with crystals for the sky in my challenge block... but I can see other applications for using the mesh with stumpwork... I'm hoping she'll forgive me for using her photo...Her blog is wonderful and full of fabulous photos...

12/05/2009

2nd BJP block and last "Faces" block....

New project... I sketched the quail for my second BJP as, along with the magpies, they are one of our favorite and most numerous year-round birds. Since they are year-round I'm choosing to bead in fall wheat and spring wild roses with it.

If you're able to watch them over a length of time, you'll be amazed at their rituals and group dynamics... The whole courting scene involves elaborate dashes and dances between sexes and skirmishes between males. Once the chicks are hatched they are grouped communally and maybe 40-50 chicks will be guarded by 3 or 4 females. When they are brought out to the feeding and water areas "advance" guards secure the area and take up positions and the all chicks are ushered out....

I am totally addicted to #15 beads and ordered a lot from Out On A Whim.com.

I was going to make a face for Rose Anne's star goddess but found this lovely face pin at the thrift store last Monday.. I used butterscotch alcohol dye to soften the harsh white and will add more color to the eyes. I've gathered ribbons, beads, cording and threads and will start tomorrow.. This is my last block in this series...

Oldest granddaughter turned 21 today and is celebrating her birthday in Las Vegas....When I turned 21 I was married and had a child.... her dad.


12/02/2009

Bead Journal Project


Now I'm looking for two things.... UFO blues. I still haven't found the painted buttons to finish my challenge block and now I can't find the bag of black 11s to finish the BJP magpie wings... When this happens the only thing to do is start cleaning up my work areas. It's amazing what turns up.
I'm more conservative with the beading than I'd like and my goal is to loosen up over the year... I know I will be be doing much more beading and in many more ways on my CQI projects.
I love the size 15s but having a terrible time finding them even on line...anyone want to share a source??

I'm still finalizing my list of birds for this project.. So far I have magpie, quail , house finch, chickadee, grosbeak, downy, song sparrow, nut hatch, flicker, song sparrow, gold finch, and red-winged blackbird... the last two are only here year round in mild winters. It is hard to choose because we have so many because I have so much food and shelter for them....

11/27/2009

Magpie has begun!

Luckily I could bead and play scrabble at the same time... Officially the BJP does not start until January but I am anxious to use some of what I learned at Robin's class... I'm experimenting with different stitches for feathering but they do not show up all that well with black on black. I started using "fan" stiches on the back and am going to use layered "stack" stitches on the wings. When I finished the tail I will do a little tut.

We have played three games of scrabble and Vivian is ahead by one game....
Related Posts Plugin for WordPress, Blogger...

Popular Posts