Showing posts with label templates. Show all posts

7/16/2015

Taming Carole Samples templates

(Update 7/15 - I have been using this system for my Carole Samples templates for about 4 years now and wouldn't change a thing...  It was well worth the effort )

 I'd always kept my Carole Samples templates on a big ring as suggested but it was difficult finding a number and awkward to put them on and off the ring in order.. When I got to her class I looked around to see what others were using but it was rings everywhere I looked ..Plus the black marker numbers were hard to read on the purple templates.. So I knew I had to have a system that was user friendly to ME!!

So I set about to work out a color-coded system with rainbow colors...  I divided the templates into subgroups with 5 to a group.... 1-5, 6-10, 11-15, etc.  First I tried colored pearl cotton on each template and it probably would work but I wasn't satisfied...


I decided that I wanted to use colored tape but didn't want to buy seven rolls for just a few inches of tape so I did the colored rectangles on my computer and printed them on a sheet of good quality labels.. I divided each rectangle into 5 approx. pieces 1/2" x 2"   and put the numbers in order by color.. starting at one end of the rainbow ....red

The hole  for a metal ring was covered by the tape but I could punch it through... But I don't see ever putting these on a ring again.. They are so easy to sort and read this way.... Eventually I will make them a travel roll but I will use them at home 99% of the time... What I need now is an color-coded organizer for the drawer and that is next on the list..


Even gathered in a bunch you can see how easy they will be to sort... Sorry it's out of focus... trying to hold camera with one hand while photographing the other is a bit shaky.... Near the middle you will notice a blue label with a tiny white strip on it also...  I am starting to add that extra strip  to my favorites (about 12 so far) to make them even easier to find...

Now that part of the problem was solved I needed a way to see all the configurations at once to make design decisions... So I put all the templates on the scanner with their new lovely colors...


I divided them into groups, scanned them,  and reduced them so each color group would fit on a 4x6  index card... These cards will be laminated and put on a metal ring... I did reduce them further and got them ALL on one 4x6 card but they may be too reduced to be usable....but worth a try..

This is a work in progress and will need some fine tuning but I am loving it so far...  I should be able to study the cards and snap out the right template in seconds.....


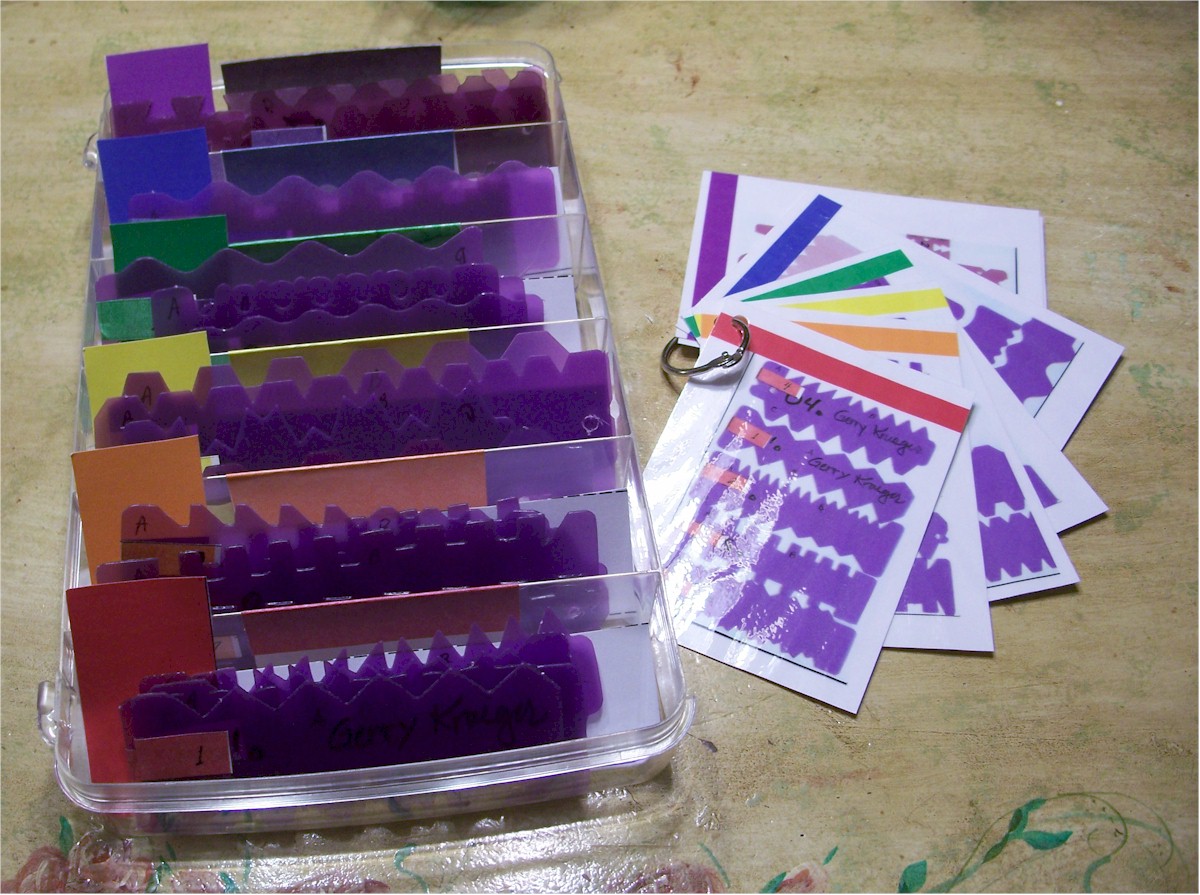
And I made progress on my project for Miss Carole's templates... I found the perfect divided pencil box at JoAnn's.  It is very shallow and has a lid that snaps on... I added some rainbow colors to the section which matched the colors on the groups of templates.  I also finish and laminated the cards which are also coordinated and on a ring.. Once I find an  template in a glance  on a card, I can find it in two seconds in the tray...


I can either use the tray on the table when I am drafting seams but since it fits perfectly in the drawer next to my sewing table... I'm thinking that's its main location... I can snap on the lid for travel but the idea of a CQ travel case is definitely in the future.... not the near future tho...  I just love my new system... and it will make using the templates so much easier...

8/15/2014

Two Useful Tips!!

I know I blogged earlier this summer about the Berol R-77 Ellipse Master but if you want to add a most useful and versatile tool to your arsenal of seam templates, this should be at the TOP of the list.  I started Lisa's blocks this morning and am using it.  It is so much fun. By combining different sizes ellipses and changing the direction, the possibilities are endless.  The cheapest place to find one is on E-Bay.

When I am stitching my little birds I like to outline their eyes with a white ring...  Now we are talking REALLY small.  The eye is the size of a #15 bead or about 1/16 of an inch.  Trying to use an outline stitch was impossible that tiny but I found if I stitched a thread at a time AND alternate  from side to side on the circle, I could get a very tidy tiny circle.... I love it when I find a solution for a irritating problem and this is one I'll use all the time...


DH is out of town for 3 days and this is the first time I've been alone that long since the shooting.  Since he is gone often I'll have to get used to it...  BUT I am locked in and except to go bathe my mother tomorrow I'm keeping it that way...

We are adding an alarm system but since we are so isolated  it is pretty much useless..and there only one patrol car for our whole part of the county...burglers realize that they can do whatever and be long gone before anyone can arrive.  But at least if the alarm is ringing when we come home, we won't go into the house.

4/26/2014

Jacket Progress

 Progress not much it would seem but actually I have been gathering fabric... I found some in the barn, some on  recent thrifting trips, and Cathy Kizarian (bless her) sent me a whole package of jewel tone fancies..  I just recently found the blue and the orange stripes at a thrift store...  I LOVE stripes and hope to find a few more as I go along.   I am a short on greens and especially orange...not an easy fancy color to find.


I mentioned in the previous post that I preferred paper piecing but thought I was going to have to do it patch by patch to get the look I wanted...  But Marilyn Nepper suggested I paper piece large chunks of it and fill in between.   I think that's a great idea.  I've sketched four (about 9") areas and will clean them up a bit.  I avoided 90 degree angles because I did not want the jacket to look like it was assembled blocks.


I looks like it will be at the very least a week or two before I am actually going to be able to start cutting... But that doesn't preclude me from thinking about it while driving or in the garden....  I mentioned the Waverly House book I wanted to use as a reference and I also thought of another one I've had for several years and have never used... It is this stumpwork book Embroidered Floral & Fauna which I love but never have really delved into.... now's the time. 

First I was just going to have flowers and birds but decided to add bugs, bunnies, frogs etc..  all the things I love. 

And it has been a very good bird week.  My precious wrens are back and singing to me daily, the hummingbirds are back, and the white crowned sparrows are here for a short time on their sojourn north.  I also saw a killdeer and a meadowlark in the pasture.  They never come up close to the house.   Last year we had this bizarre invasion of ravens in the field next to us....hundreds of them and they stayed just long enough to drive off all my magpies..  In 35 years we've never had anything like it and they are back again this year.  The field is planted  with just grass hay...nothing exciting or unusual.

I do have information on my sewing kit and will gather photos and put together a post on it...

8/22/2013

New Chatelaine and Mini Tip

I'm in the last stages of this new chatelaine...  It is a surprise gift for someone who I know REALLY needs it..

This one is not fancy materials but sturdy cotton home deco fabric. I spent a long time studying photos to pick the colors that would go with what she wears.. The colors she wears are quite different from the colors she uses in her work..

It is assembled and ready for the front pockets and buttons and beads.


I have the embroidery done on the front pockets.  Rather than cut the pockets out and embroider, I like to embroider on a larger piece and fine tune its placement on the pocket. and how do I do that you ask?


I trace the pocket pattern onto a piece of clear plastic.  This is a top of a box.


Then I can use the plastic as a template as I work and adjust the design just how I want it.  For the "bird" pocket I wanted the leaves and flowers to   conform to the shape of the pocket and sometimes it required changes in the design. When finished I use the plastic template to mark the pocket when I cut it out.


If placement is not an issue I just trace around a pocket pattern onto a larger piece of fabric  If it is a dark fabric and difficult to mark I do a basting stitch for the pocket shape.

11/25/2011

Scissor Holders and Miss Carole's Templates

The scissors holders I showed a couple days ago sold out right away and I made a few more over the holiday and added them to my esty site. They make the perfect stocking stuffer and gifts for a secret sister...
Don't miss out on this batch..


And I made progress on my project for Miss Carole's templates... I found the perfect divided pencil box at JoAnn's.  It is very shallow and has a lid that snaps on... I added some rainbow colors to the section which matched the colors on the groups of templates.  I also finish and laminated the cards which are also coordinated and on a ring.. Once I find an  template in a glance  on a card, I can find it in two seconds in the tray...


I can either use the tray on the table when I am drafting seams but since it fits perfectly in the drawer next to my sewing table... I'm thinking that's its main location... I can snap on the lid for travel but the idea of a CQ travel case is definitely in the future.... not the near future tho...  I just love my new system... and it will make using the templates so much easier...

11/14/2011

Taming the Templates.....Attention Miss Carole

(Note: Okay everyone it's your lucky day.....  I just heard from Carole Samples and she said if you will email her direct she will send you the information on ordering the templates from her..... fancwerx@inebraska.com
 They are available nowhere else and she has the machine that makes them...)

I've always kept my Carole Samples templates on a big ring as suggested but it was difficult finding a number and awkward to put them on and off the ring in order.. When I got to her class I looked around to see what others were using but it was rings everywhere I looked ..Plus the black marker numbers were hard to read on the purple templates.. So I knew I had to have a system that was user friendly to ME!!

So I set about to work out a color-coded system with rainbow colors...  I divided the templates into subgroups with 5 to a group.... 1-5, 6-10, 11-15, etc.  First I tried colored pearl cotton on each template and it probably would work but I wasn't satisfied...


I decided that I wanted to use colored tape but didn't want to buy seven rolls for just a few inches of tape so I did the colored rectangles on my computer and printed them on a sheet of good quality labels.. I divided each rectangle into 5 approx. pieces 1/2" x 2"   and put the numbers in order by color.. starting at one end of the rainbow ....red

The hole  for a metal ring was covered by the tape but I could punch it through... But I don't see ever putting these on a ring again.. They are so easy to sort and read this way.... Eventually I will make them a travel roll but I will use them at home 99% of the time... What I need now is an color-coded organizer for the drawer and that is next on the list..


Even gathered in a bunch you can see how easy they will be to sort... Sorry it's out of focus... trying to hold camera with one hand while photographing the other is a bit shaky.... Near the middle you will notice a blue label with a tiny white strip on it also...  I am starting to add that extra strip  to my favorites (about 12 so far) to make them even easier to find...

Now that part of the problem was solved I needed a way to see all the configurations at once to make design decisions... So I put all the templates on the scanner with their new lovely colors...


I divided them into groups, scanned them,  and reduced them so each color group would fit on a 4x6  index card... These cards will be laminated and put on a metal ring... I did reduce them further and got them ALL on one 4x6 card but they may be too reduced to be usable....but worth a try..

This is a work in progress and will need some fine tuning but I am loving it so far...  I should be able to study the cards and snap out the right template in seconds.....

I'm hoping Miss Carole is reading this post and I know she'll notice that I'm missing template #23 and I want her to know that Morris is not responsible...  I'm hoping it will show up when I actually get my work area sorted and cleaned...

In case you haven't kept a count this is post #997  on this blog and I will have something special on POST #1000....

1/08/2011

"Boy Look at Me Now!" says the orange patch...

Remember the purple block with the orange patch? I feel a bit guilty because I'm always talking about working in harmony with other stitchers in a RR.. But this orange patch just started talking to me and when bits of fabric start talking to me I listen. I had decided to embrace the orange and along with purple I just used the the oranges and rusts from the triad on the color wheel.


Then I added a lot of ribbons. rick rack, and braids. Isn't this a fun and festive block just doing seams...? Did I ever use a lot of the templates on this... and I had sooooooooo much fun doing this block.. I do admit the flowers "borders" on being a motif... but it is attached to a seam... Note: I wanted you to notice how adding that purple ribbon to the tiny upper right corner patch strengthened that corner.. otherwise I would have had a triangle patch with 1" sides... Adding the wide seam also brought even more into the block...
Related Posts Plugin for WordPress, Blogger...

Popular Posts