Showing posts with label fabric journal. Show all posts

4/21/2016

Eye Update and stitch progress..

The sight in my right eye is pretty much a fun house mirror image like this picture (not only blurry but distorted as well) and because of a partially blocked vein in that eye I will be lucky to keep that much vision.. and it is not fixable. But I use drops usually used for glaucoma to reduce pressure in that eye so the vein does not completely block. The blocked vein is not part of the macular and is a separate problem all together.

I can see things fairly well with my left eye if it is something within about a 24-36"  range and it allows me to stitch with my wonderful magnifying lamp. 

But you might remember about 3 years ago I shattered the ocular bones on the left side of my face and they had to implant a plate to support that eye to keep it from sliding into the sinus cavity...That saved the eye but it affected its ability to focus...especially when it is tired. So I can only stitch for short periods before the eye tires and I see double.  Grudgingly I'm accepting what I just can't do and finding other ways to do things.


Having said all that I am determined to slowly finish up what I have going...  First the books of the cottage blocks.  I have six of the blocks as pages all   bound.  Will now add laces etc. to finish off the pages...


It is nearly the end of April and  I am barely started on the gold images let alone the cream on cream..  As always on anything I cut out, I outline with a very tight chain stitch.  The last ones I did on gold velour but I'm wanting to try these on cotton and will paint the fabric gold before I stitch it. (after the outlining)  These are small enough to stick in my sewing bag and tote about...  I love that.

And the biologist at a nearby wildlife refuge confirms that we have a visiting badger in our forest... and the hummingbirds have arrived for the summer....now I'm waiting for my wren who arrive in May.

4/07/2016

Decisions, decisions, decisions......


 Tonight was all about decisions and more decisions as this project goes into the final phases.

Goods news is I get to use two things that have been my stash for YEARS and were never just right... First is the wide ribbon...an old thrift store find...  I love the colors but it is not the best quality.  It's a little stiff. Well quite stiff in fact. I might try boiling it to soften it and then I'll try to use some of my newly found ribbon folding skills to make it work...  There are yards and yards of it and it will take time to pull all the  wire.  Second is this jacquard trim...again yards and yards.  I've dragged it out time and time again and I've never found a spot that it would work..  I think I bought this at a closeout sale in a sari shop in Auckland years and years ago.  But it really works with the ribbon.

Should I use the lace cottage as the cover or use one of the pages as the cover and frame the lace cottage?  Decided to use the lace cottage for the cover of the first book.
Won't even think about the cover for the second book at this time.

Should I do laced binding with beads or a flat spine decorated with flowers? Decided to do the flat spine with flowers.  Since I'm dividing the blocks into two books, whatever I don't do with this one I will do with the other.  I had really wanted to trim the pages with tiny prairie points but just don't think I'm up to it.

And I do love this little green print which was serendipity as it was the lining of a pillow sham I use for a chair cover.

4/04/2016

Onward with "Cottage"

I'm just doing the finishing touches on the linings for 6 cottage pages.  Like the corset books of CQJP2015 I am dividing the 12 cottage pages CQJP2014 into two books.  I used the same assembly technique for both corset books but have decided I want to use a different binding technique for each of the cottage books.
 
When I did my vest to wear to Houston I originally wanted to use knitted lace on the bottom.. It is so different from crocheted lace and but also very difficult to find... I bought a couple lots on Etsy and then when it was time to use it, I decided it wouldn't work... So I am using it on the cottage books.. There's plenty.  It falls into my category of "casket factor".....  If I don't use it, they'll have to bury me with it.  It does seem to have the perfect "feel" for the cottages...
 
I love, love, love this book by Pam Sussman.... Fabric Art Journals.  There's numerous ways to bind fabric pages in such a variety of creative ways and I've only used a few.  This time I want to use a couple of the more advanced ones.  If you are considering a fabric book I can highly recommend this book.  I'm always guilty of buying books and never using them but I am wearing this one out........ 
 
I'm totally hooked on fabric books ...I love that people can handle my needlework and experience it up close in a way not possible if something is hanging on a wall.

12/16/2015

Adding an extra allowance to your block...

There is one step that I do on EVERY block whether I'm working on it or if it's for an RR --Leave an ample seam allowance. Having an extra allowance is especially necessary if you are going to make a book of your blocks.  This extra allowance allows for grommets or buttons to hold your book together.
But other reasons for extra seam allowance are:

 We mostly use fabrics that fray and that edge is the most vulnerable point.

If there is NOT ample allowance outside the exact size of the block, you are continually having to handle the edges which can easily get soiled as well as frayed..

I advise at least 1-2" allowance larger than the block because I often want to use a hoop.  If you skimp on this allowance I guarantee it will eventually cause you grief.  Having an extra allowance is especially necessary if you are going to make a book of your blocks.  Again this extra allowance allows for grommets or buttons to hold your book together.

Step 1 Cutting the pieces for the block. 

First piecing blocks is my least favorite chore.  I have tried every method and for me paper piecing the fastest and least stressful.   I use the same pattern (see note at the end) on all of them and once you embellish it is isn't even noticeable. Since I use the same pattern over and over I made templates with 1/4" allowance. 

But if I want extra allowance it is easy to add it on the patches with an outer edge.  But I would tend to  forget which were the outer edges so I marked them in red and add an extra inch on that side.

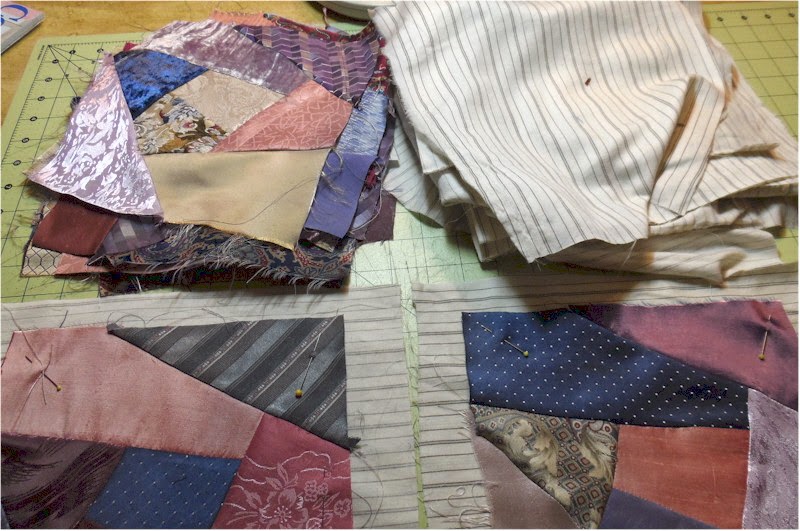
The blocks for CQJP2016 are now all pieced and are about 9 " for a finished 6 1/2" block.  They are ready to be attached to a foundation..  For a block foundation I LOVE old well-washed sheets.


Step 2: Preparing the block for embellishing. 

 Once pieced  I pin a block to the foundation. Then I do a long stitch on the machine to hold it in place.  If I had a machine which did zigzag I'd probably do that. 


I use  home-made templates to mark my basting lines on the BACK of the block.  I started cutting these squares out of old matt boards years ago and I now have every size from 6" to 12" in 1/2" increments. They make this part easier and I can recommend adding them to your list of tools.  They come in handy for other tasks also...  I use them over and over.


On the BACK of the block I trace the exact size of the finished block and inside that I trace the square that is 1/2" size smaller so I have a line 1/4" inside my outside limit of the block.. 

Without an inner line marked I see people beading right up to the edge of the actual block size...which means you will have to remove beads to finish off the block. I use two different colors and run a basting line along each line. 


When you turn it over this is what you see.


 Note:  For years and years I used a block pattern #8 from Sharon Boggon and now I am using #28 as it has a couple more patches.  These are patterns from her fabulous 2001 "I dropped a button box" quilt.  I used to find them on one page and will have to look for it.  But just type "I dropped a button box" block pattern in google and they come up all over pinterest.

2/06/2013

99% finished.....cover for CQJP2013


This  is going to be the cover for the collection of cottage blocks I'm doing for CQJP 2013...  I have a few fiddly things I want to do but since I don't need it until December I can let it rest a bit... You can see how I solved the problem of the ink scribbles lower right.  I am sooooo glad to have this out of my UFO basket.

 I started it in 2010 and  had a few problems with the design so buried it deeply in my UFO basket... Thought you would like to see the beginning... This block is quite small... on 6" x 6" but even still it took forever to do all the knots..

First I used a permanent fine line pen and sketched the cottage on silk... It would be easy to trace a cottage on silk also. You can see I had the angle on the chimney from the very beginning and didn't catch it until much later... The dormer proved to be a problem in the lace so it was abandoned.


Then I did a light color wash with alcohol inks.


Then I added the lace..  The lace on the cottage walls is a very old precious piece from Cathy Kizerian.


Then I  started the french knot flower garden and got the path done and then quit...  When I actually assemble it for the cottage book I will add a crazy quilt border and LOTS of lace...

12/16/2012

Look...A BOOK!!!!!! and it truly is......


Here it is .... my official 2012 Crazy Quilt Journal about my dog Morris.... Except for a bead or a charm here and there it is done and I am so pleased with it... I wish I could show it in person to each and every one of you...

Except for one tiny thing I wouldn't make any changes on future books....  Remember when I said the cover needed to be larger and I would remember next time..... WELL it only needs to be larger on THREE sides... a pretty critical point but I managed to recover...


It lays nice and flat like I wanted it to. And I had this lovely little rainbow leash to use as a bookmark....
Here is how it looks standing on end... 16 CQJP blocks in all and a year of work.


and finally all the pages open fully and flat..  In the next post I will show  assembling of the pages, sewing to the binding and attaching the covers.

Freda wrote that it would be wonderful for someone in the family to inherit some day....NO WAY!  I'm taking it with me when I go...  I want to be buried in my red shoes with my chatelaine, Gingher scissors, Fritz's ashes and my tambourine...and now my Morris book...

Here are all the pages except the pocket page....


Related Posts Plugin for WordPress, Blogger...

Popular Posts