11/09/2016

"French Facing" and I really do have an iron...

Slowly but surely I'm getting to the finished piece.  I did not want a traditional binding on the outside edge and opted to use a technique called a "French facing".  Allie did a tutorial about it on her blog and another for the CQMag online.  I used this technique on my suffragette quilt and loved the nice clean tailored edge it gave.  I actually thought I had blogged about it but couldn't find it...

First I cut four 4" squares and folded them diagonally, one for each corner.  Then I cut four strips (one for each side (each 2 1/2" wide)
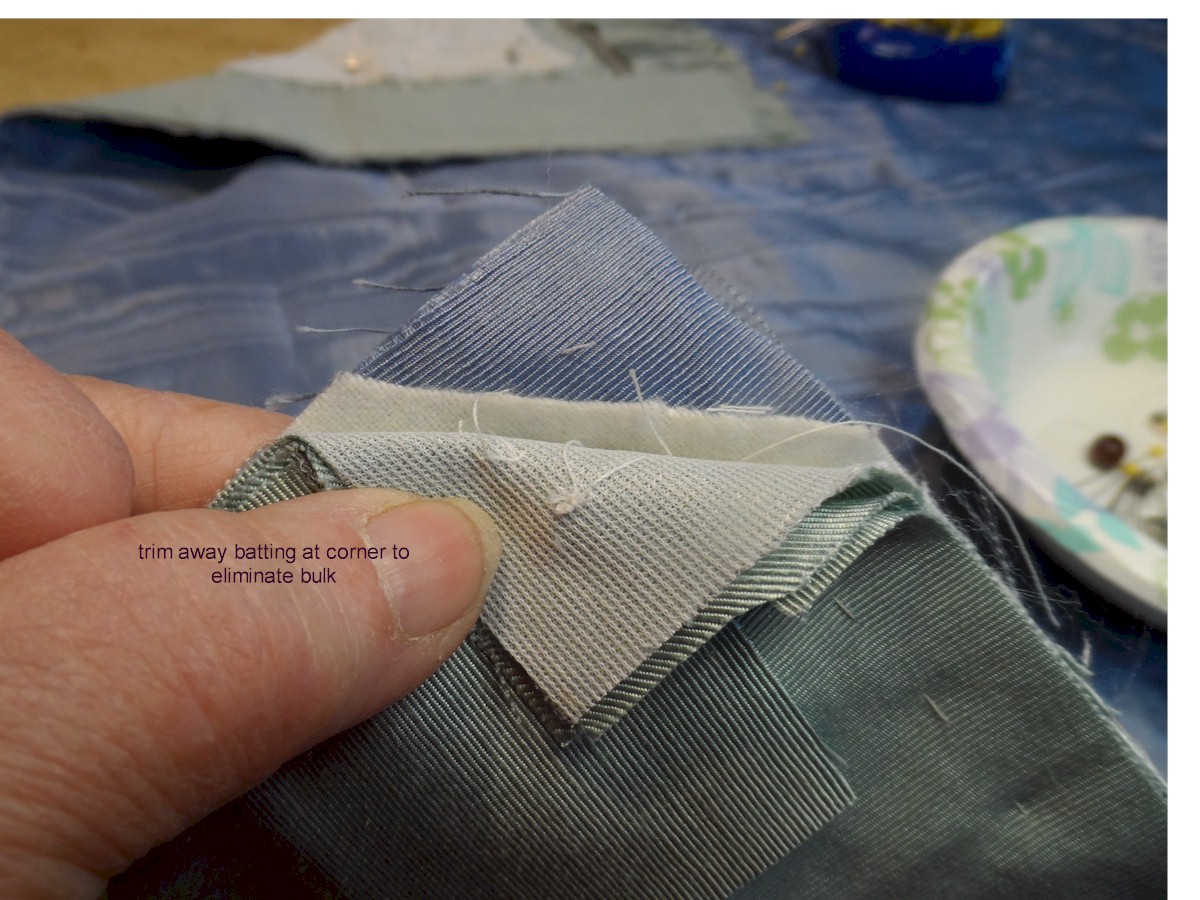
I also trimmed some of the batting away at the corner to eliminate bulk.
 
I also cut each side strip about an inch shorter also to eliminate bulk. 


When it is all sewn, turned and  the edges if the facing strips are turned under... it looks like this.  If you are interested in trying this, use Allie's tutorial as it is much more detailed than mine.

For years I have used just a little travel steam iron for all my CQ work  etc., but it doesn't steam that well anymore so I went in search of a proper iron because I wanted to give these facings a really good pressing...

... Absolutely none to be found in the house but I found three in the barn... They probably qualify as genuine antiques.


I am treating myself to some uninterrupted painting time this week and first on the list are finishing some very special cats for a couple very special ladies.  Yesterday was eye injections and painting time is my reward making it through another session.  Except for twice when the eye was not completely numb, the injections themselves are not the problem... It is the antiseptic betadine.  I am among a small percentage of patients with an adverse reaction to it.  My eyes literally burn with pain for 12-16 hours after application and my whole face swells and itches horribly.  And it seems it is necessary to prevent infection with the shots..


.


11/05/2016

Just a peek ahead!!!

Just so you know that my mind is still churning I have some projects that are fermenting in my brain that are easier for me to handle and still give me the challenge of learning something new.  As you know I have had years to fill bins with wonderful lace that I am obligated to use before I leave this earth... So I am thinking a lace jacket.

 I love this jacket.  It uses old laces but still has some structure .  I am still undecided as to what pattern I'll use, but want to use many kinds of old laces and many different textures.


I know I don't want something like this... great for a street urchin but looks like a hodgepodge. I definitely don't want the "Magnolia Pearl" boho look.  So I'm off on a new adventure as soon as I finish the anniversary quilt.

Already I've learned what bobbinette is and why I need it.  Stay tuned.....

10/23/2016

Final decisions and ribbon search.

The end nears.... Update:    The narrower of these two trims is the one I had for years and years and goes beautifully but it is just not wide enough for the look I want.. So it is at this stage I go a little crazy just to get the right thing.  I found the wider trim on ebay  which coordinates  but it was $33  for 5 yards/... and I knew I would regret not getting it and settling for something I didn't like.  The color was a tad off when it arrived but I soaked it in some coffee and it is perfect.  I will also use the rattail and cording pictured. 

I have the perfect 1/4" pale pink velvet ribbon to add but I only have 2 yards of it so have been searching the internet in vein for more.    I may have to give up on the velvet ribbon. I can find lots of velvet ribbon but it is either the wrong width or the wrong shade of pink.  I want a very soft shade and the only one I found was shipped from China and you had to buy a full spool so I will look some more today.  Of course it would have been easier if I would have thought of the ribbon months ago...

The wider trim is not the best quality so will all have to be carefully hand sewn to keep it straight..  I can use the heavier trim as a guide.


I have squared up the backing taffeta but  I will have to do a little tap dancing when it come to adding the main piece as it is anything BUT square..  It will require a lot of fine maneuvering to have it look square..  and FINALLY an egg...

10/21/2016

And the winner of the 2016 scone bake-0ff

There was definitely a grand winner and I'll save that until last.. But coming in with 4.5 stars was the very first recipe I tried.  In fact they were so good I really thought they would be unbeatable.

This recipe was.. "the World's Best Scones! From Scotland to the Savoy"  I used raisins and walnuts in this batch.  The  Oregon bakery's scones had just a bit of rosemary in them and since my rosemary was so lovely  I added some fresh from the garden....

At 4 stars were the "Fresh Apple Cinnamon Scones" from the King Arthur flour site and they were  judged in first place by Morris.  With spices, fresh apples and applesauce they were really outstanding.  They will be a repeat recipe for sure..


Also at 4 stars (just barely) were the "Lemon-Poppy Seed Scones"..  They were just a tad too "cakey" but still delicious and deserve  another bake. I would definitely add more lemon zest to them next time. This recipe only called for 2 T. lemon juice and the lemon flavor could have been stronger for my taste.


And at dismal last and did not even get photographed were the chocolate/orange scones.  The recipe went straight into the trash and I had such high hopes for that recipe...  just dreadful.

Chocolate Hazelnut Ricotta Scones

And the winner was a recipe I chose on a whim for a really  unrelated reason.  Every so often I cook an Italian recipe which calls for ricotta cheese so I buy a carton and then only use half of it.  And there is never a second recipe imminent to use before the rest of  it spoils.  So when I was searching scone recipes and found one that actually called for ricotta cheese I immediately printed it out.  And lo and behold it turned out to be the winning 5 star recipe.  I did recently see a recipe for orange-ricotta scones which I will try also..

 This did make a double recipe but could easily be halved.  I did make one change though....I reduced the sugar to 1 cup as DH does not like his scones too sweet... Also I did not add the glaze on these or any of the scones because again DH does like his too sweet.
Chocolate Hazelnut Ricotta Scones with Nutella Glaze
Prep Time: 25 minutes
Cook Time: 25 minutes
Total Time: 50 minutes
Yield: 16 scones
Ingredients
    Scones:
  • 4 cups flour
  • 1 1/2 cups sugar
  • 4 teaspoons baking powder
  • 1 teaspoon salt
  • 1 cup (2 sticks) butter or organic shortening, ice cold
  • 1 teaspoon vanilla extract
  • 1 egg
  • 1 cup ricotta
  • 100g (about 2/3 cup) semi-sweet dark chocolate, roughly chopped (or chocolate chips)
  • 1/2 cup roasted hazelnuts, chopped
  • Glaze:
  • 2 cups powdered sugar
  • 3 tablespoons nutella
  • 1/4 cup milk
  • 1/8 teaspoon salt
  • 1 teaspoon vanilla extract
Instructions
  1. Preheat oven to 375 degrees F (190 C) and line 2 baking sheets with parchment or silicone mats.
  2. -If using food processor (steps 2-3):
  3. Combine flour, sugar, baking powder, and salt in bowl of a food processor
  4. Add cold butter to dry mixture and pulse until it is fine and powdery. Add ricotta, egg, and vanilla extract to mixture and pulse to combine until it comes together into a dough.
  5. -If doing by hand (steps 4-5):
  6. Add flour, sugar, baking powder, and salt to a large mixing bowl and mix well. Grate butter with a cheese grater then use a pastry cutter or pair of knives to cut it into the dry mix until you have a course, crumbly mixture.
  7. Add the ricotta, egg, and vanilla extract to a small bowl and stir to combine, then pour into dry ingredients and fold together with a rubber spatula until it comes together.
  8. Fold in chocolate and hazelnuts then scrape dough onto a lightly floured surface. Divide in half and, with well floured hands because the dough will be a bit wet, flatten each half into a circular disc shape, about an inch high. Do your best to handle the dough as little as possible in order to keep it cold. (If you're having trouble with handling it you can chill it for about 30 minutes in the fridge or even the freezer to make it easier to work with.)
  9. Make 4 cuts, straight, across, and diagonally, in the circle so that you have 8 equal triangles (see photos) Repeat with other half of dough. Seperate them and place each triangle about 2 inches apart to allow spreading room on prepared pan.
  10. Bake for 12 - 16 minutes or until edges start to turn golden brown. Remove from oven and allow to cool completely.
  11. While the scones are cooling, whisk all ingredients together for the glaze until smooth. When completely cool drizzle glaze over scones and let dry for about 30 minutes. Store in an air-tight container for up to 5 days.

 I didn't get the pumpkin scones baked but will give them a try next month.  I can't imagine any recipe will displace the chocolate/ricotta scones though.. 

I believe part of the success was due to a few extra tips   I found as I was researching recipes.  All recipes cautioned about overworking the dough and I did find specific instructions on handling the dough with a bench scraper and gently folding it.  The second tip was freezing the butter and grating it into the flour mixture which I did with every recipe.  And the final tip was once the dough was cut and on a baking sheet to stick it in the freezer for 30 minutes before baking to achieve a better rise which I also did.  These tips seemed to help.

Because of this challenge Morris has received the official title of "Royal Guardian of the Scones."  As long as a tray of scones sat on the counter cooling he parked himself right by it as long as it was there...and nary a crumb made it all the way to the floor.

10/20/2016

A bonanza day!!!

 
Due to being gone and other commitments it had been weeks and weeks since my thrifting partner and I have had a day out... Yesterday was to be our day and not only was I primed to go I actually had a list... Most times I have a thing or two I'm watching for but this time I   had a real list and it was a long one.

My friend has some mobility problems and not only needs a cane, but  it is also necessary she wear a brace on her leg.  So we are always looking for the best handicapped parking spot.  We started yesterday with this spot right in front of the door at our first stop... We call this a "movie star parking spot" and it's always a  sign of momentous bargains awaiting us. And it was true...not only did I fill my list, I found many things I didn't even realized I needed..  We went to four stores and had to come home because the car and the trunk were full.

These were a few of the things that were high on my list... One was pans to replace the several I have burned beyond saving without Molly alerting me when the kitchen is smoking.  I found 3 high quality pans with lids...

When I was at the retreat Connie Kalina had a nifty "mini" curling iron for her silk ribbons so that was on my list.  I found this mini hair straightener and it works perfectly.  I needed a pouch for a organizer for medications in my purse and a nice frame for a picture of Molly for my kitchen.. I found a lovely velour blanket to make new inserts for Morris's bed and several nice high count cotton sheets to cut up....

Although a extra large suitcase was on my list for DH, another magnifying lamp wasn't.

This "Atlantic" suitcase is in pristine condition and just what DH wanted...extra large and sturdy.

I never have found the other extension for the rolling base on one of my big magnifying lamp and this base will work perfectly for my big heavy lamp to be mobile again...

The lamp part itself is lightweight and has a long enough arm  that if I add two mounts to the kitchen counters, it will be ideal for reading recipes.

I was jumping for joy with this unexpected find.


I get bored with my everyday dishes and am always taking sets to the thrift stores and bringing home new ones for each season... These will be comfy and fun for this winter.

Also found 2 absolutely gorgeous glasses for my gin and tonics...

And there were many other finds I didn't even get photographed.  I was not just joking when I said the car was full.


All in all we were grinning ear to ear at every check out counter..


I am at the final stage of the hanky anniversary piece and adding the last few charms before it goes onto the backing... It seems when I get to this stage with any project I see every single flaw and hate it. I'll be so glad to be done with this as it has been a real struggle.

Related Posts Plugin for WordPress, Blogger...

Popular Posts