First I need to clarify definitions:
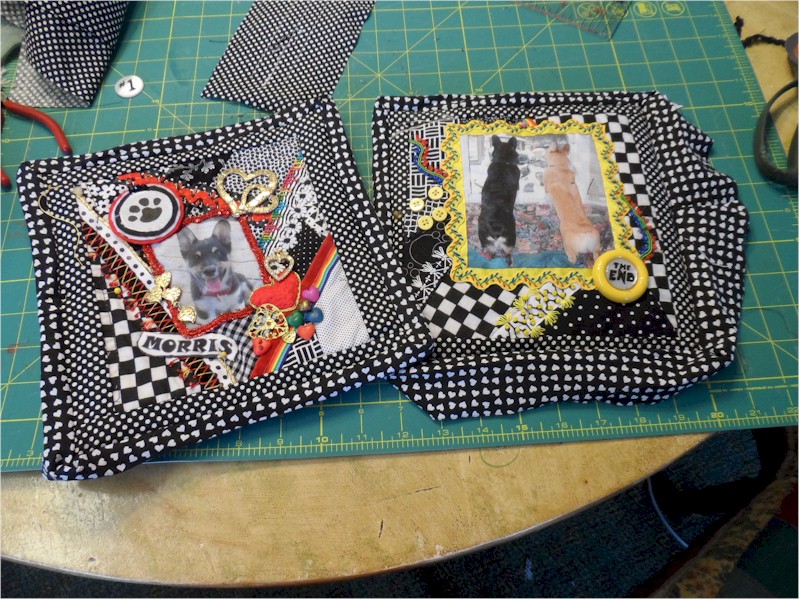
One BLOCK = the 6" CQJP square as I finished it...
One PAGE = two (2) blocks back-to-back.
One SECTION = two pages sewn together..
I ended the Crazy Quilt Journal Project 2012 with 16 blocks... I wasn't as careful as I should have been and there was considerable size difference between the largest and smallest blocks... Rather than cut them all down to the size of the smallest block (which was certainly a viable option) I chose to add a border to all the blocks and then trim them to common size...
I then cut a light piece of felt to the common size of the blocks ... A piece of lightweight cotton batting would have worked just as well. I wanted this filler between the blocks to give the page some body... no limp pages for me.... At the same time I cut two pieces of heavy interfacing for the covers... They need to cut about 1/2" larger on the outside edges....not on the side facing the spine of the book.
Then I sewed a strip of 2 1/2" binding around each page (2 blocks back-to-back) by machine... I made the binding out of material to coordinate with the blocks... I highly recommend making a BIAS binding.... it is much more pliable and forgiving than binding cut on grain. There are numerous sites (and even videos) which show how to do this but I really liked this site... http://cynthiashaffer.typepad.com/blog/2011/05/turning-a-corner-making-a-point-binding-tutorial.html. She did a much better job of explaining this step than I every could.
And then I neatly turned the binding to the back, pressed it, and sewed it by hand..
When all the pages were bound I sewed two pages together to make a SECTION!
Then I cut the spine a little wider than I thought I would need from the same heavy duty interfacing. I marked lines about 1/2" apart... I cover one side with coordinating fabric by using double sided interfacing...
I then sewed down the lines with a bobbin thread that would show easily on the fabric.
Then by hand, I sewed each section to a line....in order of course..
When open you can see that the sections are about 1/2" apart on the spine but because the pages are so thick that is necessary for the book to open properly and lay flat.
At this point (without covers) you can see how it looks...
There are 3 SECTIONS of two PAGES each. So there are 12 blocks for the inside to the book,
I trimmed the spine to just leave enough seam allowance to add the covers and covered it with a piece of felt... I then assembled the covers exactly like I did the pages except I added both the felt and the interfacing.
I then sewed the covers to the spine by hand. This was the hardest part due to the thickness of the layers... So I used a very long sturdy needle, extra heavy thread and a pair of pliers to make the task go easier..
Then I covered the black felt on the spine with the dog paw ribbon using again double sided interfacing.
Done.... I struggle with writing tutorials as it is easier to do something than write directions on how to do it... I strive it to make the process easily understood. If there is any point that needs more clarification, please write me and I will update it....


.jpg)

4 comments:
Thanks Gerry, very well written and illustrated.
Beautiful work. Linda in NM
I enjoyed your tutorial, Gerry. It gave me lots of ideas. Thanks.
Thank you for sharing this wonderful and clear tutorial.
I know how difficult it is to explain exactly what you mean.
Marry Christmas to you and your family!
Hot Dog! This book is great! I hope you enter it into a contest because the world should see how wonderful it is...well, more of the world than already reads your blog. Congratulations!!
Post a Comment