10/17/2016

Let's talk tools


I'm the first to admit that I'm a tool "junkie"  and am always buying tools that I think will be fabulous and they are a dud.  But I've had some good luck lately and this first tool is absolutely fabulous and there are just not enough superlatives that I can use to describe it... If you have ever had a problem threading needles you will love this.

First it is about the size of a donut and fits perfectly in any sewing tote.  Second your hands are free when you use it...


The lid goes up and it telescopes out and HAS A LED LIGHT (battery operated).  You can get
your hand with a needle right under it.  It came just before I went to Kansas City and everyone saw me doing a happy dance every time I used it...  I keep it wherever I'm working when I am at home.

This would make an excellent gift for any friend with vision problems.  It is available at Amazon/


Next when I stitch away from home I use a travel light...  I have at least 5 or 6 of them... Some too big, some not enough light but my favorite up until now was this OTT led light which can be used with either batteries or electricity....

It is nice and compact to take in a suitcase and give good light with AC/DC.  I took this one to London.  Hotel rooms are notorious for inadequate lighting.

But it is going to be discontinued and my new one is better.


I just bought this one before we left for Seaside and it too folds down perfectly to fit in a suitcase or sewing bag.  It is about 5X6"....not much bigger than my cell phone but thicker.


But it too telescopes out and is very adjustable.  It can be used with batteries but it can also be used with electricity which gives a better light. I really like the option of either power source.  It is very adjustable and I can bring it right over my needlework...

The light is led and very bright.  In fact it has two brightness settings.  I've only had it about a month and have only taken it on one trip but so far I love it.

It   is available at Amazon.


Now I am never without these glasses with the flip down magnifying lenses. They are very light weight and I can slip them on quite comfortably over my prescription glasses..  Mostly at home I work directly under my large magnifying lamp but there are times that I need  to see close and also farther away and then I can look right over these magnifiers.

I do NOT like the ones that clip onto my regular glasses where I would have to constantly be putting them up or down and the weight of the clip-ons drag my glasses right now my nose and are also very uncomfortable.  These are working great.

Again... Amazon 


These have become a godsend for playing cards where I have to see the cards in my hand and look  at the cards on the table.


I've saved the latest new tool for last.  This does count as a stitching aide as I am usually off stitching when the kitchen is filling with smoke. I recently blogged about our loss of Molly and how she was so diligent about alerting me when the stove timer went off... I am constantly "overbrowning" things without her... For me this is a very big problem.   I began searching for timers but almost all just ding or buzz for a short interval and quit and also the alarm levels were not adjustable.  But I have found this.  It is designed for a noisy restaurant kitchen station.

It is large and plugs into electricity.  The alarm is adjustable up to 90 decimals and will not stop until you turn it off manually.  Besides the siren it has a flashing red light.  And once it goes off it begins recording the length of time it has been ringing.

It too is available at Amazon and is quite large (about 5 x 7" and weighs a pound) and also very pricey but Molly would approve...  I really miss my "kitchen buddy."

Product Features
  • Volume Control Dial - Adjusts Alarm Up To 90 dB
  • Large, Easy to Read Display
  • Flashing Red Alarm Light Can be Seen Across a Room
  • Automatically Counts Up Once Timer Has Elapsed
  • Non-Skid Rubber Feet

10/14/2016

Adding type instead of an image.

Sometimes I like to add some wording to a block that has a theme.  Such is the case of this block with a rabbit theme.  This little poem was too long to stitch so I used my favorite method of adding words to a block...

Here it is on the entire block and it is the perfect final touch.


On my current project inspired by my anniversary sampler, I wanted to use the original words on the sampler.  My original plan was to cross stitch the words petit point but it just wasn't going to work.


So I scanned it and printed it on paper-backed cloth made for image printing.  I use a cotton variety but there are also silk sheets available.  I personally like the cotton better because it has more body and is more dense.  I just rough cut what I want to print and will trim it after I have the Wonder Under on the back.

Wonder Under is a fusible paper-backed web made by Pellon.  It comes in two weights and I prefer the heavier one.  It is readily available at fabric stores and is usually shelved with the interfacings.  It is widely used by stitchers doing applique.

I want to mount my wording  on felt.  The problem is that even the denser cotton is very transparent once the paper backing on the image is removed.  First if you are using a colored felt, the color will show through and spoil the image.  Second often the fibers of the felt might also show through when attached to the fabric with the image.

To get around that problem I attached the image FIRST to a piece of plain white cotton or muslin.  I use Wonder-Under to attach it.

Here are the materials assembled.... image on fabric, wonder-under, cotton square and colored felt.

After the image is backed with Wonder Under and ironed to the cotton/muslin square I trim it to size and attach ANOTHER piece of wonder-under and iron it to a larger piece of felt.


 Once it is attached to the felt I trim again leaving about 1/8" of felt exposed.  And it is looking like this.. There is nothing turned under so it will lay flat and the wonder-under keeps any edges from fraying.  Now it is ready to attach to my block.

Sometimes I use trim on the edges or just attach with tiny stitches and/or beads.  Here I am using trim across the top and beading around the rest of it.


The smaller image of our name I just attached with tiny stitches.


The first time I added a poem I just printed it on silk and turned the edges under.  It did not lay flat and the needlework underneath showed through.  I was not happy with it.  It was lumpy and wrinkled.


When I was working on my Morris book I wanted it to be "interactive" with flaps that could be lifted with an image underneath.  The flap needed to be even more firm so I added another step with two pieces of felt.

When you lift this flap there is a wild turkey underneath.  I have these flaps throughout the Morris book.   I added the flaps with beads as "hinges."


When I did the book about my sheep I used the same technique to add a poem, names, and other information.


I know someone will write and ask how I got the curve in the type of the rabbit poem.  Years and years ago I downloaded a little free software program called "Type Twister"  I just love it but it is no longer available and it now only works on my old computer. It is a fabulous little program and so sorry it's not compatible anymore.


10/11/2016

Sexy squash and scones #2

I planted 3 types of squash this year in my tiny garden...  butternut, spaghetti, and buttercup...  buttercup is my absolute favorite (far right). But while I was puttering along with my life there was an orgy of cross pollinating going on.  I ended up with a LOT of squash but very few are true to type...

There is a wide variety of shapes, colors, and textures... so every squash I cut into is an adventure.  Luckily we love all squash... even if it's "spaghetnut" or butterghetti"


We also had our 1st frost and dozens of the late apples fell to the ground.  I know of at least 3 that Morris brought into the house today and ate...stem, core, seeds, and all.  This evening I found 3 more that he also brought in today and hid... there may be more.  Luckily the chickens love them and the deer keep the area under the three trees tidy indeed.  And speaking of chickens I'm now suspecting our chickens may be roosters in drag. ...still no eggs.  I really expected eggs late September and now we are well into October.


This second batch of scones is fresh apple cinnamon (with applesauce in them from above apples)  They too are delicious and I did repeat grating the frozen butter and chilling the dough.  They rapidly disappeared and tomorrow will be chocolate/orange scones.

And of course Morris guarded them while they were cooling on the rack....

I did burn a batch of sour cream rolls the other day and luckily passed through the kitchen today when the scones were in the oven and noticed the timer had expired and caught them before they burned.  Unless I am actually next to the stove I never hear the timer go off... I depended on Molly for that as she always came to find me (even if I was in the barn) to get me to the oven.  She could actually sensed when it was going to go off about 20 seconds before it did.


Unfortunately Molly has left us.  I knew it was time when the timer went off and she couldn't pull herself up to fetch me. It was several weeks ago and it is still hard to talk about her.  Any time we sneezed or coughed she would charge through the house to check on us.  She always slept right in front of the bedroom door at night and also when I was sick, injured, or having a bad day with my eye injections.  Even though not trained as a service dog, she was a fierce protector by nature. She was a rescue dog and we were her fourth home and we loved her to the very end.

Morris misses her terribly as we all do...

10/09/2016

A Bit About Borders....


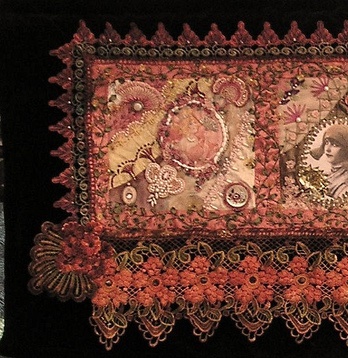
Sometimes  I notice stitchers do things because it's the way it's always done and don't seek a better or more inventive approach.  I can count myself among these stitchers even though I'm trying to expand my horizons.  The first time I saw blocks assembled so that the sashing, border, and blocks were harmonious as a work of art was when the late Leslie Erhlich assembled her blocks from a fan round robin...


This is on a dark brown velvet and the laces were hand dyed by Leslie to pick up the colors from the block.. As you can see the sashing is anything but simple and is embellished with stitching that extends into both the blocks and the borders and unifies the entire piece. Notice the detail in the lower corner.

This round robin goes back a long, long way.  It's easy to pick out the blocks I worked on as I always painted a special button for each.
The majority of times CQers assemble blocks with a simple sashing and a "ho-hum" border...like the majority of quilts.. Either there is a sashing between the blocks or the blocked are abutted to each other and most often the borders are simple bands of color...

Not that I don't appreciate the work and beauty of these quilts but I am always stunned by the occasional quilt that goes beyond these parameters.


And this is certainly such a quilt..  But even though the border has all the elements of the quilt, it seems to get lost.
I like a border that stands on its own and is also an integral part of the quilt.


When I do  a spider web I go to Helen Stevens for inspiration and when I am about to do a border my "go-to" person is ALWAYS Allie Aller.  Like the quilt above the border in Allie's has incorporated all the elements of the center but at the same time it stands alone while it enhances the quilt as a whole..


This crazy quilt is also Allie's and an entirely different and unique approach to borders. The entire pink outer border is highly embellished.


If you follow her quilts on her blog you will see her borders are all tailored to each quilt and add immensely to the entire piece...  Again the outer border on this quilt is highly embellished which is a point I'm trying to remember as I start thinking borders for the anniversary quilt.


But her ultimate borders were the ones on this quilt which went to Houston a couple years ago..  It's difficult to see in the complexity of this border in a photograph.  Not only is it complex it is all hand embellished.


This shot of it hanging on her design wall gives a better idea of the work involved.


But one of my favorites is this small quilt that is itself an elaborate border for a piece of embroidery. I love all the diverse elements in this border.  It's my inspiration as I'm choosing trims and elements for my anniversary.  I marvel at the light fabric near the center that has the huge floral elements and works beautifully.  I would have never considered it in a million years and I just love it.


Here is a close up of one section and you can see how Allie combines seemingly unlikely fabrics and trims.  The lace above the stitching looks like ordinary machine lace from a curtain or tablecloth.  I've always wanted to use this piece as an inspiration for a bag.  It's the diversity of elements that speaks to me and I keep coming back again and again to look at it.


I just recently visited Allie's blog and she's starting a new project and laying out these trims to consider.  Here I was yesterday considering just ONE woven trim and a couple pieces of cording.  I'm going to have to give this a lot more thought..  and the next time you're assembling blocks think of Allie's borders...


10/07/2016

Grand 2016 Scone Bake-Off


When DH and I were first married he would order a scone any time they were available at a bakery...in fact he still does.  I tried them occasionally but always found them dry and tasteless.  I even tried on several occasions to bake them myself but they too were dry and tasteless...

When we were in Seaside someone told DH about a wonderful small bakery (the Sea Level)  in the neighboring town of Cannon Beach so early one morning we drove there and ordered scones..  Much to my amazement they were moist, flaky and absolutely delicious.  I had to recant every single derogatory thing I've ever said about scones.

On my return home I vowed to be able to bake just such scones...  I started with this recipe and they were indeed as delicious as the ones in Cannon Beach..

  This recipe was.. "the World's Best Scones! From Scotland to the Savoy"  I used raisins and walnuts in this batch.  The bakery's scones had just a bit of rosemary in them and since mine is so lovely now I added some fresh from the garden....

I believe part of their success was due to a few extra tips   I found as I was researching recipes.  All recipes cautioned about overworking the dough but I did find specific instructions on handling the dough with a bench scraper and gently folding it.  The second tip was freezing the butter and grating it into the flour mixture.  And the final tip was once the dough was cut and on a baking sheet to stick it in the freezer for 30 minutes before baking to achieve a better rise.  These tips seemed to help.

Of course DH has graciously offered to be the official taste tester and I have gathered the following list of scone recipes to begin with.

Apple Cinnamon Scones
English Royalty Chocolate/Orange Scones
Poppy Seed Lemon Scones
Chef John's Pumpkin Scones
Chocolate Hazelnut Ricotta Scones

Meanwhile Morris patiently waits
for a scone to leap off the pan into
his mouth..

I figure that this is a worthwhile winter project.  If anyone has a favorite scone recipe that I should try....do indeed send it to me.  I will keep you posted as I progress and maybe even get DH to share his thoughts.


Related Posts Plugin for WordPress, Blogger...

Popular Posts