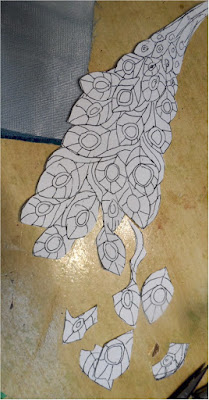
I already have a tutorial for "cut-away transfers" and will add this to it. I've tried to meticulously break it down into every step.. the hardest thing for me to do. It's always easier to do something yourself than to explain how you do it... But follow along as this is a MOST useful technique. I'm working this tail "off-block to make it easier for me to handle under the magnifying lamp.
 First I found peacocks tails I liked and cut them into pieces.
Then I played around with these pieces -arranging and rearranging- until I came up with a tail shape that suited my block. I taped them together. Once I had them like I wanted for my tail I taped together so I could trace them.

Once traced I could scan it into my Microsoft word program to get a reverse image.. I always label this copy "right side" so I don't get mixed up later.

In the picture tools of Microsoft Word is the ability to flip this image. Almost all word or photo programs have this ability...you might have to hunt for it. But Staples or Office Depot can do it for you also.
So here you have the reversed design to add to the BACK of your fabric. You must have a reversed image so when you are done it will be correct on the front. By writing on the original it is easy to see this is the reversed image I want to work with.
Since the center if each "eye" of the feathers is the same I do not need reproduce it but I could if I wanted to with this method. I could reproduce the tiniest details
I begin by cutting out the entire shape
 I've added fusible tricot to the back of the fabric to prevent raveling and I pin this entire paper piece of the tail to the back of the fabric and trace around the entire outside edge.
 When I remove the image this is what it looks like. I am using a heavier marker that I usually would so it shows better on film.
 Then I cut off just a few of the whole sections at the bottom, replace it in position on the fabric and trace around the cut off sections
 And it will look like this......
You just keep repeating cutting and tracing
 This sounds complicated but actually it goes very quickly... literally minutes. Each cut and trace adds to the design. If you mess up just tape it back together and recut.
You eventually end up with a pile of little pieces and your design on the back of your fabric.
I then run a quick basting stitch on the back and when I turn it over I have my design in a format easy to stitch and bead upon. I don't have to worry about film shifting or markers smearing or fading. I will outline all the feather in a gold chain and will add gold beads to the chain and work in from there.. I did this fan years and years ago for this block and this is the look I'm going for.


.jpg)

5 comments:
Thank you for this Gerry - I know I will use this when I need to transfer a design to dark fabric that I can't mark on using any other method. Up until now I've been relying on tissue paper but that gets really frustrating to pick out the 'bits'.
such detailed instructions, must admit I do not know how to use word or even how to type a letter on the computer still use the old fountain pen and paper! These feathers ar going to look spectacular when completed
I am so excited to read and learn from your tutorial!!
Thank you! Thank you!!!
Cindy Rogers
than you Gerry for yet another generous share. Great instructions that are clear and easy to understand.
xx, Carol
This is one of my favourite "Gerry" techniques. Just starting on Anne Stokes block #4. I was not impressed when I figured out that I had made this series of blocks bigger than the first ones. I am not going to take the 3 completed ones apart so I just made one block smaller to match the first set and I'll make 2 10-page books.
Post a Comment