5/31/2009

Diane's block ready to move!!!


I love the fussy little finishing touches.... couple seams, a fan and a few fancy buttons and it's ready to roll. My favorite on this block was finding the lace that coordinated with Faye's gorgeous circle seam... I forgot to memtion that it was lace leaves that I used for the dragonfly wings.... Now back to bunnies....

5/29/2009

Progress on Diane's block.....


You can see the marvelous piece of lace I found that repeats Faye's seam of circles... perfect, right? I added the dragonfly at the center and am working on the rose cluster in the lower corner. The rose appears darker than it is. The ribbon I used was organza so is actually very airy.... I beaded the painted button and it is just pinned approximately as I want to do a couple seams in that area and then the fan. I am going to make the deadline as DH will be gone for 2 days and my evenings will be free to stitch.....


5/28/2009

Diane's FFT#7 Block


I'm setting other blocks aside to work on this block because I really want to keep it on track time-wise and it should leave here on the 1st which is Monday.... I tend to get rather outrageous sometimes when I am first or last on a block but it's a different story being second... I try to coordinate my efforts with the first stitcher so that the block has a strong direction.

First the block itself is traditional, soft and romantic and, as first stitcher, Faye's work is elegant and perfect......As I look at it I want to pick up on Faye's elements and colors so....
  • I will find some way to echo Faye's strong circle elements.
  • Faye's picked up the mauve's and lavenders in the rose and I will continue those colors plus add more shades of pink
  • Faye stitched lots of delicate rose buds so I will continue the rose theme with a substantial rose floral cluster to anchor the lace in the lower left... Will antique that lace first.
  • Faye added a web and a spider and since our challenge is insects this month I'll add one. Diane has an aversion to butterflies so it will be a dragonfly...beaded of course.
  • Finally for my own additions I'm thinking something romantic and traditional like a fan and a button of course... I'm thinking a romantic cottage button......

Tune in tomorrow to see if I'm meeting my objectives.....

5/26/2009

Why I'm not stitching much!


Last fall I wrote at length on my ram woes... This was a nice tidy area of field fencing for the rams....but once the ewes went into heat the rams went into testosterone overload... What fence they didn't climb over they tried to ram through..either to get to the ewes or to attack each other.. The ground was too frozen to put in new posts and we spent the winter trying to "make-do"

I have pulled out almost all of the damaged fencing and am putting in a wood fence with new posts and it has to be done before the shearer gets here which will be soon.... so stitching is limited... I did get some done on a rabbit while waiting at the vet and also tore out some of what I did on my OOYCZ project...AGAIN.... I'm trying to find a teenager to help with the digging.

I remember it well!!!


Yesterday I posted about my poor neglected garden and I was amazed to find a comment left by someone who actually visited the garden in 1999 on the very last day it was open to the public. Nearly 1500 people came through the garden that weekend. When the last person left I locked the gate.. hung a sign "Garden closed to the public. Please respect our privacy." I went into the house, locked that door, pulled the shades, unplugged the phone and collapsed on the couch with the dogs...

On that very same day the Corgi rescue person left a dog crate with 5 year old Maggie in it. She had changed hands 5 times before she got to us... She was grouchy, ill tempered, stubborn, and independantly minded and I adored her immediately. Now at 15 years she is deaf, slow and has doggie dementia but is still stubborn and independant and still adored...

5/25/2009

I can handle quirky and eccentric!


All fall and winter I was on a one-woman crusade to convince my husband to sell the farm and move into town. ... to no avail.... He is NO handy man and I am tired of the work and upkeep... BUT as everything is in spring bloom I've decided what better place to fall over dead...

The picture on the right was an old tack shed that I recycled into a gazebo years and years ago... I've used stained glass (some antique and some I made) throughout the garden because I love to see the sun rise or set through it... The garden proper (not the forest) was close to 2 acres and each year I've let more and more go wild.... quack grass heaven....

I have a lot of "garden art" throughout the garden which I seldom see anymore and have decided this summer I'm moving it ALL up close to the house... It will be like those cluttered quirky gardens you sometimes see with hundreds of gnomes... I have no gnomes but plenty of other stuff and I'm old enough that I can handle eccentric and quirky....

5/22/2009

Working outside your comfort zone.....


On one of the CQ lists Lauri is having a competition encouraging stitchers to work outside their comfort zone (OOYCZ). I joined just to challenge myself because I am so far into my comfort zone that I hyperventilate just looking at certain colors or using certain techniques. We can't reveal what we are doing until it is over in July. I finally got my block made and started stitching and finding it hard...ripping out all I did the other day. But it is giving me a chance to evaluate why I make certain color choices and what is so scary about others.
Sometimes I feel my comfort zone has evolved into a rut.... Anyway I am taking photos as I go along and when I can I will share it all.... But one thing requires photo editing an image and I can expand on photo-editing techniques without giving away any secrets about my OOYCZ.

Modifying silkie with photo editing.


About 90% of silkie put on blocks are "framed" with lace, stichery etc., but you can actually use photo-editing to adapt your image to your block....incorporating it right onto your fabric.. Almost all photo editing programs so matter what they are called have similar tools and one of them is an eraser which creates a transparent background... If I wanted to use this little critter on a block it would be difficult to do it seamlessly. So I "erased" the background...


Then I scanned a little square of my fabric into my program and moved the image with the erased background onto the fabric square. Then I can make a silkie of my image. I'll trim around the critter leaving about 1/2 " and lay it on the block and bead, stipple stitch or satin stitch to hid the edges...

Incorporating silkie into block

On Lau
O

On Lauri's spider block I didn't want a conventional frame around the image and wanted it incorporated into the little scene I was creating... So I laid the image as close as possible to the tree and proceeded to finish the scene using the tree and stitching to hold down the edges and added beaded to blend the stitching and the image...

bunnies & dye day


I have all the very lightest and darkest areas stitched and now will fill in the rest. I do want to overdye some thread for the bunnies and also some lace for my OOYCZ project so will do that today. My own little wild rabbits sat eating sunflower seeds and gave me a chance to make some changes in my sketches as I watching them... Unfortunately they also love to get into my veggie garden so are also known as the "Rotten Rabbits"

5/18/2009

Grand Day Today

Nancy Larson from CQI was in town visiting her grandchildren this week and we arranged to meet today. We hit a thrift store and then hung out here at the farm the rest of the day and talked about and shared stitching and I fed her leftovers for lunch... In between stitching info we discovered that besides crazy quilting:
  • We both listen to books on CDs and both love English mysteries
  • We both adore the work of Helen Stevens and want to go to England to take her workshop
  • We both taught school
  • We both have corgiis
  • We both had 2 sons and then adopted a daughter
  • plus numerous other things in common....

I decided I might be adopted and Nancy is really my sister..... luckily for me her grandchildren live here so I know she'll be back and we will definitely plan another fun day and I'll take her for a proper lunch.... In the meantime we are both signed up for the faces RR this summer.

Bunnies Begin


I've roughly sketched bunnies on nylon felt and pulled a variety of beige and brown threads to use. I honestly don't remember reading anywhere about embroidering on felt but sorta discovered it by accident. I find it marvelous to work on. There's no weave to worry about when working small and it stretches nicely on a hoop. The edges turn so neatly when I cut the image out to applique. ...It is very forgiving...especially if I use a color of felt close to the color of the image.... I always stitch the lightest and darkest areas first and then fill in..

5/16/2009

Part of my garden....29 years later


I love my wildlife garden almost as much as I love my forest... I took the above picture in April 1980 when I moved in. It took a month to haul away trash and broken down vehicles and equipment and begin to plant... I took the picture below this morning standing in the exact same spot... A portion of the same old apple tree is still propped up. If you look closely you can see the gazebo tucked into the trees on the left and there's a pond by the little bridge. I will be filling the antique tub with flowers soon... The sign is a coveted award from the WA Dept. of Wildlife.. another tale to tell later.....

Let the bunnies begin


Oh ye of little faith Kerry....count the bunnies!!!! I spent some time last night searching for "bunny positions" on Google images. Let me inform you if you type "rabbits" into Google images you get a fair amount of Playboy bunnies appearing....of course I'm sure when Lisa said bunnies that's not exactly what she had in mind.... right Lisa?

I played with the sizing and cut them out and moved them around until I was happy. Like playing with paper dolls. Used photo editing to lay out approx. trail.... Decisions made:
  • All the bunnies except one will be stumpwork...(one is peeking from under lace).
  • Trail will not be beads but barest hints of grasses and tiny flowers
  • For interest bunnies will vary in size but be similiar in coloring
  • Ears will be 3D when possible...
I'm choosing stumpwork because:
  • Some bunnies edge on seams and using stumpwork eliminates bumps
  • I can slightly pad them for 3D effect
  • It's soooo much easier to position them when worked "off-block". This is critical because I am trying to work around existing needlework... I will be only covering a couple sequins and beads. Now I'll trace the outline of my bunnies onto a beige nylon felt and begin work on a hoop. This is going to take a while but when I get a "vision" I just HAVE to follow it through... When done this block would be great photographed and used on notecards..... Maybe I'll do that for Cobi!!

5/15/2009

My plans for Lisa's block


Lisa's block arrived yesterday... There were 9 unfinished seams when Ati got it and she finished them ALL beautifully and added the apple blossom branch.. Ati and I made a deal... She would finish the seams and I'd add critters...(Thanks Ati) Lots of room left for critters and when I read Lisa's booklet she mentioned she loved bunnies..and the first thing that popped into my head was "hoppin' down the bunny trail".

I can visualize a "bunny trail" (beaded maybe) and there's lots of empty space for 7-8 bunnies anyway and maybe a bee or two and a spider even. It also needs more pink... I e-mailed Lisa that she may not see this block for a while...

Lindy's Heart Block


This was the second of the two blocks (the other was Gerry H's spider block) that I set about to move color as a primary goal.. The red triangle was isolated down in the corner and I wanted to incorporate more true red.. I added a red silkie, red hearts and red seams. I also shortened the blue and pink trim that divided the block diagonally which freed up a seam for red and a nice area for a focal red heart. I moved the little heart with the cross down to the lower right corner where it really shows up a lot better. Of course I have to be last on a block to make these kind of changes..

5/13/2009

Forest Protection

I should have added that when I applied for these grants I agreed to an covenant being placed on the land that the trees cannot be clearcut for 80 years... It's comforting to know that the day after I'm dead and gone that some developer isn't going to come in and cut it all down....

5247 trees, 2000 shrubs and 14 years later......


This is what my field looked like in 1995 when I planted 5,247 trees with grants from the Carbon Offset program, the Dept . of Conservation, Dept of Agriculture and the Dept. of Wildlife. In addition on Arbor Day that year 150 junior high kids help plant 2000 shrubs that provided food and habitat for wildlife. The field had been farmed for 100 years, was worn out and suffering from erosion. The little yellow guards are biodegradible and kept the deer from pulling up the seeding trees.

Below is a picture of this forest taken yesterday by the Dept. of Conservation agent while assessing the success of my venture. In 14 years it has succeeded beyond all our dreams. It provides habitat for deer, elk, moose, cougar, badger, racoons, weasels, skunks, grouse, quail, wild turkeys, and numerous species of birds we didn't have before such as chickadees and nuthatches.

Redwinged blackbird


The redwinged blackbird was a treat I saved for last... I love doing birds and this one seemed so appropriate with the spiders and sunflowers..

Spider block Gerry H.


Finished...goal was to move the intense warm colors from upper left down into the block and use black to incorporate and repeat the black of the little triangle mid-block .

5/11/2009

Beware of dog on wheels


Now that Fritz has his wheels he is a force to be reckoned with... If Maggie (age 15 yr) is between him and food he just runs right over her. Luckily the gear is very light and doesn't hurt her. Since she had radiation treatments for a malignant brain tumor, she's very laid back and just goes with the flow. Many times each day I get my toes run over.

Spider Webs


I'm continually experimenting with achieving the marvelous look of Helen Steven's webs.. I did as before (see earlier post) and attached the outer "frame" or structure on pins, did the radial lines and this time I did circular parts as guides and filled in. Then I adjusted the "frame" on pins tension and secured. It went well. For more info on how I do it see 3/30 post - Spider Web Experiment.

I try a different thread every time to find one I like. I hated the black thread which was a Gutermann but then I used a white Coats Heavy Duty Quilting thread and it was PERFECT to work with and will be my thread of choice for webs and I can even dye it....

When I have a idea for something extra or whimsical I save it for last as a special treat for me... Now I get to do it.......Good girl, good girl.

5/10/2009

Spider block and a shared tip!!


Sometimes when doing a slanted satin stitch on a large or irregular shape, it is hard to keep your stitches consistent and in line. At least it's hard for me anyway.. To solve this problem I make spaced slant lines to keep me on track. The bottom leaf is finished. The next leaf up is one I added spaced slant lines to use as a guide. The spacing doesn't matter as they will be covered. The top leave is in progress and shows how I use the slant lines. This is especially helpful on things like leaves, fans, etc where there is an angle and the shape expands...

Below is the entire block.. As soon as I finish these last two leaves I will begin the spider webs (2 of them)...and then the secret surprise at the bottom of the block!!! In case you hadn't noticed I will point out something on Lauri's addition that delights me when I see it. She added the bluebird and then let her work amble down and "tiptoe" into the green and rust spaces of the next stitchers... A very subtle and wonderful design elements for bringing blocks together.... Noone has done a traditional seam treatment...takes the pressure off me... LOL


5/07/2009

Transferring sketch...


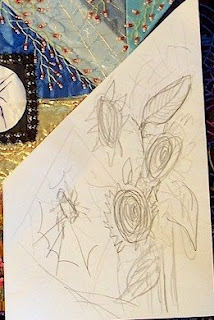
I am happy with the positions and sizes of my sunflower drawing but now the problem of transferring it to the block... I have an aversion to making marks in the front of a block unless absolutely necessary. I've also seen both "disappearing pens" and transfer papers smear and bleed... So I used my computer to reverse the image and place in on the BACK of the block. I cut away parts to trace around with a pen. I basted the traced marks and when I turned the block over to the front I had a nice guide to the drawing basted there. I really like doing my marking on the back of the block.

While doing this I kept thinking about the odd little black triangle and wondering if it had a secret meaning for Gerry Hookstra... Then I had an idea how to repeat it in the block... Check back...


5/05/2009

Moving Color


I'm starting two blocks and my primary focus on both blocks will be moving color... Gerry Hooksta's spider block is on the left. The blues, peaches and greens are moving nicely but the intense gold and orange in the upper left needs to be repeated elsewhere in the block.. Both Janet and Lauri used some orange beads which will help.. I've decided to move the colors with sunflowers.. Because the space is a unusual shape and because I don't want to overwhelm the block, I did do a rough sketch of the sunflowers.... And luckily I got a bracelet at the thrift store the other day that has stones the perfect color for an awesome spider......

On the right is Lindy's (Australia) heart block. I'm the last to work on it and it is a small block (approx 9 1/2") so the space is limited....BUT the lovely true red of the velvet in the lower left is isolated.. There's lots of lavender and pink moving about but no true red.... The flash washed out the red in the silkie which I will trim in red and gold. And now I'm sorting through stash looking for true red elements... At one time when I was waiting for this block I envisioned a tree filled with tiny gold hearts but it's not going to happen... Maybe on another block....

5/04/2009

Faye's block finished

Well the lilies were a challenge and they look somewhat like orchids. I tried several techniques but was the happiest with these... Roses much easier... I absolutely fell in love with the thread I used on the bullion fern. I had bought it some time ago at our only thread store... The clerk was so rude I swore I would never go back but for this brand of thread I'll relent. It is a silk from France and the brand is Gloriana...
Now my friend Ati gave me a "ha, ha, ha" when I listed all I planned to do on this block. She thought there would be no room for anyone else... But Ati, I did it all and I just eased over my alotted space a bit!!!! It was a wonderful block to work on....the colors were soothing and the fabrics luxurious. It belongs to Faye in Australia...

5/02/2009

My beautiful visitor!


I had this beautiful peacock visit yesterday... A neighbor has two and this one decided to spend the day with me.... It kept going to the glass door in the barn shop to look at it's reflection and then wandered about eating bird seed. Later I was on the phone and turned around and it was on the deck peering through the sliding door at me...When I went to bed it was roosting in my maple tree.. Haven't heard it this morning so maybe it found it's way home......

Faye's elegant dragonfly!


Just finished Faye's elegant butterfly... The wings are wired organza as in Di van Niekerk's stumpwork... Now that I see it on the screen I realize I need to make smaller eyes...

5/01/2009

GREAT day at thrift store...


About the time I think I'll never find another mega bargain... I find TWO!! Monday I got the heavy crocheted bedspread for $6 and the little sewing chest for $7... Granted the spread has three spots that need minor repair and the sewing box is a tacky reproduction... The sewing box will definitely be painted and antiqued because the finish is ugly to the max and the top is the perfect place for the fab CQ fans (one Jo's and one mine in progress). These two finds will hold me for a while... My crowns are hanging on the corner of my headboard ...in case I ever feel the need to take the throne and make an royal decision....

My work area


Susan on the CQI list asked about work spaces in public area of the house. This is mine and it consists of a chair and 3 pieces on wheels and it all can be whisked out of sight in a minute.... This whole setup is only about 4' square. It is in the living room just a few feet from the kitchen door and I can watch the birds and sheep out the window. I love being with my husband and dogs and not being isolated.

The best is the hospital bedside table that can be adjusted to any height... I enlarged the surface a bit and added piece on the back of the table to hold tools... I love it... The tall towner of drawers I purchased online last winter and painted it.. The little cart has bins of beads and tiny things... I use Robin Atkin's method of bead storage (on her website) and it's amazing how many beads can be stored in minimal space. I do have bins and storage in another room to replenish my projects.

I have another hospital table and another tall tower that I can roll out for a larger project... Here's a tiny to a picture of the addition for tools I added to the back of the table... http://tinyurl.com/c6tz9t It has taken some tinkering and adjustment over several years but now it's perfect for me..... and I do ALL my CQ here....
Related Posts Plugin for WordPress, Blogger...

Popular Posts