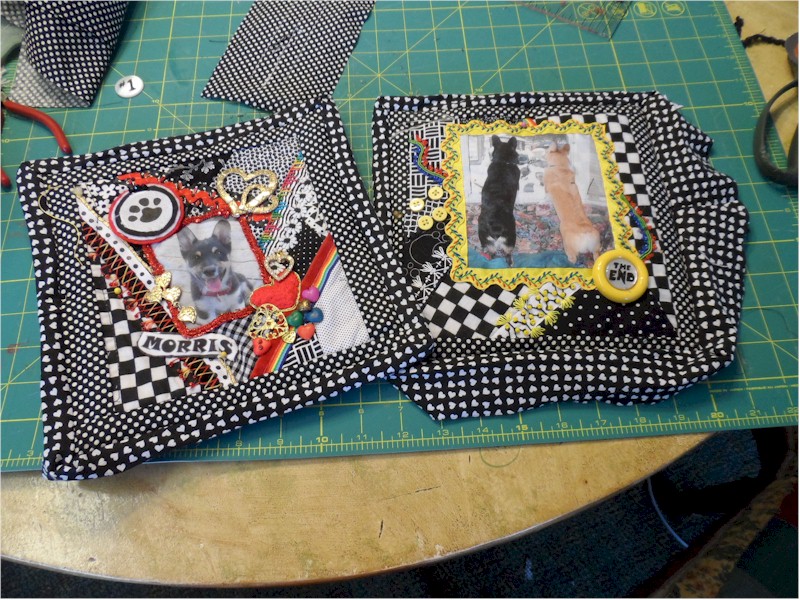
First I need to clarify definitions:
One BLOCK = the 6" CQJP square as I finished it...
One PAGE = two (2) blocks back-to-back.
One SECTION = two pages sewn together..
I ended the Crazy Quilt Journal Project 2012 with 16 blocks... I wasn't as careful as I should have been and there was considerable size difference between the largest and smallest blocks... Rather than cut them all down to the size of the smallest block (which was certainly a viable option) I chose to add a border to all the blocks and then trim them to common size...
I then cut a light piece of felt to the common size of the blocks ... A piece of lightweight cotton batting would have worked just as well. I wanted this filler between the blocks to give the page some body... no limp pages for me.... At the same time I cut two pieces of heavy interfacing for the covers... They need to cut about 1/2" larger on the outside edges....not on the side facing the spine of the book.
Then I sewed a strip of 2 1/2" binding around each page (2 blocks back-to-back) by machine... I made the binding out of material to coordinate with the blocks... I highly recommend making a BIAS binding.... it is much more pliable and forgiving than binding cut on grain. There are numerous sites (and even videos) which show how to do this but I really liked this site... http://cynthiashaffer.typepad.com/blog/2011/05/turning-a-corner-making-a-point-binding-tutorial.html. She did a much better job of explaining this step than I every could.
And then I neatly turned the binding to the back, pressed it, and sewed it by hand..
When all the pages were bound I sewed two pages together to make a SECTION!
Then I cut the spine a little wider than I thought I would need from the same heavy duty interfacing. I marked lines about 1/2" apart... I cover one side with coordinating fabric by using double sided interfacing...
I then sewed down the lines with a bobbin thread that would show easily on the fabric.
Then by hand, I sewed each section to a line....in order of course..
When open you can see that the sections are about 1/2" apart on the spine but because the pages are so thick that is necessary for the book to open properly and lay flat.
At this point (without covers) you can see how it looks... There are 3 SECTIONS of two PAGES each. So there are 12 blocks for the inside to the book,
I trimmed the spine to just leave enough seam allowance to add the covers and covered it with a piece of felt... I then assembled the covers exactly like I did the pages except I added both the felt and the interfacing.
I then sewed the covers to the spine by hand. This was the hardest part due to the thickness of the layers... So I used a very long sturdy needle, extra heavy thread and a pair of pliers to make the task go easier..
Then I covered the black felt on the spine with the dog paw ribbon using again double sided interfacing.
Done.... I struggle with writing tutorials as it is easier to do something than write directions on how to do it... I strive it to make the process easily understood. If there is any point that needs more clarification, please write me and I will update it....
Showing posts with label block changes. Show all posts
12/19/2012
4/14/2011
Adventure with Sharon Boggon
In case I haven't mentioned it often enough I've just returned from CQ Adventure in CT. Start saving your pennies now in case they have it again next year... The first three days were spent with Sharon Boggon from Australia. She feels contrast is the most important key to a great block that really works... We spent a good deal of the first morning discussing all aspects of contrast and she referred to it again and again during the course... Cheryl A. brought this green block to show me.. It is from a tone-on-tone RR and was made by Cathy L. It will be a great exercise in using contrast without depending on color. After she showed it to me we weren't able to connect again to discuss it so here goes... That night at dinner Cathy K, Diane M and I began discussing green plants, animals, etc. to use as a focal point... Sharon had had a fantastic Brazilian grasshopper which would be great and we thought of alligators, frogs, turtles, lizards and various bugs....maybe even a John Deere tractor.
But if it were me doing a the block I immediately think of birds and a parrot or parakeets would be at the top of my list. When I start looking at images to do a bird I am especially looking for birds that are "doing" something or in an interesting position such as both of these photos..The bird eating is a photo from the archives at this site.. a fantastic site for anyone loving birds...do visit it...
I'd probably do the bird in embroidery on a hoop or it could be printed and appliqued on... but another great option is a method Alison Aller is using a lot and would work here beautifully. She would print the parrot on fabric, add fusible interfacing, cut it out, and iron it on the block. So now we have added our first contrast... size! The parrot immediately changes the perspective of the piece...
Then I would begin finishing the seams in as many ways I could think of using stitches of vines and leaves wandering here and there on the block... starting to work on another contrast...texture! Then I'd add branches using a heavy perle such as a 3....bringing the parrot to the foreground... Another contrast... dimension! To further these steps I'd add the largest leaves using heavier threads, ribbons and textured threads such as valour with maybe even weaving some leaves attached only at the branch. As the final steps why not including a dragonfly with green organza wings and a jeweled body...and maybe a hide a lovely tree frog and even a salamander...
So to sum it up we have used all greens but have added variety and interest with contrasts in dimension, size, and texture... This is why I LOVE rounds robins... They are like puzzles and force me to think outside my comfort area...
My next post will cover a couple other aspects of contrast with the block I did in the workshop....
Labels:
birds,
block changes,
crazy quilting,
technique,
tutorial
2/15/2011
What nobody talks about!
After the RR is over and a block goes home I'm assuming that I'm not the only one that makes changes both simple and drastic. We just never get to see it after that happens... I think also lots of blocks ends up in a drawer because it's hard to see what's needed.. This summer I want to do a tutorial on "Can this block be saved?" Well I'm showing the whole story of this block..This is how it left home with lots of lace and a silkie....also instructions for lots of hearts and flowers and no orange. And I included a little verse that said it all... "My little trollop is a slightly soiled dove...searching everywhere for her own true love.." This was the same "encrusted RR" as the previous posts...
This is the block on it's arrival home with lots and lots of wonderful stitching on it... If I really love a block I will start the final tuning and I really loved this block... Please note Maire's delicate stitching on the stripes.. and Leslie's whimsical use of beads next to silkie... Ati finished framing the silkie with roses...Here's what I see I need to do:1. There's a piece of naked lace in the upper left and we all know lace cannot be left naked.
2. I hadn't thought to request fans but there are two fabulous fans from Cobi and how clever for Cobi to add fans... perfect... and it needs MORE fans...
3. The tiny perfume charm which Ati added needs to be in her hand.
4. The button trail just isn't working but that one large red one is fantastic and I will use it.. Most of the others will go into my button box for use on something else..
5. Since the theme of the block is searching for love I want more hearts, hearts, hearts...
6. I feel the red silk roses need to be repeated somewhere else on the block....a purely personal choice.
Now here is the block after I finished it...1. I embellished the naked lace upper left and turned it into a saucy garter.
2. I added four more filigree fans and beaded them.
3. I replaced the trail of button with a trail of hearts of all sorts and the key to her heart.
4. I moved the perfume bottle to her hand and I took that fabulous huge red button and painted a rose on it.. I placed it and a few others from the trail right up next to her head...
5. Finally I replaced the beaded roses lower left with luscious red silk red roses to echo Ati roses...
I don't often completely remove something but if I do, I use it on another block or somewhere else on the same block... I do add lots that most often is inspired by what the stitchers have done (like the fans)... I encourage everyone to make changes to suit you as it's your block... and share what you've done... This is an important part of the process and never makes it to the albums...
Subscribe to:
Posts (Atom)
Popular Posts
-
Pigtails and Quilts is having a "Crazy Quilts are Quilts Too" celebrating crazy quilting and I'm pleased to be participatin...
-
Remember the soutache jewelry from the other day... Well I have a huge hug and thank you for Jocelyne Ausseil who found this fantastic tuto...
-
Marilyn Nepper in Canada really got busy on her computer and found some great sites with even greater instructions... She even found ...
-
Addendum: Here are a couple websites with tutorials... http://historicalsewing.com/pleated-trim-jazz-your-victorian-neckline https...