12/31/2015

Outside my window!

Yesterday I read an article expounding all the healthy benefits of a walk in the woods (or nature).  It increases a positive outlook, lowers your blood pressure and on and on.. Tonight DH was reading another article that said about the same thing but even viewing nature through your window can have the same benefits.  Well I had a very healthy day today...

Our feeders are just outside all our windows.  You can't move about the house without seeing the winged drama.  Our weather has turned very cold so we are filling the feeders often..  The birds wait in the lilac bush until the feed is out. Small birds in the branches and quail beneath.

But this morning we had a bit of sun and I spied a large pheasant all fluffed up to retain heat sitting in a patch of sun.  This time of year we mostly  have mourning doves, quail, house finches, juncos, goldfinches, wood peckers, chickadees, nuthatches, ravens, owls and song sparrows...and wild turkeys.


Just as I turned from taking the photo of the pheasant I saw this bird in the lilac.... a varied thrush.   We get them in the spring but never this time of year.  So it was a special treat.


Later in the day we were snuggled on the couch with the dogs and watched this doe actually sucking the sunflower seeds from the feeder...  Her fawn was getting some from under the feeders..

We are blessed to be surrounded by wildlife all the time but there was a sad side this week also.  An old coyote went into the barn back into a storage area.  It was thin and weak and was seeking shelter to die.  It was out of the weather and there were plenty of mice.  It lasted 4 days before it passed.  I love the coyotes and know we would be overrun with gophers and mice without them..

The high today was about 15 degrees so I keep side rooms closed to conserve heat.  Molly has three beds but her very favorite is in this bedroom with the closed door.  I can take her bed out but she won't get into it.. She wants it in that bedroom in her special corner.  So when I close the door she sits all day and stares at the door willing it to open.

And of course she doesn't want to be in there with the door closed.. it's cold in there.
 

Sensational seams by Jo Newsham (NZ)

Years ago when I joined Crazy Quilt International Jo Newsham of New Zealand was one of the moderators. Her seamwork was an inspiration and she had one special twist that was hers alone.  If it is possible for something to be both simple and complex, it was her seamwork... Elegant is what the word I think of as well.. 
She always used perle thread and her seams were filled with variation and contrast.


And when most stitchers stop at 3-4 passes on a seam, Jo often had as many as 6 or 7.


But the things that was so unique about Jo's seams were the playful variations she often included within a seam.  Look closely at the leaves in this seam treatment.   They all have a different movement and add a whimsical quality to the seam.  Jo did this a lot and I know of no one else who does.

Here are a few other examples.  Note that there is not  only  variations in the patterns, there is variation in height and width as well.


But here are some of my very favorites of her  seams... especially the bottom one where there is a definite  order to the variation and the seam grows in complexity as it moves ahead.  She used this technique often.
The bottom example here has   this type of orderly progression and the top seam is a perfect example of multiple layers to the max....
Then about 5-6 years ago Jo got interested in Zentangle and one day announced she was quitting CQ all together to devote all her creative energies to this new passion.

I often have this fantasy where I turn in to CQI and she will be back!! But in the meantime I treasure all the seam examples of hers that I have saved...

12/27/2015

Got the lace and now the gold stuff......

Several years ago I did a series of RR blocks doing my version of goldwork using ticky-tacky Christmas trims and combining it with CQ.  Since they were RRs I had to send them all out but I want to do some more for myself with the CQJP2016.. So the goldwork will be combined with the crème de la crème CQ   and will   be a similar concept as the block below..  I will do the goldwork "off-block" and add it as I did in this block..

Since I gathered up all the laces yesterday, I awoke this morning eager to gather all the gold stuff I had left and I still had plenty.

Luckily I am snowed in or I would be tempted to hit the sale bins for Christmas gold trims on sale and I really don't need any..


I did want to make some of the more structural laces gold and experimented a bit this morning.  Gold paint alone made them too dark but if I painted them, let them dry and then buffed them with gold Rub n' Buff,  I could achieve an antique gold look.. It also toned down some of the trims that were too glitzy. 

Talked it over with Susie W. this morning and she had a few more suggestions to try..
Also Connie E. posted for exquisite beaded birds and I was excited to see what the artist used for the bodies.  It looks like maybe a faux ultra-suede and she painted on it. It would be nice because it wouldn't ravel.

  I had just a bit of that fabric and the gold paint I put on it was ghastly (on the left) but I think the Rub-n-Buff will work (on the right).  Again Susie suggested some other products for me to try.  I also remember when I was making dolls I used gold eye makeup to get a soft gold look on fabric.  So I will get organized and try a lot of techniques.


Here are a few of the other blocks in that series.  The butterfly was worked on gold brocade and it needled well but raveled... and I have no more of it... For the body of the bird lower left I used a gold lame but it did not needle well so maybe I'll have to hit the fabric shop after all when DH gets back from the coast.  The block lower left was inspired by a piece of William Morris wallpaper.
 

12/26/2015

Auditioning lace and journal tip...

I started auditioning laces today..I have a special drawer for my most special and prized laces.  They're usually very delicate, handmade and with fine thread.  I don't tat so any quality tatting I find goes in that drawer also.  I used many of them on the corset blocks but still have plenty for this CQJP2016.  I had to wash some today and tea dye some of the stark whites.


Tip:  If you are thinking of making a journal cover keep an eye out for simple doilies of this type.  They are often overlooked because they are so plain but they are perfect as a foundation for laces.


DH left without me this morning...I would have worried all the way over, all the time we were there and all the way back so I chose to stay home warm and safe.  He kept saying I wish you would come and I kept saying I wish you would stay home.   He called to say he made it over the pass and sent this picture.

12/24/2015

Getting out of my comfort zone.......

One of the things I loved about joining round robins was it forced me to use colors and themes I would have never chosen otherwise.  Since I loved pastels and lace, I seldom did anything else if it were left up to me.  But doing some of the most difficult round robin blocks turned out to be my very favorites just because they were a challenge.


The one I most often think of was a block that was all purple with one bright orange patch and it had two awkward tiny corner patches.  I spent a lot of time trying to decide what to do with it.


I just couldn't imagine what I could do with it... and this is what I ended up with.  It has always been a favorite as well as a huge challenge.  I have used similar techniques for problem corners many times since.


Then  years ago Lauri Burgesser hosted a challenge that was designed to get stitchers to venture out of their comfort zones.  As my challenge block I chose to do things I never did at that time... jewel tones, curves and layered stitching plus  no lace, no trims.
This is the result AND because I did this challenge, ever since I have loved doing fancy seams more than most anything,  I was especially  glad I participated in that challenge.


For a couple years CQI had a little different challenge... It was year long for one large block  and they provided a list of things that had to be included in the block.  This one for 2009 was a long list including butterflies, hankies, lettering, paisleys, pansies, birds, etc. I really enjoyed that challenge also and was sorry it was discontinued. They only did it two years.


So when Kathy Shaw came along with her CQJP challenge I was among the first to eagerly join and I have been so pleased I did.  With it I have to set my own challenges and each year I try to include things that force me out of whatever comfort zone I'm in.  Last year the main thing was learning ribbon folding.  I had tried several times and given up...  It was do or die for 2015.

This year I'm still working on what to include.  So far it will be a lack of color... crème on crème...  It will truly be a challenge not to add color and somehow I want to
 include one goldwork element...  I want to also add as many of Jo Newsham's seams as I can.  I am still trying to work out the details.  Also I just got a set of Sharon Boggon's templates and I want to really explore their possibilities.  So I'm looking forward to getting out of yet another comfort zone.

12/20/2015

Cover for journal/needlebook/address book etc.

I finished the cover for the journal Christmas gift.


The piece of filet lace I used for the foundation was not long enough to make the flap so I added an extra piece of wide lace to either end.


You can clearly see the elastic cording I threaded across the top and bottom to hold it snug.  And it makes it easy to transfer the cover to another book.


It is exactly the same technique I used when I covered the journal I use to record stitches.


On this though I used the gold elastic they sell to wrap Christmas packages.  The foundation for this cover was a vintage crocheted placemat.  There are more directions here.

Lace Journal Cover and Change of Plans

Working on this lace journal cover as a Christmas gift.  Giving it a good blocking before I add more lace and final beading.  I use 1/8" elastic to finish it so it can be moved to another journal/planner or address book.


All the CQJP blocks are pieced and on foundation.  Only this one has the guides basted.  The black is the size of the block and the red is a warning to stop beading.  I have ample allowance to make a book and also ample foundation in case I want to use a hoop.  I always like to use a hoop if I'm doing a lot of satin stitching..  We are going to the coast for the holidays and I will take the rest of the blocks and do the basting in the car so I don't have to look at the icy roads.
I decided that I would not like to work on white for a whole year.  Although this looks beige, it is really cream.  So instead of white-on-white....it will be cream -on-cream... 
I'm naming it my "Crème de la Crème" series. 
 
This was a cream-on-cream RR block... the last block of mine worked on by Jo Newsham whom I miss dearly.  I want to include a lot of her seam patterns which I have saved.  She was the very best! This is on my to-do list to block and mount...The intricate diagonal seam near center block is hers.. Cathy Kizeian, Rita Cruz, Cobi Wittekoek were also in this RR...a stellar bunch with a needle.

12/18/2015

Ribbon Fold - Diamond Rail Fence

The ribbon fold "Diamond Rail Fence" is one of my favorite folds and it is listed as challenging.  I mentioned that it was Susie Wolfe who finally figured it out to do mine. A local friend, Kathy Streeter, did her version of directions on how to do this fold and I was able to do it with no problem.


Kathy even included in her directions where to put the clips..
If you are interested in doing this fold, feel free to download her instructions.  This folded ribbon trim looks great on CQ and is fun to embellish...

12/16/2015

Adding an extra allowance to your block...

There is one step that I do on EVERY block whether I'm working on it or if it's for an RR --Leave an ample seam allowance. Having an extra allowance is especially necessary if you are going to make a book of your blocks.  This extra allowance allows for grommets or buttons to hold your book together.
But other reasons for extra seam allowance are:

 We mostly use fabrics that fray and that edge is the most vulnerable point.

If there is NOT ample allowance outside the exact size of the block, you are continually having to handle the edges which can easily get soiled as well as frayed..

I advise at least 1-2" allowance larger than the block because I often want to use a hoop.  If you skimp on this allowance I guarantee it will eventually cause you grief.  Having an extra allowance is especially necessary if you are going to make a book of your blocks.  Again this extra allowance allows for grommets or buttons to hold your book together.

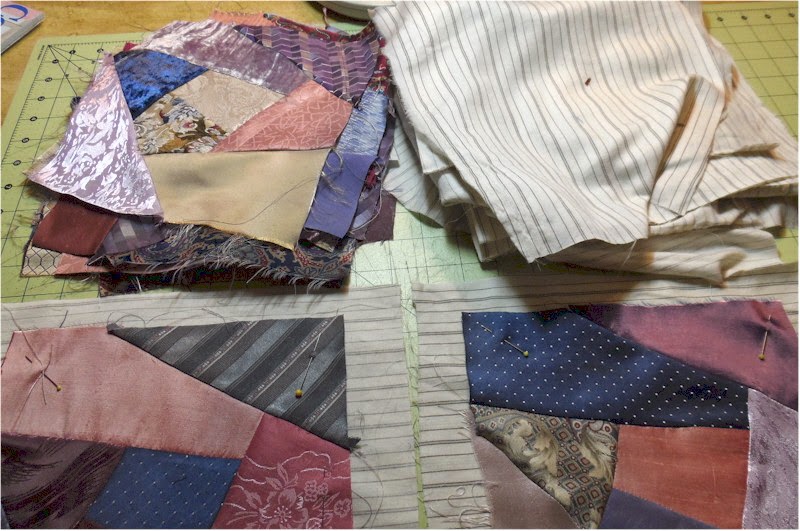
Step 1 Cutting the pieces for the block. 

First piecing blocks is my least favorite chore.  I have tried every method and for me paper piecing the fastest and least stressful.   I use the same pattern (see note at the end) on all of them and once you embellish it is isn't even noticeable. Since I use the same pattern over and over I made templates with 1/4" allowance. 

But if I want extra allowance it is easy to add it on the patches with an outer edge.  But I would tend to  forget which were the outer edges so I marked them in red and add an extra inch on that side.

The blocks for CQJP2016 are now all pieced and are about 9 " for a finished 6 1/2" block.  They are ready to be attached to a foundation..  For a block foundation I LOVE old well-washed sheets.


Step 2: Preparing the block for embellishing. 

 Once pieced  I pin a block to the foundation. Then I do a long stitch on the machine to hold it in place.  If I had a machine which did zigzag I'd probably do that. 


I use  home-made templates to mark my basting lines on the BACK of the block.  I started cutting these squares out of old matt boards years ago and I now have every size from 6" to 12" in 1/2" increments. They make this part easier and I can recommend adding them to your list of tools.  They come in handy for other tasks also...  I use them over and over.


On the BACK of the block I trace the exact size of the finished block and inside that I trace the square that is 1/2" size smaller so I have a line 1/4" inside my outside limit of the block.. 

Without an inner line marked I see people beading right up to the edge of the actual block size...which means you will have to remove beads to finish off the block. I use two different colors and run a basting line along each line. 


When you turn it over this is what you see.


 Note:  For years and years I used a block pattern #8 from Sharon Boggon and now I am using #28 as it has a couple more patches.  These are patterns from her fabulous 2001 "I dropped a button box" quilt.  I used to find them on one page and will have to look for it.  But just type "I dropped a button box" block pattern in google and they come up all over pinterest.

12/14/2015

CQJP2015 Assembled and finished...

Finished.. and I couldn't be happier with them..

I so grateful to Margreet who introduced me to making books with my blocks.  I love it when friends can actually touch and feel the work.


I think the ads on the lining worked out well. Here you can glance over the pages... I think I missed a couple but you get the idea..


Related Posts Plugin for WordPress, Blogger...

Popular Posts