Showing posts with label rr blocks. Show all posts

3/05/2017

Progress and dreaded glue gun...

 Well I have all the pages hand sewn to the spine which was an relative easy job because I had the sew lines well marked with stitching. Now I will cover this side of the spine with black felt. and then add the covers.         The 1/4" spacing I chose was about right but I could have added a tad more even.
 
The cover are done except for the final touches... "Glue gunning" was a skill I hadn't ever mastered and it has been about 20 years since I used one.. But I had to have a few damaged brain cells when I thought could see well enough to sew with black thread on black ribbon to bind the pages...

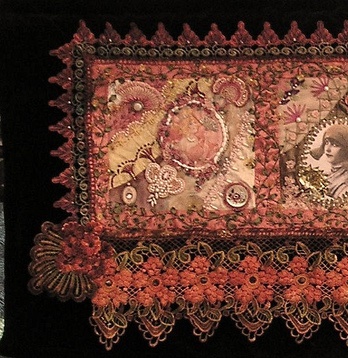
I used a glue gun (rather badly) to apply both the ribbon binding and the trim\ The glue came out in lines too thin or to heavy so I need practice for sure on my trigger control.


In the process I managed to burn about every finger, glue the glue gun to the stand, glue the glue gun to the table and even glue a block to the table.  I ended up with bits of unwanted glue several places. I'm hoping I will improve with practice..  With all the improvements to technology over the years I thought maybe someone had invented a better glue gun....NOT!!

So I went to Google to see if there were helpful tips and there were many sites... Most all cautioned not to touch the hot glue gun which I think is quite obvious and the rest of the tips were about as helpful... like: "If sitting down while working, make sure you wear long pants to avoid burns from any stray drips of hot glue. "

 However there were a few that were new to me.
1.Vaseline on the tip of the glue gun to prevent little glue hairs.
2. Try rubbing alcohol to remove unwanted glue which I will definitely need to try.
3. Store your glue sticks in a spot with low humidity to prevent glue hairs.
4.  Use a hair dryer to soften unwanted glue spots.

When I posted about my Valentine Dinner I forgot to add photo of my all time favorite dessert... Lemon Sponge Tart..  I thought the recipe was on the site but I couldn't find it so I will type it to share... Particularly great recipe if you need a mostly gluten-free dessert. If a lemon lover like me you NEED this recipe.

1/07/2017

"Casket Factor"

 We all know the best part of starting a project is searching for the right embellishments and getting to fondle all our stash...  Well making the "proper ladies" into a book warrants a truly elegant  selection...  And I have so much stash that if I don't use it, it will have to be buried with me...hence the "casket factor"  This stripe is the remains of a valance that looks like real silk... I am delighted to use it..

The antique metallic lace ( lower center) I bought in London last fall.  The dealer had 4 yards and I only wanted one and she wouldn't cut it.  So of course I had to buy it all and it was expensive.. I must  use it all because looking at it languishing makes me feel guilty.

The heads of the proper ladies are a bit bulky and really need a good firm fabric for backing.  I wished I had had a really heavy velveteen in the right color.  DH had to go to a meeting for an hour yesterday so he dropped me off at the thrift store nearby.  Lo and behold I found two huge velveteen pillow shams in the right color ($1.99 for both).  And I was able to remove enough matching piping from them that will make the pages nice and firm... but I'm sure there will be plenty of velveteen leftover to add to the stash.  That's how it grows...a little goes out and more goes in...

Another item that I'm determined to use are these organza roses "by the yard".  They looked so cool when I bought them years ago but every time I tried to use them they looked so tacky.... But come hell or high water they are going on this project.


The weather has either been subzero or a blizzard.  We are just coming out of a subzero spell and expect heavy snows all week.... A good  reason for lots of comfort food...  Recently Paul on the British Baking Series made a ham and turkey pot pie which I tried with a potato crust rather than pastry.  I also add lots of roasted parsnips.  It was yummy.

I was looking for a different side dish to serve with this white cod and made  spanakopita  filled with spinach, feta, and eggs. Rather than use individual layers of filo dough I used sheets of puff pastry.  It was so easy that I will do that all the time.  Spinach is DH's favorite  vegetable (not mine) and it is a hard one to use in different ways.  I cooked up a huge bag and will use the rest of it to make gnudi on Monday...  Today is Asian Beef and Broccoli with yakisoba noodles...

On these super cold days I like to use the oven to warm up the house....  maybe banana bread  is in order also. Our house is 111 years old and is so drafty even with quilts on all the windows .


10/09/2016

A Bit About Borders....


Sometimes  I notice stitchers do things because it's the way it's always done and don't seek a better or more inventive approach.  I can count myself among these stitchers even though I'm trying to expand my horizons.  The first time I saw blocks assembled so that the sashing, border, and blocks were harmonious as a work of art was when the late Leslie Erhlich assembled her blocks from a fan round robin...


This is on a dark brown velvet and the laces were hand dyed by Leslie to pick up the colors from the block.. As you can see the sashing is anything but simple and is embellished with stitching that extends into both the blocks and the borders and unifies the entire piece. Notice the detail in the lower corner.

This round robin goes back a long, long way.  It's easy to pick out the blocks I worked on as I always painted a special button for each.
The majority of times CQers assemble blocks with a simple sashing and a "ho-hum" border...like the majority of quilts.. Either there is a sashing between the blocks or the blocked are abutted to each other and most often the borders are simple bands of color...

Not that I don't appreciate the work and beauty of these quilts but I am always stunned by the occasional quilt that goes beyond these parameters.


And this is certainly such a quilt..  But even though the border has all the elements of the quilt, it seems to get lost.
I like a border that stands on its own and is also an integral part of the quilt.


When I do  a spider web I go to Helen Stevens for inspiration and when I am about to do a border my "go-to" person is ALWAYS Allie Aller.  Like the quilt above the border in Allie's has incorporated all the elements of the center but at the same time it stands alone while it enhances the quilt as a whole..


This crazy quilt is also Allie's and an entirely different and unique approach to borders. The entire pink outer border is highly embellished.


If you follow her quilts on her blog you will see her borders are all tailored to each quilt and add immensely to the entire piece...  Again the outer border on this quilt is highly embellished which is a point I'm trying to remember as I start thinking borders for the anniversary quilt.


But her ultimate borders were the ones on this quilt which went to Houston a couple years ago..  It's difficult to see in the complexity of this border in a photograph.  Not only is it complex it is all hand embellished.


This shot of it hanging on her design wall gives a better idea of the work involved.


But one of my favorites is this small quilt that is itself an elaborate border for a piece of embroidery. I love all the diverse elements in this border.  It's my inspiration as I'm choosing trims and elements for my anniversary.  I marvel at the light fabric near the center that has the huge floral elements and works beautifully.  I would have never considered it in a million years and I just love it.


Here is a close up of one section and you can see how Allie combines seemingly unlikely fabrics and trims.  The lace above the stitching looks like ordinary machine lace from a curtain or tablecloth.  I've always wanted to use this piece as an inspiration for a bag.  It's the diversity of elements that speaks to me and I keep coming back again and again to look at it.


I just recently visited Allie's blog and she's starting a new project and laying out these trims to consider.  Here I was yesterday considering just ONE woven trim and a couple pieces of cording.  I'm going to have to give this a lot more thought..  and the next time you're assembling blocks think of Allie's borders...


Related Posts Plugin for WordPress, Blogger...

Popular Posts