3/30/2009

Spider Web Experiment


I love Helen Steven's spider webs and am going to try to get closer to what she does...Two things I notice about her webs is that they are irregular plus are circular webs framed by a triangular structure. I know I should have a hoop but a hoop is impossible with the beading already on Janet's block.

One of of the problems I've had before was wispy, fly-away thread...I wanted to use a tatting #70 thread so I sprayed it with spray starch and pressed it...then I ran it through a sheet of fabric softener several time. It made a big difference... I anchored the triangular shape with pins so I could adjust and readjust as I went along. I made the triangular structure and began some spokes...working from the outside to the center..

Then I began to do the circular parts of the web...attaching to each spoke with a tiny stitch as I went along.

When I finished my circular web I went back and wove in some more spokes. At this point it is still loosely held at the outside edges of the structure.... I can make it more taut as I put in the leaves around it... Certainly not in the Helen Steven's catagory but I like it better than any other web I've made. This thread shredded a little so next time I will use silk.... Having the outside structure just held with pins allowed for much more manipulation...

Note: I chose to do the web before doing any foliage because I was experimenting with anchoring and adjusting the web with pins and needed a clear field to work in. Now I can go back and add the foliage.

Laurie's spider block


Well I had planned to spend a few more days on this block but Janet's and Kim's blocks arrived and Meg's is on the way so I reluctantly let this one go.... I did add the fairy tho because what is a fairy garden without a fairy... If Lauri brings it to the retreat I may add another critter or two and another web..... Into the mail.....

3/29/2009

Bench using sheep shelter glass


I don't have time to photo Lauri's block this morning but I can give you another bench and this one has a story.. We were visiting Ron's uncle in Hebron ND years ago and he was giving us a tour of one of Ron's aunt old farms... Coming home we passed an old railroad car sitting in the middle of a field with sheep wandering in and out... I could see stained glass windows along the top of the sides and some that had broken...
Always wanting really old glass, we walked over to look. The farmer was using this old discarded dining car for a sheep shelter. Not only was there gorgeous glass on the ground, the car itself was filled with elaborate wood paneling and ornate brass hardware to die for....and everything was rotting away. Since the farmer was a friend of Ron's uncle we decided to ask him if I could have some of the glass and some of the hardware.... His grown daughter hadn't realized the hardware was there and wanted it, but I could have all the old glass I wanted...
I pieced it back together and used it in this bench and in a ceiling light fixture in our family room.... There's a wonderful quality to really old glass. The wood in this bench is some I salvaged from an old barn the fire dept. was burning down for a training exercise... They had to drag me out... If I had known earlier I'd torn down the whole barn and toted it home...
But I still often think of all the ornate brass hardware...handles, knobs, hooks, door plates etc.... I hope she did something wonderful with it because I sure would have!!!

3/26/2009

And he sat down beside her!


Things are moving along... a web, a spider, fairy flowers and pearl edging... I am counting the last two as seam treatments...right? Now just a couple critters, a couple more webs and of course ...a fairy. Now where to put the fairy..?

3/25/2009

Pitiful Pearl and MiniPearl


She was named Pearl for the white spot on her head, but she was dubbed pitiful because of her sad beginning. I bought 4 lambs at once two years ago. Three had been together with their mothers in the flock but Pearl had been rejected by her mother and had been separated from the flock and bottle fed at the house. She was such a tiny little thing and loved to be cuddled.
When we got home the three bonded lambs clung together when they ate and slept and every time Pearl tried to come close to them they moved... So whenever I looked out there would be 3 lambs in a group and Pearl about 10 ft from them.. She bawled all the time. To make matters worse the bawling irritated the older ewes and every time Pearl got close to them they gave her a big whack with their head. Nobody wanted Pearl.
Whenever I went out Pearl wanted to be petted and loved. If I sat on a stool to clip fence she'd put her head in my lap. And when I left she would bawl pitifully....hence Pitiful Pearl. By the end of the summer tho she found her place in the flock but she always remains my favorite.
She had her lamb last night, the last lamb due this spring. It's a big beautiful lamb and probably the only one I'll keep. She's only 1 hour old in this photo and I named her Mini Pearl and Cathy K. suggested she should have a price tag hanging from her ear.... Note: Years ago Minnie Pearl was a famous country singer who always had a price tag hanging from her staw hat.

3/24/2009

Now the fun begins...........

I've tucked the silkie into the tree and anchored it with a limb and grass. In the area just above the right side of the silkie will be more flowers but not until I put in the spider's web.... Then the fun part....fairy flowers, critters and the garden path........The little birds in the tree are MOP beads.....

3/22/2009

Miss Muffet "vignette"

When the spider RR was posted I began a search for Miss Muffets and found a wide variety..... I'm thinking this one says "Lauri's block" on it... But I just don't want it as an element or motif "on" this block... I want it integrated "into" the fairy garden.

I've never seen "vignette" in a crazy-quilting glossary but it should be there... To me a vignette is a level up from a motif. My favorite dictionary definition of vignette is "a pleasant little view" and I find myself doing them more and more. For me it's like bringing a little story to a block....

Lauri's concept of a fairy garden seems the the perfect spot for a Miss Muffet Vignette..... So here goes...

3/21/2009

Lamb Photo Op


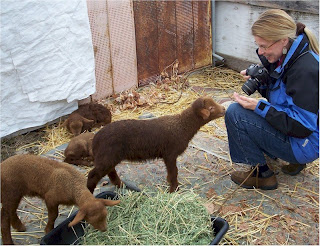
Today was their photo debut and here is friend Simone Ramel coming to my aid... When I try to do it by myself I get noses on my lens as they are sooooo curious.....We separated the lambs from the ewes. Lambs hopping everywhere and mammas bawling their lungs outs....The two newest are tired already and are cuddled on the carpet.

These are the two youngest, one just born yesterday. No matter how I tried I couldn't get a shot with all five but did get some with four.... I haven't seen Simone's shots yet so maybe she did...I had one light colored lamb....the rest are a gorgeous dark mahogany color... Tunis sheep are called the "Romping Redheads" for their unique coloration.....

Back with mommas and everyone had to get a little treat from momma....And momma Topaz is giving me the evil eye for taking her baby.... The last ewe "Pitiful Pearl" (my favorite) is penned tonite and I expect her to lamb at any moment...

And the winners are.....

I just pulled numbers from a tin and went to a corresponding posts and the winners of buttons are LouAnne and Lynn/SoCal.... Send me an address and I'll pop them in the mail... I do NOT sell buttons but I DO use them often on RR blocks. So if we end up in a RR together, you might get one yet.... Thanks everyone for posting and visiting my blog and I'd love to see pics of any buttons you paint and I'll try to answer any questions... Final tip ...start on a larger button...like 1 1/4- 11/2".

3/20/2009

Sunflower Bench

When is a bench not a bench? When it is 3 chairs. This "bench" is actually 3 chairs held together with pipe clamps. Again the chairs were thrift store finds and classic "70s" complete with ugly plastic upholstered seats and back inserts which were trashed and replaced with boards I painted.... I do not leave this outside. It is in a workroom in the barn and on occasions such as a garden party it is pulled out. If I had a house with a large entry it would be perfect.... Right now it is piled high with fabric. (This photo was taken by friend and garden photographer, Charles Mann and was in BH&G 3/2003)

3/19/2009

Tickled Wendy's Fancy Fans

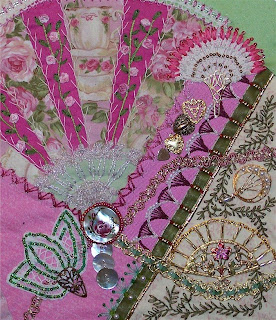
Before the camera evaluation of Wendy's block... I have to admit I am an addicted encruster so what I want is not to everyone's taste.... In the previous post on this block I said .... "I need to repeat Ati's vine somewhere, secondly I thought the button would serve as a handle for the large fan but it is not working so will address that. Finally there is that awkward rectangle mid-right I knew was there but hadn't a solution..."

I repeated the vine elements, the hearts broke up the awkward rectangle and the MOPs extended the handle...Well I think I solved all those problems and I'm happy except for one thing.... In a perfect world I'd remove the green fan on the lower left, move it 1/2" and use a different shade of green beads.... but c'est la vie....

3/18/2009

Madison's bench (Repeat Post)


This is a repeat post but appropriate for spring... I used to haunt farm auction for cheap used lumber to build benches so this post falls under recycle, paint it if it's ugly, and painted furniture.. Enjoy

Years ago I had an on-site rose nursery. After one season I discovered people bought plants, walked around the garden and left. But if I had benches they bought plants, walked around the garden, rested on a bench and ..."bought more plants" So I started building benches during the winter months...all from recycled lumber and odd bits.


I made this bench for my princess
granddaughter, Madison, for a summer visit from Alaska... The "jewels" were odd bits of stained glass.This bench was by far the most popular with customers as a photo opt. It easily sat two people and there must be hundreds of photos floating around my area of gardeners seated on this bench holding a hoe or rake as a royal staff. I devised a plan using NO nails and just a recipitcating saw, lag screws, and a socket wrench that would allow anyone at any skill level to build a bench.


The eye of the camera


Time after time after time I think I see what's on the block only to take a photo and discover I was so very mistaken.. There is nothing like the objective eye of the camera to give you a new perspective..
.
Now I never say I am finished with my work before I look at it on the screen. A prime example is Wendy's fan block. I thought I was done or close to being done, but now as I see it I realize there are soooooooooooo many gaps and much more to be done..
First I need to repeat Ati's rose vine somewhere, secondly I thought the button would serve as a handle for the large fan but it is not working so will address that. Finally there is that awkward rectangle mid-right I knew was there but hadn't a solution... It was so hard to put something there that didn't become part of the fan because of the shape....So back to the needles... I decided to finish this block before going back to Lauri's...

3/13/2009

Lauri, Lauri, in all your glory.......


Lauri, Lauri, in all your glory.......how does your garden grow? I have just started on Lauri's spider block and she wanted a fairy forest.. Lindy did a fabulous tree and I'm just enlarging the garden.... I won't finish the roots until I get some critters at the base of the tree.
The subject of faces came up and I used one I had made for a xmas block...... I fell in love with Lauri when I met her and wanted her for my daughter-in-law. Unfortunately for me she was already happily married with a family....Such is life....

If it's ugly..the other side of the door.


It stands to reason that if one side of the door is ugly the other is also....so of course I had to paint the other side. This bathroom was built in the forties and very tiny...and ugly. So the door is a diversionary tactic!!!!

Wait until you see what I did to the ugly kitchen.......

bevy of birds


These still have to be sprayed with acryllic and sanded...

3/12/2009

Button Button..Who Wins a Button!


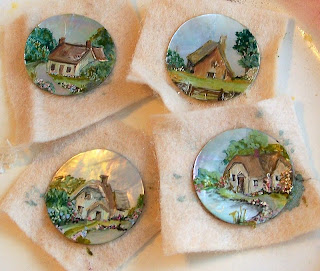
Sorry these are out of focus... Will try to get a better photo up later. Leave a comment and next Saturday, March 21, I will draw two names to win a cottage button each!!!
I'm hoping some people will send me pictures of cottage buttons they have painted.... It doesn't have to be perfect remember..... folk art!!!

Cottage button - stage 4


At this point the acryllic paint is rather dull and the general appearance is not that attractive unless you take it to the next level. First I use a Q-tip to apply just a touch of gold metallic paint around the edge. I like it to be uneven as if the button were old and worn at the edges. Then I start spraying light coats of the gloss finish .. Krylon #1303 Crystal Clear. It creates a permanent protective coating with a glossy finish. It is available at craft stores and art supply center... Very important : Let each coat dry thoroughly. If you spray before a coat is dry it will always be tacky and clouded... I usually spray 6-8 coats. It gives the button a glass-like quality. I sand it very lightly between coats and when finished buff with a soft cloth.

Then I start with a row of beads around the button and then a row of picot (3 beads, skip a bead). When finished beading, trim away the felt close to the beading.....

Cottage Buttons - Stage 3


Now it's a piece of cake...just lots and lots of tiny tiny dots... use them on the trees and where plantings would be. At this size they are not going to look like any particular flower but neither do flowers at a great distance.... Just pile the dots on tops of each other willy nilly...... Making tiny dots is no great artistic talent but does require some practice keeping your hand steady and only letting the very tip of the brush touch the button...

I will leave these dry overnight and do the razzle dazzle finish tomorrow.....

Brushes: I buy my brushes at a craft store ...size a 10/0. A brush called a spotter is perfect. For roses I use an angular brush but for all else I just use a spotter and a liner brush. I use acryllic craft paints.... I did a tutorial on doing roses where I discussed brushes more...it is at http://www.victorianpincushions.com/button_tut.html.

Cottage button - stage 2


The first step is a base color on the cottage. I use a tan for for the walls and a brown for the roof and at this point I add a medium green in the general area to be trees. This is a thin coat as always...

Now it's important to add dimension by establishing a light source.. Make the walls facing the light source a lighter. It doesn't matter which walls as long as you are consistant with walls facing the same direction. Add another thin coat over the green....
Once dry, the doors and windows can be added... Tip: If there are windows on a wall with a door make sure the tops of the windows are level with the top of the door. Otherwise the wall begins to look like a eyes and a nose...... Tip: Since the roof extends out over the wall add a thin dark line under the edge of the roof. This adds depth... this seems like a unnecessary step but it really give the cottage a finished. look... so remember to do it!!!!
Using a couple shades of brown, make tiny tiny strokes resembling shingles...put base coat on chimneys. I usually need to put a second coat on the windows at this point and add another layer of dark green....Tip: more layers more depth....

Cottage button - Stage 1


I love painted buttons but it a major operation for me and tends to make a huge mess so I usually paint a couple dozen at a time... Although painting roses is the fastest and easiest, I prefer to paint birds and cottages. I will take you through the stages of painting a cottage.. Although I repeat them all the time people always want to skip the prep steps... Bad choice!!!

Critical Preparation: First glue the button to a scrap of felt. If the button has a shank cut a hole in center of felt so you can glue felt tightly to the botton of button... In addition to giving you a handle while painting, the felt will provide a surface for beading and attaching to your block... This felt gives you a handle so you do not touch the button itself. It to easy to get oil from your fingers on the button surface or smear your work. Plus it's tiring holding a 1/2" button steady.

Once dry, fill any holes with any white putty from the hardware store. and the sand button lightly with fine sandpaper. Unless you sand the surface the paint tends to "puddle" on the surface...
Now for the most important prep step
. Brush a very thin layer of blue wash (blue paint mixed with water) over the button. This must dry or cure. I leave it sit overnight. The wash gives the button a tooth or surface that makes painting soooooooo much easier and it is thin enough to let the luminosity of the button shine through .
You can see other buttons I've painted on my other blog.... http://olderrose.blogspot.com/search/label/button%20painting.


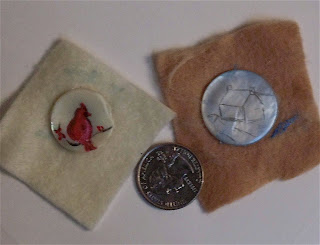
Now the next step..... The button on the right has been glued to felt, sanded and covered with a thin coat of blue wash...I sketch the shape of a cottage with a pencil. Start with a very simple shape. If you are uncertain of your drawing skills. Reduce a simple cottage shape to size of button, cut it out and trace around it...Now we're ready for next step... stage 2
Added note: The putty is called spackle and is sold in the paint dept. in small containers. Whether it's gray or white doesn't really matter as you are going to paint over it with cottages... But with birds or roses the holes may be awkward so I like the white.... If you look closely at the cardinal you can see the filled holes under his body but after it is finished they will hardly be noticeable.....

3/07/2009

Fanciful birds


This is as close as I could come to the little birds on the postcard. I embroidered them on felt, cut them out and appliqued them to the block and added a little stuffing from the back of the block. Then I edged them with gold... I want the branch to be gold braid embellished with gold thread and gold beads.. I'm still thinking about leaves. They should be 3-dimensional like the birds and branch so that leaves stumpwork, beaded leaves or just bead leaves. It's making the decisions that is fun!!! I know little birds has nothing to do with our 2009 Challenge but I just love doing birds....

3/06/2009

If It's Ugly.......green door


Since I'll be out sitting with sheep most of the day I'm doing a quickie post. One of my guiding principles of life is "if it's ugly, paint it." My house is 107 years old, poorly built and entirely ugly...The door to the bathroom had about 30 layers of paint on it and was just a plain door... and really ugly. Sanding it down was out of the question and it was an odd size and would have had a door made to fit it or the opening redone to fit a pre-hung door unit. Soooooooo
I used a crackle medium and painted it green and antiqued it to make it "ugly with character" Then I put moulding around a rectangle in the center and painted a scene. It's now a landmark in the house as I can send anyone needing the bathroom to search for the green door...
Then I had to paint a different scene on the other side....

3/04/2009

New from old!

A dear friend came today and helped me get all the ewes inside the old greenhouse. We get together every month or so and make jewelry.. I should say she makes jewelry. I get ideas, assemble old jewelry and string beads but never finish... But today I did... The pendant is a vintage fan-shaped clip-on earring mounted on some filigree. I love making new pieces from old jewelry so I am determinded to finish and put clasps on the things I've started over the last year.

But she is really interested in learning CQ. Showed her how to make a block and sent her home with a JBM book... Hopefully I'll have a stitching mate soon!!!

Beaded Paisley


Except for the outline this paisley is all beads. The first was all stitching... I love doing the paisleys because, like CQ, you get to use all the odd bits. The little globby beads on the left side have been in my stash FOREVER and never fit anywhere but were perfect for this....
At this point the new paisley is a bit larger than I'd like it to be so I am going to work on the bird motif to get things back in balance..
First I must do more seams before I treat myself to another motif.
Paisley about 3" long.

3/03/2009

First lamb of season born this morning!


Sapphire was the first to give birth and I didn't expect one for another couple weeks.. Mama's first job is to clean the lamb of all traces of afterbirth.. This serves several purposes. It quickly dries and warms the lamb and all during the process she is stimulating the lamb to stand and move. Another critical aspect of this function is that she is imprinting the lamb with her scent...It's easy to see when a lamb finds an udder.... while nursing it's little tail whirls like a rotor on a helicopter.

3/01/2009

Marya's Heart Block


I was able to add 10 hearts.....6 glass ones, one metal one in spray, 2 embroidered ones in lower left and the beaded heart. The beaded heart is from "Bead Embroidery" by Yukiko Ogura...a gem of a book.

Not only are the roses from my fabulous thrift store ribbon, the ruching is also from thrift store "knitting ribbon" which I purchased years ago and have used extensively. If you enlarge the photo you can see how wonderful the colors in the ribbon are for vintage roses. If I never find another bargain at a thrift store again...I will die happy with this ribbon.

Now I will work on the technique tutorial for the 5 pin roses...
Related Posts Plugin for WordPress, Blogger...

Popular Posts