

Showing posts with label cottage button. Show all posts
Showing posts with label cottage button. Show all posts
9/12/2015
She lives!!!! and cottages finally....
I can take my arm out of the sling for part of the day and the splint is off my hand so I can stitch and hopefully paint again soon... almost 2 weeks since the accident. I can probably mop the kitchen soon also as it certainly needs it. These are a few of the cottages I did just before the accident and just now getting them all posted on Etsy.

1/29/2011
Birds and Bees and Ladybugs......
 and a cottage or two... I got some loaded on my Etsy shop last night and will do more today... With the exception of the cottages, these buttons are all about the size of a quarter.
I'm hoping people are thinking Valentine's Day and secret sisters.....
I am finally getting a system for the repetitive part of the Esty posting.. But still I absolutely don't know how Pam Kellogg keeps putting up not only her stuff but her mother's also...
I am finally getting a system for the repetitive part of the Esty posting.. But still I absolutely don't know how Pam Kellogg keeps putting up not only her stuff but her mother's also...
And hooray!!!! some one bought the little red barn so I get to paint another barn...
I'm the kind of person who just keeps banging her head against a wall and when it doesn't work I find another wall... But I have met my match with photographing these buttons... I started the day with great hopes but was never satisfied with the results.... It wasn't that much better than just plopping them on the scanner and in the end that is just what I did.. and will do until I can take a macro photography course.
 I'm hoping it shows great strength of character to know when to throw in the towel so stand back... I'm throwing it... %$###%$*$#
Weather here going from 40 degrees to 3 degrees in 24 hours.... I love winter....almost as much as spring... In fact rather than going south for the winter, I would love to go north for the cooler summer..
1/22/2011
Buttons

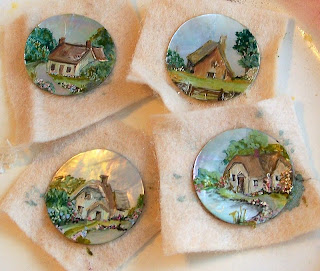
Actually this was to be my Etsy week but got a late start because the barn took up so much time...so will go into next week also... I have been working on a data base and painting buttons including these four cottages which are 1 1/2". I just scanned these and they need a few more touches and some gold... The scanner does strange things to the MOP glow...
The one on the upper right is a special order but the rest will go on Etsy... I've started truncating the cottages to get in more detail and like the look...
But came to two conclusions.. First cottages will have to cost more because they require so much time but I like doing them. Second I will save all my 1 1/2" antique MOPs for cottages... I only have 52 left and the odds of me ever finding another source for these fantastic, gorgeous, beautiful buttons are astronomical... They are so wonderful to handle and paint on.
I am in the progress of painting more cardinals, blue jays, hummers, bees and ladybugs on the 1" buttons.......
11/15/2010
Country Cottage Buttons
 I did get eight cottages loaded on Esty tonight... They are all hand painted and each is one-of-a-kind.. The bird buttons are 1" and the cottages are 1 1/2". I like doing the cottages and will play around with different styles when I have time... I was having a devil of a time with the reflection and followed Janet's suggestion and just scanned these.. I think they'd be cute on garden blocks... Have a look... http://www.etsy.com/shop/olderrose?view_type=gallery It's always a shock to see them enlarged... like looking at your pores under a microscope.
Now a question... is anyone into making cigar box purses or collecting wooden cigar boxes...? I have a couple nice ones that my son sent down from the lodge.. Wealthy customers bring their own expensive cigars... If anyone is interested I will send pictures... I am going to photograph the interesting graphics on the boxes for future use...
1/30/2010
Finished Buttons Finnnnnnnnnnnally
 It's not that the buttons take that long but I do them in layers and each layer has to dry before the next is applied....so the paints are always out for a week when I start...all over our only table. But I just haven't been motivated this winter to paint. Hopefully I'll remember that before I drag all the paints out again....
I love to have a pretty painted button though to put on RRs that I do.... The rose buttons are about an inch and the cottage buttons are just a little larger. I couldn't resist doing Pat Winter's pink retreat cottage on a button.
 They have been sitting around unfinished for a couple months and I could always find something I would rather do... Now that they're done I can do whatever moves me without feeling guilty (for a while at least.) and staring at the mess.
I'm excited about starting on Wendy's encrusted RR blocks. She had masks in the center which just said Venetian Carnival to me. I love working with a theme....
3/12/2009
Button Button..Who Wins a Button!

Sorry these are out of focus... Will try to get a better photo up later. Leave a comment and next Saturday, March 21, I will draw two names to win a cottage button each!!!
I'm hoping some people will send me pictures of cottage buttons they have painted.... It doesn't have to be perfect remember..... folk art!!!
Cottage button - stage 4

At this point the acryllic paint is rather dull and the general appearance is not that attractive unless you take it to the next level. First I use a Q-tip to apply just a touch of gold metallic paint around the edge. I like it to be uneven as if the button were old and worn at the edges. Then I start spraying light coats of the gloss finish .. Krylon #1303 Crystal Clear. It creates a permanent protective coating with a glossy finish. It is available at craft stores and art supply center... Very important : Let each coat dry thoroughly. If you spray before a coat is dry it will always be tacky and clouded... I usually spray 6-8 coats. It gives the button a glass-like quality. I sand it very lightly between coats and when finished buff with a soft cloth.

Then I start with a row of beads around the button and then a row of picot (3 beads, skip a bead). When finished beading, trim away the felt close to the beading.....
Cottage Buttons - Stage 3

Now it's a piece of cake...just lots and lots of tiny tiny dots... use them on the trees and where plantings would be. At this size they are not going to look like any particular flower but neither do flowers at a great distance.... Just pile the dots on tops of each other willy nilly...... Making tiny dots is no great artistic talent but does require some practice keeping your hand steady and only letting the very tip of the brush touch the button...
I will leave these dry overnight and do the razzle dazzle finish tomorrow.....
Brushes: I buy my brushes at a craft store ...size a 10/0. A brush called a spotter is perfect. For roses I use an angular brush but for all else I just use a spotter and a liner brush. I use acryllic craft paints.... I did a tutorial on doing roses where I discussed brushes more...it is at http://www.victorianpincushions.com/button_tut.html.
Cottage button - stage 2

The first step is a base color on the cottage. I use a tan for for the walls and a brown for the roof and at this point I add a medium green in the general area to be trees. This is a thin coat as always...

Now it's important to add dimension by establishing a light source.. Make the walls facing the light source a lighter. It doesn't matter which walls as long as you are consistant with walls facing the same direction. Add another thin coat over the green....


Once dry, the doors and windows can be added... Tip: If there are windows on a wall with a door make sure the tops of the windows are level with the top of the door. Otherwise the wall begins to look like a eyes and a nose...... Tip: Since the roof extends out over the wall add a thin dark line under the edge of the roof. This adds depth... this seems like a unnecessary step but it really give the cottage a finished. look... so remember to do it!!!! 
Using a couple shades of brown, make tiny tiny strokes resembling shingles...put base coat on chimneys. I usually need to put a second coat on the windows at this point and add another layer of dark green....Tip: more layers more depth....

Using a couple shades of brown, make tiny tiny strokes resembling shingles...put base coat on chimneys. I usually need to put a second coat on the windows at this point and add another layer of dark green....Tip: more layers more depth....
Cottage button - Stage 1

I love painted buttons but it a major operation for me and tends to make a huge mess so I usually paint a couple dozen at a time... Although painting roses is the fastest and easiest, I prefer to paint birds and cottages. I will take you through the stages of painting a cottage.. Although I repeat them all the time people always want to skip the prep steps... Bad choice!!!

Critical Preparation: First glue the button to a scrap of felt. If the button has a shank cut a hole in center of felt so you can glue felt tightly to the botton of button... In addition to giving you a handle while painting, the felt will provide a surface for beading and attaching to your block... This felt gives you a handle so you do not touch the button itself. It to easy to get oil from your fingers on the button surface or smear your work. Plus it's tiring holding a 1/2" button steady.
Once dry, fill any holes with any white putty from the hardware store. and the sand button lightly with fine sandpaper. Unless you sand the surface the paint tends to "puddle" on the surface...
Now for the most important prep step. Brush a very thin layer of blue wash (blue paint mixed with water) over the button. This must dry or cure. I leave it sit overnight. The wash gives the button a tooth or surface that makes painting soooooooo much easier and it is thin enough to let the luminosity of the button shine through .
You can see other buttons I've painted on my other blog.... http://olderrose.blogspot.com/search/label/button%20painting.

Now the next step..... The button on the right has been glued to felt, sanded and covered with a thin coat of blue wash...I sketch the shape of a cottage with a pencil. Start with a very simple shape. If you are uncertain of your drawing skills. Reduce a simple cottage shape to size of button, cut it out and trace around it...Now we're ready for next step... stage 2
Added note: The putty is called spackle and is sold in the paint dept. in small containers. Whether it's gray or white doesn't really matter as you are going to paint over it with cottages... But with birds or roses the holes may be awkward so I like the white.... If you look closely at the cardinal you can see the filled holes under his body but after it is finished they will hardly be noticeable.....
Added note: The putty is called spackle and is sold in the paint dept. in small containers. Whether it's gray or white doesn't really matter as you are going to paint over it with cottages... But with birds or roses the holes may be awkward so I like the white.... If you look closely at the cardinal you can see the filled holes under his body but after it is finished they will hardly be noticeable.....
Subscribe to:
Posts (Atom)

Popular Posts
-
 Pigtails and Quilts is having a "Crazy Quilts are Quilts Too" celebrating crazy quilting and I'm pleased to be participatin...
 -
 Remember the soutache jewelry from the other day... Well I have a huge hug and thank you for Jocelyne Ausseil who found this fantastic tuto...
 -
.jpg) Marilyn Nepper in Canada really got busy on her computer and found some great sites with even greater instructions... She even found ...
Marilyn Nepper in Canada really got busy on her computer and found some great sites with even greater instructions... She even found ... -
 Addendum: Here are a couple websites with tutorials... http://historicalsewing.com/pleated-trim-jazz-your-victorian-neckline https...