Showing posts with label RR block. Show all posts

3/05/2017

Progress and dreaded glue gun...

 Well I have all the pages hand sewn to the spine which was an relative easy job because I had the sew lines well marked with stitching. Now I will cover this side of the spine with black felt. and then add the covers.         The 1/4" spacing I chose was about right but I could have added a tad more even.
 
The cover are done except for the final touches... "Glue gunning" was a skill I hadn't ever mastered and it has been about 20 years since I used one.. But I had to have a few damaged brain cells when I thought could see well enough to sew with black thread on black ribbon to bind the pages...

I used a glue gun (rather badly) to apply both the ribbon binding and the trim\ The glue came out in lines too thin or to heavy so I need practice for sure on my trigger control.


In the process I managed to burn about every finger, glue the glue gun to the stand, glue the glue gun to the table and even glue a block to the table.  I ended up with bits of unwanted glue several places. I'm hoping I will improve with practice..  With all the improvements to technology over the years I thought maybe someone had invented a better glue gun....NOT!!

So I went to Google to see if there were helpful tips and there were many sites... Most all cautioned not to touch the hot glue gun which I think is quite obvious and the rest of the tips were about as helpful... like: "If sitting down while working, make sure you wear long pants to avoid burns from any stray drips of hot glue. "

 However there were a few that were new to me.
1.Vaseline on the tip of the glue gun to prevent little glue hairs.
2. Try rubbing alcohol to remove unwanted glue which I will definitely need to try.
3. Store your glue sticks in a spot with low humidity to prevent glue hairs.
4.  Use a hair dryer to soften unwanted glue spots.

When I posted about my Valentine Dinner I forgot to add photo of my all time favorite dessert... Lemon Sponge Tart..  I thought the recipe was on the site but I couldn't find it so I will type it to share... Particularly great recipe if you need a mostly gluten-free dessert. If a lemon lover like me you NEED this recipe.

1/09/2017

Critters and a recommended step

I pinned the spider block to a cork board for a good stretch... If I could only recommend one step to make your work look better it would be a good "blocking" -stretching on a frame or board.  It aligns all the threads in the fabric and in the needlework...  I heartily recommend doing it at least a couple times during the work on the piece and for sure at the end.  This is already looking better.  It's not high on the UFO list...maybe late spring.  I want to add more insects of all types...
 
 
We have had another 10" of snow and waiting to be plowed out again.  This morning DH was cleaning snow off the roofs of the pump house, gazebo and the chicken house.. also digging the door to the pump house clear so I can get in and out when necessary to the heaters... 
 
During the years we had the on-site nursery we had two 100' greenhouses that had to always be cleared of snow to prevent collapse.  We both agreed that we were glad not to have that worry  any more.  We had sold one greenhouse when we closed  and the roof of the other went off in a storm a couple years ago.  Any more snow though and we will have to remove some snow from the barn.
 
The deer are eating everything and anything with all this snow making food scare.. Here a doe is eating the ivy leaves growing up the maple tree right next to the house.  I have seen them nibbling on both juniper and lavender... very unusual as they don't ordinarily like either. No harm done here as the ivy leaves will grow back in the spring.
Here is a rotten rabbit eating the bark at the base of a shrub which will kill the shrub..  Rabbits do way more damage than the deer.


1/08/2017

UFO Project - Spider round robin block

Again this was a round robin but a traditional 12" block... The theme was "spiders".  I liked   the block when it came home but always felt it could be extra special with some fine tuning so it has been languishing in my UFO basket for years.  This should be a relative quick and easy project...but I have been known to turn quick and easy into complicated and lengthy.

I love the somber colors and the leery little Miss Muffet in the center.  The brighter pinks have to go and maybe more olive green lace added (would have to dye it) and definitely more spider webs.  There are many cool spiders there already..  I can see this framed out with spiders on the border... more gold also.  I have to pin this to a board and think about it...

I have a spider quilt I bought on ebay years ago and will get it out for inspiration...When I have it out I will photograph it to share because it is a gem.

1/05/2017

UFO projects - Proper Ladies

I haven't done any crazy quilting since I finished the anniversary quilt in early November...  There are several projects left unfinished that I'm going to do my best to finish....   Recently  I joined a UFO challenge and am going to try to finish one a month.. Among them are RR blocks of some very proper ladies.....:Pearl, Bertha, Sadie, Emma, Opal and Gertrude...

UFO #1. A book of "Proper Ladies".  I was in a round robin a few years back and the theme was "faces".  I made some faces from polymer clay and attached them unadorned  to blocks and gave each a name.  When I was a girl all the major hotels and department stores had tearooms and proper ladies wore hats and went "downtown" to lunch with their friends...   I  asked the stitchers to give their lady the hat of their dreams ...to feel free to add ribbons, feathers, birds, fruits, jewels and flowers galore.  My only restriction was No purple with red hats.  The stitchers in this round robin did a fantastic job of dressing my ladies but I never got around to doing mine.  So now I'd like finish them in style and make them into a book...

One problem is I put them on the diagonal which is the first thing to address and another is coming up with a clever cover...

6/29/2015

Progress and my hummingbird experiment

I backed the Christmas blocks with rigid Peltex as I want them to stand up. I used double sided fusible to attach the gold ribbon binding. The next step will be using wide velvet ribbon (probably meant for holiday wreaths) as the connecting element..  Doing it on the grid of the cutting mat will help me keep everything all in line... hopefully.
 
I tried a green and red ribbon for the binding as well as the gold but much preferred the gold.. After they are all attached I will do the "over the top" gold embellishing with more gold cordings and braid.  It will all go on with a hot glue gun as stitching through the Peltex is too difficult.    Now where is that glue gun which I have not used for 10 years at least?
 
Remember my discovery that clustering hummingbird feeders is the solution to hummingbird territorial wars?  Well it works... I have seven feeders on my little sitting porch and not only is there a minimum of aggression, I have many, many more hummingbirds.  I have also had many types of hummingbird feeders over the years but this type by First Nature is by far my favorite.  It is the easiest to clean and refill of all I have used.  I disposed of all my others and use these exclusively... I ordered them from Amazon but I've seen them at Walmart also.  Next year I will add a couple more.
My morning rant... It is a week until the 4th and already this morning I can hear fireworks.  We are in  extreme high fire danger now with a heat wave.  Fireworks are illegal in the state but people can go on the Indian reservations and buy them...  idiots.

6/26/2015

Santa and gift from the birds

Now that I have a plan I'm so sorry that I have waited so many years to do something with these blocks.  They are really extraordinary.  I will have to see if I can find out who was in the RR.  The upper right is my block and I added the ballerina, soldier, Raggedy Ann to the others, but the rest of the work was RR participants. I mounted them on Peltex (a rigid fusible interfacing) and now going through my thrift store stash of Christmas ribbons to finish the edges.


I only know of only one other farm within a 5 mile radius that has flowers and it is at least 2 miles away as the crow flies...... but yesterday these fabulous poppies appeared in a patch of weeds near the old sheep pasture..  They are at least 6" across and you can bet I'm going to save the seed.

6/24/2015

A lesson learned and a problem to solve!

I ran into this very problem in the recent Diva round robin.  Blocks arrived to be worked on which had skimpy seam allowances and no "stop" line clearly indicated.  I learned this lesson the hard way in a very early round robin years ago.

A Christmas round robin was a tie for my very favorite round robin  (and I have done many many over the years).  As you can see from the arrows on these finished "squared" blocks that there is not even a 1/16" available for a seam allowance without cutting away  beads or trim.   Five of the blocks are like this. I have never finished the set of 6 because I wasn't sure how I wanted to address this problem...

 
It was really my fault...
 1. I didn't allow enough extra material around the outside edge of the block to allow any adjustment.  2. I only allowed for a 1/2" seam allowance.
3. I didn't clearly define the "stop" line for all beading to end
 
.Now I make sure -
1. there is plenty of extra material on the block,
2. There is an ample seam allowance - at least 1/2".  
3.  That the "stop" line is clearly marked front and back.  Now I even baste along that line with a highly contrasting thread.
 
I have always wanted to finish these blocks into an accordion-fold book which I could put on the mantle during the holidays.  Now I have some ideas how I am going to solve this problem and I will share as I go along.
 
And I have a new gadget.  I just love tools and gadgets.  My hands are always painful with arithis all the time and shaking the little paint bottles makes them even worse,  And when I have gone months without painting (like recently) the paints either settle or thicken and all need a LOT of shaking.  I found this delightful little machine and it is absolutely perfect for this task...  It is made for manicurists to use with nail polishes but it suits my needs wonderfully.

1/26/2015

Round Robin Update

Spent the weekend finishing Rengin's RR block. Of course she has a folded ribbon seam and a button. The pansies are made from rayon seam binding which Susie and I dyed... Rengin requested we put our name on the block so I did my name on the left..... sideways hoping that it would look more like decoration than lettering. I got the teeny tiny buttons in LA and they come in 20+ colors. they have a website http://buttons4u.com/Merchant2/merchant.mvc… I will get to town tomorrow to mail it...

And all my Diva RRs are home.  Don't they look great together.  It was a fine bunch of stitchers.
And Susan Jarosz still has all my wool RR blocks....

11/18/2014

The parrot next door - post #1494

I finished the monochromatic block in the CQI wool RR. It is the last one and the only one where I was not pressed for time so I enjoyed doing it up right. Don't miss the red-eyed tree frog button (lower right) that I painted for it.  

My best advice to stitchers who are uncertain about color choice is you will ALWAYS be successful if you do either one of two things... 1. Use a very limited palette such as above  or 2.  Use EVERY color.

My closest neighbor is 1/4 mile from me and his  ex wife had 3-4 fluffy little white dogs who barked all the time...  She moved out last fall and when spring came and he would have his door open I could hear a barking dog.  So one day I saw him on the road and asked him if he had gotten a dog or if his wife had moved back... He informed me that neither had happened.  He had a parrot who had learned to bark like those dogs when he was excited.  Mystery solved.

I have no active stitching project in progress although I could drag out the peacock piece or finish the cottage piece for Judith Montano's class.  I could even tune up some of my old RR pieces.  But I'm waiting for the next Diva block to arrive (Nikki's) and am using the time to paint with my new toy  (more next post.)


11/12/2014

Contrast with value, dimension, size and texture - post 1490

At the CQ Adventure in 2011 Cheryl A. had a tone-on-tone RR block which was all greens. She was looking for ideas for adding contrast without depending on other colors.  Several of us thought of green critters to use as a focal point...   we came up with a lot...  grasshoppers, alligators, frogs, turtles, lizards and various bugs.  But I knew if  I ever had to do a monochromatic green block I'd add a parrot.  So when Theresa color blocks arrived I was delighted the green one was available.

As you can see I have already added my handsome parrot.... now the challenge will be to add more interest and variety using only greens.... I want to do that with contrasts in
value, size and texture.

It would be especially difficult to mark on the wool so AGAIN I have turned the block over and drew the leaves on the back and basted the lines to show through to the front.  Now I will fill in foliage, berries etc. with various greens and various materials.

 I did an extensive post   in 2011 on adding variety and interest with contrasts in dimension, size, and texture...  You may find it interesting.

If I hadn't done a parrot, my second choice was a John Deere tractor...

10/20/2014

?/applique and what size am I anyway?

I've started a lamb for Kathy Shaw's wool block and since this is completely backward from how I usually do these off-the-block critters, I will share the process with you...

I am sure there is a name for this procedure but I haven't a clue what to call it... Ordinarily  I embroider the critters and trim extremely close to them and applique it on the patch...  Here are a few BEFORE I trim them close


This time instead of trimming close I will leave the excess and dye it with alcohol ink.  I will put the whole thing on the block and work on top of it....
I can stitch on this now because the jacket is   under construction and I can tote Kathy's block with me.  I really want to get it done before I leave.


In my eagerness to start my jacket I neglected to make a sample of the pattern to make sure it fit...  I did that very thing today and luckily it does fit...  I wasn't even sure what size of pattern to buy.  Patterns used to run large but the the whole sizing for women has changed so much and it has been so many years since I've sewn from a pattern... To compound the problem I'm not even sure what size I am.  Over the last year I have gradually lost 35 pounds but still wear the same fat clothes.

 But since the sample did fit and I started in earnest today.  First I added another layer of the tricot knit interface.  When I did the patchwork I did it much larger that the pattern to allow for any shrinkage with all the stitching.  The backsides have a beauty of their own..


The left side was perfect but the right side was really cutting it close in a couple spots and I may have to add a patch in one spot.

Because I am under-tall, I shortened the garment a LOT...  The front edge is at an angle because it laps across.

I am still working out how I'll do the lace sleeves.  I can always use it as a vest if it doesn't work.. I always try to have a backup plan...  Much of my lift has been the backup plan......


10/09/2014

You never know until you try....

or alternately "not everything is a winner."  I always post all the things I've done that I'm happy with but this time my grand idea fell a bit flat....  The long overdue wool blocks finally arrived ...about 3 months late.  When I signed up for that RR I figured by the time fall farm chores started I'd be long done... Instead last week I received not one set but THREE...half of the entire RR is in my UFO basket. 

What I really wanted to do is to embroider a stumpwork cardinal in my usual manner... But since time is now a factor and the blocks  are wool, I decided to make the cardinal from felt.  Something I hadn't done before.

It took a bit to decide on the focal color and finally decided on the cranberry color because it is in three of the patches..  It might have worked better had I used wool felt and shrunk it until it was quite thick.. It just seemed the felt needed more body... I think though I will just stick to embroidered stumpwork birds from now on.... 

Luckily the weather has been lovely and I've been able to do outdoor work all week... I need a new U-bolt on my tractor tiller and waiting for it to arrive.  It will probably arrive  with the expected rains....  Beth has asked for no beads but this cardinal just needed a few...

10/01/2014

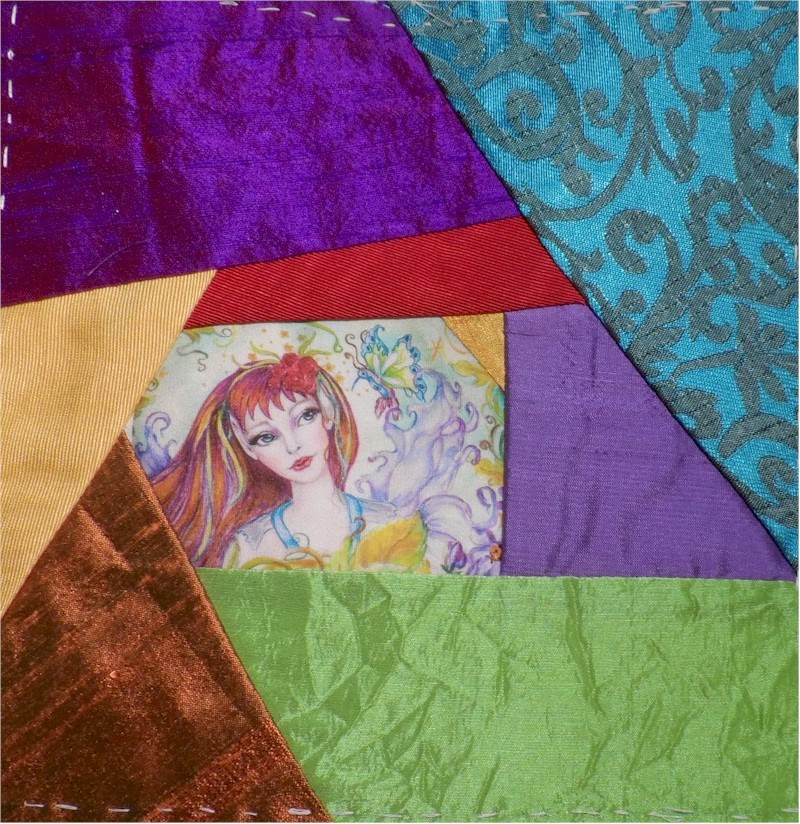
I finished Annette's fairy block for an online round robin I'm in...  From me this block will travel to Rengin in Istanbul, Turkey.  I'll point out just a few design decisions....  First I wanted to "echo" the linear feel of the tatted lace and chose to do that with the linear seam treatment upper left.  I deliberately left the right seam treatment very monochromatic so it didn't compete with either the lace or the linear seam treatment.
 
I tried to integrate the image with the block by having her hair and wing come out of the image patch and some of the floral motif encroach on the image patch seams...  I echoed the swirly parts of the hair with swirl in the floral motif.
 
I also love to use ribbons to create a "stage" for seam treatments...  Here in the before photo you can see I'm adding FOUR ribbons on the seams... one each of grosgrain, organza, acetate, and velvet.
Just adding an extra four shades of purple adds interest but you can also see how well the ribbons work with and enhance seam treatments.


9/19/2014

Annette's Fairy Block

 
Annette's blocks arrived just in time and I'm frantically making decisions, gathering supplies and packing.  This is the block I chose...  I love the combination of the strong yellows, purples, and lime green.. so will add more of all of these three..

The strong turquoise pulls the eye away from the fairy which is the focal point .


So I will soften the turquoise with some very fine and delicate tatted lace.. You can see that once the turquoise is muted that your eye stays on the fairy... at least mine does.

 I'm excited to also use a piece of intense yellow lace I've been saving for the perfect spot.. and have pulled some great ribbons and threads...  I'm thinking daisies, violets and butterflies.  She has purple in her hair....how delicious is that??

This is not a piece for in-the-car stitching but I will find time for it otherwise..


9/03/2014

Fans finish and full steam ahead on jacket...


The fan blocks for Lisa are finished and ready to mail   It will be a while before I get the next one and the wool block RR is  "whatever" so I am working on seams for jacket and getting all the motifs appliqued...
Tomorrow is back to the eye doctor... Sight in right eye has deteriorated to blurry  blobs and very dim... Left eye not so blurry I can't still stitch but very dim also//.. Working with multiple lamps at a time (3 ott lights) and upgrading my magnifier.. looking for one the strength jewelers or lab workers use.

8/31/2014

Fan Blocks RR

These are the last fan blocks... This RR also ran into problems so I am finishing off two blocks for Lisa.  I had hoped to have them done this weekend but not quite...but very soon.. I wanted pink cording on the ribs but couldn't find it so added a lighter weight cord and don't like it...too wimpy.  Luckily I found the heavier cording when I was looking for rickrack and will be back on track.


For this block I wanted green rickrack (which I know I have) but can't find the right shade so I'm going to have to get some before I can finish this one... This one has another little problem.... I added a black metallic body to the butterfly but unless you're very close it doesn't show so I will try outlining it... If all else fail I will add a little gold and maybe Lisa won't notice...

8/23/2014

Roadrunner block

I usually do my seams the very first thing but on Fitzy's block I'm saving them until last because I have some special ones in mind with SW jewelry for inspiration. Notice I did bring the image down into the block with the sign supports and repeated the shape of the "inn" with the cactus... The roadrunner will get his feet once seams are done... I did add muslin to her block so I could put it on a hoop...

My CQ stitchers were here today and there were six of us...  It is sooo much fun to have this group.  I share the RRs blocks with them and tell them that RRs not only provide me with new challenges, I get to handle and learn from others...  I do try to join RRs and time them to fit with other obligations but this time many were so late that they have all piled up at once. This takes from some of the fun for me..


Although none of my CA group are strangers to needles, all are new to CQ and I try to have some kind of handout each time... today I gathered samples of paisleys.  I hadn't done one for while and hope to find an occasion to do one soon as they are fun. In Victorian times they were called Persian Pickles... I love that term...

8/19/2014

Fitzy's blocks for the Diva RR arrived... They are an excellent example of why I love RRs... They force me to try and explore outside my comfort zone... She lives in Arizona and each of her blocks has an image of a vintage motel sign as the focus..  The sign "No-Tel Motel" appealed to my  sense of whimsy and had lots of risqué possibilities.


But in the end I chose the Tucson Motel.. I loved the colors and the lines in the sign....    


Fitzy specifically mentioned cactus and so include those....especially one in bloom... I will study some turquoise and coral vintage jewelry for inspiration for seam treatments... and of course a bird when possible.  Since Fitzy is a runner (even with a broken toe), what could be more perfect than a roadrunner... And of course a motel key.... Claudia included keys also and I thought that was a ideal icon to repeat through the blocks.

I will post the block on a bulletin board and think about it for several days before I actually start..  The thinking and making decisions is the most delicious part...


6/29/2014

New RR and more critters....

This was the year not to start something new but finish things... Well the jacket and hanky project blew that resolve... I could justify joining the fan RR because I'm using them to finish my peacock block...  I'm using the same rational as I just joined the  Crazy Quilt Divas new RR.  I mentioned recently my bonanza of silk ties and they are going to be used for this.  I pulled all the ones with maroon and blue which didn't excite me so I separated them... But I'm not a blue person but maybe later the blues would make great winter blocks..
But the maroons are rich and yummy and will be perfect for finishing off the lace cottage which has been patiently sitting for a couple years.  I can go to the barn and get a couple more maroon ties to fill this out.  I can see this finished with lace, velvet ribbons and beaded trim... I have some great maroon upholstery fabric for a border...
I've a few more motifs for the left side of my "critter coat" and most of the seams are done on it also... The color is wonky in this photo.   I'm ready for a break from it though.

 I've been watching Allie finish  up things right and left and I'm thinking it is a good time to finish up the CQJP cottage blocks. For months I have been collecting rose fabrics plus ginghams and pin stripes to do just that.  So not having fabric isn't an excuse... Spokane stays in the mid 90s all of July and August so that would be a great project when I'm hiding from the heat during the day.


6/26/2014

Wool DYB RR done!


Definitely a hoot....  I used everything from wool yarn to #3 cottons...definitely mix and match.... I wanted a LOT of texture.
Related Posts Plugin for WordPress, Blogger...

Popular Posts