1/29/2017

This and that from the farm

I do like winter but now I'm thinking spring...checked out the squash seeds at the store the other day.   One of my favorite things about winter is the spectacular sunrises when I'm up and about.  We do  have spectacular sunrises in the summer but they are at 4 in the morning.


I've been on a roll with great new recipes lately... a  pork fried noodle recipe, a blueberry/orange scone recipe and today it was this stollen recipe from Dresden.  DH has the fondest memories of the stollen his Gma Krueger used to bake in the 40s for him. - "cristbrod"  I tried several recipes this winter and wasn't really happy with any even though they all rapidly disappeared.  But my quest for the definitive stollen recipe has ended as  this is the best ever... And it used a technique new to me.  After you combine the flour, eggs, yeast milk as usual for a yeast dough, you cream 1 cup of butter with 2/3 c. flour and incorporate it.  It made incorporation of the rum soaked fruits much easier and the texture was divine..

On another note altogether my crappy neighbor continues to be a thorn in my side... We have had so much snow for so long that when he runs low on hay he turns his animals loose to forage... and of course the closest food source for hungry animals is my farm.  His place is piled high with garbage so I expect they go through that first.

Below my living room window  are his six pigs scarfing up all the sunflower seed for the quail and doves  and eating anything and everything. I tried chasing them home with a broom but they turn on me...
Eventually they moved to the back of the house to root under the walnut tree and left it looking like this...  I did have a drip system in place here covered with black plastic and mulch to conserve water for the honeysuckle and pyracantha bushes.
And the poor cows just munch down on all the shrubs....

 It does no good to complain and over the years  everyone has reported him to no avail. I can't be angry with hungry animals but I do harbor evil thoughts about the neighbor daily. Luckily my veggie and perennial patches are protected or they would be destroyed also.

Below  is a plum tree that has the spring buds starting to swell and  emerge.  They will eat all the low more tender branches. I have enough plum trees that will survive this munching...

1/24/2017

It's really all about the darn tails

Well I wasn't able to stitch in the car but I was glad I had it along as I did get a little stitching done in the hotel while we were stranded in Seattle last week.  Remember how wimpy this cherry blossom  tree was?    One of the reasons was that when I started this project in 2010 I challenged myself to use a goodly supply of Edmar threads.... which I hated and have been able to give most away. 
 
Trying to do hundreds of French knots with rayon thread drove me crazy and I quit..  I tried everyone's suggestions such as changing which end I knotted, wrapping the thread a different way around the needles, pressing the thread....and it was always a tangled mess... Rather than pull out all the Edmar thread, I just filled it in with knots of both silk and cotton threads and I'm happy with it. 
 
So I filled out the tree and added more knots around the image...again cotton and silk threads.  I took the "silk" snow off the mountain and after trying silk thread, perle thread, Glossilla rayon, and cotton thread, I am using a Krenik metallic and sticking with it...no more changes.


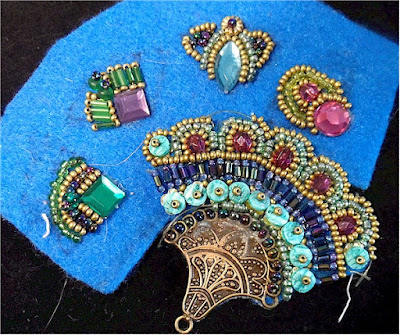
But from the very beginning of this challenge project there was one thing I was really looking forward to and that was the TAILS....  I can see that I will finally get there now.. In 2010 I did this fan and bead combination in anticipation of beading the tails.  I had hoped to use the fan somewhere on the block...if not the block, on the border. In fact I did have it on there once and took it off.  I love the little dyed shell beads
 

This bunch of  beads are actually rather gaudy earrings which screamed "peacock" to me and I've been saving them all these years.


Plus I have a large bag of odds and ends of "peacock" colors to do spectacular tails...don't you think?


But if I hadn't already changed everything possible on this block, I took aim at the peacocks themselves today.. and guess what?  Into the computer for a critical look and major changes ahead for them..
Right off they are too large to be in proportion for the lavish tail I had in mind.  Since I did them on felt, taking them off and doing a little size reduction will be no problem...  I would have taken them off anyway because I want to change their placement.  One on the right will be not only smaller but also 1/2" higher.  The walking peacock will be also smaller and nearer the pond.

So the two sketches show how much better balanced the block will be with modified, altered and rearranged peacocks. I can't remember ever having a block the has taken so long and gone through so many changes...  By rights there was so much to be changed I should have just scrapped this project altogether...  BUT by golly I wanted to do those darn tails............................One tail (or maybe both are going right off the block...) 

1/21/2017

Just the buttons you were waiting for!

I finally got some of the new buttons posted and there are more to follow..   Lots of critters... check them out..
 

The trip to Seattle was scary... The roads that the weather service said were rainy and clear were so bad that they closed the pass for three days just after we crossed.  Thinking we could go south to Portland and then inland, we found it was closed due to an ice storm - 4 days.  We were stranded   and finally went north to Stevens Pass and got across and drove forever in dense fog....so glad to be home.


1/16/2017

Life on the farm....

In a recent post I mentioned the damage that rabbits do by girdling the base of a plant.  They usually work on shrubs and anything special like my clematis I have wire collars around the base.  But this year they have started on my crabapple trees..  These are 35 year old trees that produce 100s of pounds of fruit for both birds and deer.. so when we discovered it yesterday we were out there in 3 degree weather wrapping the trees with chicken wire and hoping they survive the damage.

Tomorrow we have to make a quick trip to Seattle for our Global Entry interviews and will be gone overnight.  Ordinarily I would move the chicken's water to their inner area and keep them locked in there the two days...  but the heater is frozen solid to the ground and not to be moved without possible damage. DH said we can leave the inner door open for just one night and they'll be OK.

Well it's not going to happen and he has to make a trip to town today and me get another water heater.  After twice losing chickens to raccoons I make sure my chickens are locked securely every single night....every single night.

The chicken house is about 9x18' and divided into 2 sections.  The inner section is doubled wired on walls and overhead and the wire is buried a foot into the ground.  There's a ramp to their  roost and nesting boxes which are wood and I can put a heat lamp in there.  I have "mothered" these chickens for almost a year and not about to lose them now. Raccoons are rapacious, clever,  and persistent and kill chickens to just tear out their innards. Besides raccoons we have weasels who burrow in underground (although the ground is frozen solid now). 

Going over Snoqualmie pass in the winter is always risky but it looks like we are going to sneak through between storms.  These interviews have been scheduled since October and if we miss them, it will be months before others can be rescheduled.  I will probably be holding my breath and the hand grips all the way.  It seems so weird packing and not taking hand work to do in the car...  I might thread up a lot of needles before we leave and try French knots.  They are pretty loosey-goosey.  Loosey-goosey is my style now and even that for just short periods of time..

1/15/2017

Old Tip I still use -"Cuttin' Up"

By accident I ran across a old tip which I just saved for my new  tip file.  It so happens I use this tip all the time mostly for button painting..  some times a subject does not suit itself to a round button shape and sometime changing an image makes it more interesting... Here are two examples... A rooster in full strut  is not conducive to a small circular shape but if I make a copy and a reverse copy and cut them up I can fiddle with position. By lowering the tail and reversing the head, it is much better for a round shape..
 The same is true for a quail in this position...a strong diagonal which heads right off the block or button.   By reversing the head, it is more interesting composition.


If you liked playing with paper dolls this tip is right up your alley...  Below is the original post five years ago and a complex design achieved by cutting up an image... one of my favorite blocks...

Tip on Adapting A design to your Space

- posted 3/13/2012


Wendy's blocks arrived and she has asked for a peacock theme and her block is six inches square...  I wanted to do a whole peacock which really lends itself to a rectangular space such as at the left...

I had already gathered lots of peacock images a couple years ago when I was working on my challenge block so it was easy to go to that file for inspiration.


Usually when you see peacocks in a square format,  they are either in a "tails up" position or are very stylized such as art nouveau or Jacobean.. 

I had some criteria in mind... First for materials I have a rather rustic gold cording that I hope to use for this block and so the design has to accommodate that.  I want to focus more on the tail than the rest of the bird and it has to fit in a square....

Something such as this is leaning towards what I am thinking...  The tail is bold and simple enough for cording but I am not crazy about the general design.... so I get out my scissors and print several copies of the image and cut it into puzzle pieces... and start playing around...


I'll cut out the head and neck, the body, and the tail and start arranging them and rearranging them until I see something  that brings a spark and will fit in a square format...


Something like this....  I use paper cut outs a LOT in my crazy quilt work.... most often when I am testing the size of design...

So if you have a design you like but it is not the right shape, rather than spend a lot of time with pencil and eraser......cut it up and arrange it to please you.


Using this method this is the final design to fit in a six inch square


and here is the final block....


1/14/2017

2017 - Tidy Up - Finish Up

I never make new year's resolutions as such, but I do think  about an overall plan for the year... 2017 is going to be my year for tidying up and finishing up....not only needle work and blog but life in general..
 
These are the needlework projects for 2017... My initial plan had been to start with the easiest (proper ladies) and do one a month... But that plan is already in the dust.  Once I got rid of the red bridge on the Asian challenge block I am excited to get going on it.  I have the most energy already invested in this block and a huge lot of embellishments ready for it...  I'm starting immediately today with filling out the trees...endless  French knots
And the list of "tidy up" things is long.
 
1.  The button painting tutorial is first on that list.  I have changed the way I  teach button painting, the supplies and links are outdated, and it needs more visuals...
 
2. My favorite tutorial is "cut-away-transfers" and I continue to use it and continue to sing it's value but never get any feedback... But no matter how I plan my peacock tails they will be very difficult to transfer with usual methods  and the perfect example to use to update this tutorial.. The more complex the design the better to  transfer  with "cut-away" So that tutorial will be updated and refreshed.
3.  Start some sort of  organizational plan for tips on blog... No ideas on this yet as there are so many... literally hundreds.... overwhelming to say the least.
 
4.  I need to add a couple more galleries to my blog... The suffrage quilt alone deserves a gallery.
 
5. Etsy tidy-up is already underway.   I started updating Etsy a bit last month.  I am down to about 25 older buttons on the site and new fun buttons are about to go up.  Just need to post and write descriptions.  I finally figured out a coupon for free shipping and have fixed neglected updates...
 
6.  I want to sort stash and give a lot a way.. either on blog, to sell, or through workshops. Also want to get a booth at the fall quilt show to promote CQ.  I'm not really up to teaching  anymore but  DH would drive occasionally me to talk and display about it ..
 
Once the weather is nicer the tidy-up/finish-up is extending to garden and barn... Everything now for me is getting ready to sell... new furnace, painting house etc. last year were first steps... DH is not ready for this  but I keep moving in that direction.... this hard winter has been a struggle for him so when he is ready I will have all my ducks in a row....


1/10/2017

UFO- Peacock Challenge Block 2010

This is the last of my UFOs slated for 2017.  I'm glad I signed up for the UFO challenge because even if I can't complete it, it has made me really prioritize what I really want to do this coming year... and this   piece is one of them and the most difficult.  This was a challenge block from 2010 and I like my concept but hate the block.  I've taken it out periodically and it is NOT working and I throw it back in the basket.  This time I've really taken a hard look at it because I was either going to fix it or scrap it entirely...

It had a moon which came and went, crystal stars which came and went, lace clouds which came and went, the fan by the silkie comes and goes, and the snow on the mountains has gone through several transformations. Plus the plan for peacock tails has changed every time I pulled it out.
 
This  was part of a 2010 challenge and had twelve VERY precise specifications it had to include.  The challenge was the brainchild of Cathy Kizarian.  I'd have to go back and check but among other things, it had to include: colors outside of our comfort zone, Asian theme, landscape, framing a silkie, curved seams, gold and glitz., layered seams, fans, paisleys, and birds etc.   Turquoise was not in my color palette at all so all this lovely turquoise fabric was sent to me by Nicki Lee.
 
After photographing it and putting in photoshop I have discovered three things that bothered me and with a good long look I could easily identify them... First and foremost is the bridge by the tree (middle left)... I put the bridge in first and added the tree and the tree looks like it is growing out of the bridge which doesn't even look like a bridge.... so with the magic of photoshop,  it 's gone and I like it better already.. Sometimes it is one thing  that paralyzes me and it takes me a while to recognize what it is...  this time it only took 7 years.  See how much better it is with it gone and maybe a bench later...or not...
 
The focal point is the maiden and the peacock..  The bridge interrupted  the flow around the block.  It will be so much better without it..and no bench


The second thing are the cherry blossoms..  Cherry blossom trees bloom profusely and mine is absolutely wimpy...  This will be an easy fix ... just time consuming but it's not like I've not done French knots before ad nauseum.


The third thing is the head of peacock by the silkie is lost against the turquoise..and again an easy French knot fix....
I want the flow of the water to echo the flow of the peacock tails...that's the plan anyway.  I have been saving jewels for the tail for years and it will be semi-steem punky...


Here it is all pinned on a board sans red bridge.

I actually joined a fan round robin with these fabrics and planned to use the fans to frame the block...


But getting rid of the lace bridge was the biggie...

We had 10" more of snow...


1/09/2017

Critters and a recommended step

I pinned the spider block to a cork board for a good stretch... If I could only recommend one step to make your work look better it would be a good "blocking" -stretching on a frame or board.  It aligns all the threads in the fabric and in the needlework...  I heartily recommend doing it at least a couple times during the work on the piece and for sure at the end.  This is already looking better.  It's not high on the UFO list...maybe late spring.  I want to add more insects of all types...
 
 
We have had another 10" of snow and waiting to be plowed out again.  This morning DH was cleaning snow off the roofs of the pump house, gazebo and the chicken house.. also digging the door to the pump house clear so I can get in and out when necessary to the heaters... 
 
During the years we had the on-site nursery we had two 100' greenhouses that had to always be cleared of snow to prevent collapse.  We both agreed that we were glad not to have that worry  any more.  We had sold one greenhouse when we closed  and the roof of the other went off in a storm a couple years ago.  Any more snow though and we will have to remove some snow from the barn.
 
The deer are eating everything and anything with all this snow making food scare.. Here a doe is eating the ivy leaves growing up the maple tree right next to the house.  I have seen them nibbling on both juniper and lavender... very unusual as they don't ordinarily like either. No harm done here as the ivy leaves will grow back in the spring.
Here is a rotten rabbit eating the bark at the base of a shrub which will kill the shrub..  Rabbits do way more damage than the deer.


1/08/2017

UFO Project - Spider round robin block

Again this was a round robin but a traditional 12" block... The theme was "spiders".  I liked   the block when it came home but always felt it could be extra special with some fine tuning so it has been languishing in my UFO basket for years.  This should be a relative quick and easy project...but I have been known to turn quick and easy into complicated and lengthy.

I love the somber colors and the leery little Miss Muffet in the center.  The brighter pinks have to go and maybe more olive green lace added (would have to dye it) and definitely more spider webs.  There are many cool spiders there already..  I can see this framed out with spiders on the border... more gold also.  I have to pin this to a board and think about it...

I have a spider quilt I bought on ebay years ago and will get it out for inspiration...When I have it out I will photograph it to share because it is a gem.

1/07/2017

"Casket Factor"

 We all know the best part of starting a project is searching for the right embellishments and getting to fondle all our stash...  Well making the "proper ladies" into a book warrants a truly elegant  selection...  And I have so much stash that if I don't use it, it will have to be buried with me...hence the "casket factor"  This stripe is the remains of a valance that looks like real silk... I am delighted to use it..

The antique metallic lace ( lower center) I bought in London last fall.  The dealer had 4 yards and I only wanted one and she wouldn't cut it.  So of course I had to buy it all and it was expensive.. I must  use it all because looking at it languishing makes me feel guilty.

The heads of the proper ladies are a bit bulky and really need a good firm fabric for backing.  I wished I had had a really heavy velveteen in the right color.  DH had to go to a meeting for an hour yesterday so he dropped me off at the thrift store nearby.  Lo and behold I found two huge velveteen pillow shams in the right color ($1.99 for both).  And I was able to remove enough matching piping from them that will make the pages nice and firm... but I'm sure there will be plenty of velveteen leftover to add to the stash.  That's how it grows...a little goes out and more goes in...

Another item that I'm determined to use are these organza roses "by the yard".  They looked so cool when I bought them years ago but every time I tried to use them they looked so tacky.... But come hell or high water they are going on this project.


The weather has either been subzero or a blizzard.  We are just coming out of a subzero spell and expect heavy snows all week.... A good  reason for lots of comfort food...  Recently Paul on the British Baking Series made a ham and turkey pot pie which I tried with a potato crust rather than pastry.  I also add lots of roasted parsnips.  It was yummy.

I was looking for a different side dish to serve with this white cod and made  spanakopita  filled with spinach, feta, and eggs. Rather than use individual layers of filo dough I used sheets of puff pastry.  It was so easy that I will do that all the time.  Spinach is DH's favorite  vegetable (not mine) and it is a hard one to use in different ways.  I cooked up a huge bag and will use the rest of it to make gnudi on Monday...  Today is Asian Beef and Broccoli with yakisoba noodles...

On these super cold days I like to use the oven to warm up the house....  maybe banana bread  is in order also. Our house is 111 years old and is so drafty even with quilts on all the windows .


1/05/2017

UFO projects - Proper Ladies

I haven't done any crazy quilting since I finished the anniversary quilt in early November...  There are several projects left unfinished that I'm going to do my best to finish....   Recently  I joined a UFO challenge and am going to try to finish one a month.. Among them are RR blocks of some very proper ladies.....:Pearl, Bertha, Sadie, Emma, Opal and Gertrude...

UFO #1. A book of "Proper Ladies".  I was in a round robin a few years back and the theme was "faces".  I made some faces from polymer clay and attached them unadorned  to blocks and gave each a name.  When I was a girl all the major hotels and department stores had tearooms and proper ladies wore hats and went "downtown" to lunch with their friends...   I  asked the stitchers to give their lady the hat of their dreams ...to feel free to add ribbons, feathers, birds, fruits, jewels and flowers galore.  My only restriction was No purple with red hats.  The stitchers in this round robin did a fantastic job of dressing my ladies but I never got around to doing mine.  So now I'd like finish them in style and make them into a book...

One problem is I put them on the diagonal which is the first thing to address and another is coming up with a clever cover...

1/04/2017

Delightful, fanciful lace abodes.....


A dear friend Kathy Streeter took my simple little lace cottage pattern and did a cottage of her own.  The lace is everywhere..  The way she did the roof is especially clever..using several kinds of lace.
 
If you can enlarge the photo check out the way she used ruching for greenery in front of the house and felt for other shrubbery..  Lots of great ideas here.. Plus how beautifully it's framed...
 
On a downsized cottage for feathered friends another friend Kathy LaFrancis just sent me this photo yesterday of a lace cottage of a different type.  Of course I love the bird button.  It is just too cute for words...
 
Don't forget the lace cottage tutorial is still up.  Hope someone else is trying a lace cottage this winter and send me a picture.... http://olderrose.blogspot.com/p/well-i-my-cottages-garden.html
Related Posts Plugin for WordPress, Blogger...

Popular Posts