Showing posts with label peacock. Show all posts

2/13/2017

99% Complete

Yesterday I finished the beading on the tail... Usually I just trim close to the outline chain stitch to apply to block...  This time I chose to turn under and glue about 1/4" of fabric.  These little clips were perfect.  I use them for so many CQ tasks...


Then I let the glue dry for about an hour... This project has been ongoing so long and I really enjoyed working on the tail and but glad to finally see that there is an ending to this "tale of the tail"


I did the peacock body about 7 years ago and now I want to tweak it a little...  I really want it to have a smaller head and there are two ways I can do that. 
1.  I can actually compress it as I sew it on the block to make it a little smaller...which I will do.

2.  The second thing I can do is just an optical illusion.  If I make the body bigger the head automatically appears smaller.  So I'm doing that also by increasing the size of the wing and adding beads to the body...

I do not add the beak and eye until I actually sew it on the block.  Here's what it looks like so far...................


Today I'm adding more green patches to the bottom of the block and then I'm going to take a little break from it and work on something else..

2/08/2017

Progress on peacock tail

I knew I was going to love working on this tail and I am... slowly but surely.  I am finishing up with the turquoise beads and starting to fill in with the iridescent blues (pink arrow). As I finish the top of the tail I want to include sequins I received from Shirlee if I can find them.  As usual with this piece I have made several changes mostly in my choices of beads and also I wanted to use krenik metallic threads in the tail and they just didn't work. DH will be gone all weekend so I will probably sit around the fire in my nightgown and finish the tail.  Our road is so bad you need the 4wheel drive to get out and no one can get in... A perfect time to just cuddle down.  One of my super magnifying lamps is on wheels so I can put up a card table and work anywhere..


The other day  I once again bought a 5 lb. bag of lemons so I can use up all the extra eggs in the frig.  These chickens are great layers.  I will be making lemon sour cream loafs, lemon curd, etc... all my usual lemon favorites.

Usually I have a problem using up a 5 lb. bag of lemons before they spoil but I solved that problem... Around Christmas I has a bunch of leftover lemons and google told me to chop them up and freeze them... Which I did. 


I happen to enjoy my occasional gin and tonic and prefer it with lemon rather than lime.  So now instead of dropping in ice cubes I drop in frozen lemons... Delicious!  I suppose you could use them in lemonade also..  but a G&T is my favorite and I usually receive a bottle of Dry Fly gin for my birthday, mother's day, and Christmas.(some times for Valentine's Day and Thanksgiving also)

And it's snowing.....

1/24/2017

It's really all about the darn tails

Well I wasn't able to stitch in the car but I was glad I had it along as I did get a little stitching done in the hotel while we were stranded in Seattle last week.  Remember how wimpy this cherry blossom  tree was?    One of the reasons was that when I started this project in 2010 I challenged myself to use a goodly supply of Edmar threads.... which I hated and have been able to give most away. 
 
Trying to do hundreds of French knots with rayon thread drove me crazy and I quit..  I tried everyone's suggestions such as changing which end I knotted, wrapping the thread a different way around the needles, pressing the thread....and it was always a tangled mess... Rather than pull out all the Edmar thread, I just filled it in with knots of both silk and cotton threads and I'm happy with it. 
 
So I filled out the tree and added more knots around the image...again cotton and silk threads.  I took the "silk" snow off the mountain and after trying silk thread, perle thread, Glossilla rayon, and cotton thread, I am using a Krenik metallic and sticking with it...no more changes.


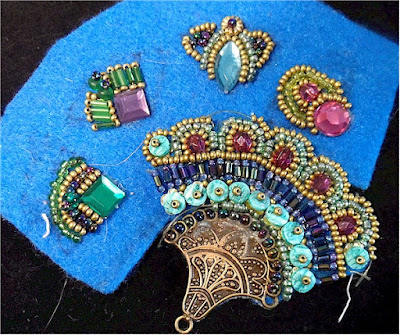
But from the very beginning of this challenge project there was one thing I was really looking forward to and that was the TAILS....  I can see that I will finally get there now.. In 2010 I did this fan and bead combination in anticipation of beading the tails.  I had hoped to use the fan somewhere on the block...if not the block, on the border. In fact I did have it on there once and took it off.  I love the little dyed shell beads
 

This bunch of  beads are actually rather gaudy earrings which screamed "peacock" to me and I've been saving them all these years.


Plus I have a large bag of odds and ends of "peacock" colors to do spectacular tails...don't you think?


But if I hadn't already changed everything possible on this block, I took aim at the peacocks themselves today.. and guess what?  Into the computer for a critical look and major changes ahead for them..
Right off they are too large to be in proportion for the lavish tail I had in mind.  Since I did them on felt, taking them off and doing a little size reduction will be no problem...  I would have taken them off anyway because I want to change their placement.  One on the right will be not only smaller but also 1/2" higher.  The walking peacock will be also smaller and nearer the pond.

So the two sketches show how much better balanced the block will be with modified, altered and rearranged peacocks. I can't remember ever having a block the has taken so long and gone through so many changes...  By rights there was so much to be changed I should have just scrapped this project altogether...  BUT by golly I wanted to do those darn tails............................One tail (or maybe both are going right off the block...) 

10/26/2015

My day was waylaid.....

The last thing before I fall asleep I often plan what I want to do the next day.  I love waking up with a sense of purpose.  DH is out of town and I had a lovely long uninterrupted day ahead. And I decided I was going to spend the day painting buttons and answering emails.  I did neither.

I got the lace and trims on the last three blocks last night and this morning I awoke wondering where was the blue silk I bought in LA two years ago and what did I do with the two extra blocks I made for the covers for the corset cuties.  And so I ended up making a huge mess but finally found the silk, etc. and was able to sort tons of things out. But not until I had made a huge mess everywhere.   My goal is to go right into January and finish this project.  I got the silk page linings cut today, the interfacing applied, and the seam lines basted.  Now I can add the corset ads and embellished them. These linings will be my on-the-go blocks for the next two months.

I decided I would not start any new projects in 2016 until I finished the hanky project and the cottage project.  The hanky project has been held up because I could not find exactly what I wanted to back and border it with.  I had my heart set on a dusky blue moirĂ© taffeta and it proved almost impossible to find... But I have it now and will move ahead after the first of the year.  There will be lots of embroidery on the taffeta so this is not a quickie project.


The second big finish will be the cottage blocks.  I originally intended for these to be a book.  But after the excitement of a quilt in Houston, I thought I might finish it as a quilt and enter it.  I just could not make a firm decision.  But now I have.  I will go with my first plan and make it into a book.  Friends and family can look at it in a book and I know that  I  (nor anyone else) would ever hang it on a wall... so a book it is.  I have this lovely striped silk for the linings and now that I have made that decision I am eager to do this.  I loved these blocks from start to finish.  The blocks are only 7" but I want the book pages to be about 12" square so each block will be bordered and embellished.  So this also will be a time consuming finish.

When I do finish these, which will probably take several months, I ran across two projects to finish that have been shunted aside.....  especially  the peacock piece which I have MANY hours already into.  The other is a ORANGE piece with a Moroccan theme. 

So even though not one button was painted, it was a very productive day and just what I needed to get myself going again.

2/08/2014

Peacock stash and Victorian sitting bench...

I have just 5 days to get my blocks together to mail for the fan RR.  I wanted peacock colors because I want to combine it with a peacock UFO... So while Susie was here I went through my stash plus added a few from a thrift store on the only day we were able to get out.  Our cold spell is about over and we managed to get through it with no frozen pipes which is always a relief in this old house.  The pickup hasn't started for days. I bundled my California Susie in heavy sweat pants, warm jackets and plenty of quilts.


The Victorian sitting bench is on a holding pattern...  I have it all screwed together but don't want to add a cushion until I get it outside to paint...which will be a couple weeks at least... Now it just has just a couple blankets on it but it is safe to say that it is a success even in it's unfinished state...


1/29/2014

Upcoming Fan RR

Several years ago we had peacock as a guest for several weeks...  He had escaped from a nearby farm and the owner tried everything to entice it to come home... which it finally did.  But I enjoyed him immensely while he was with us.  Here he is by the door into the barn shop.  He was either here or by the slider on the house....admiring himself with his reflection....and what a strut... At night he roosted in the apple tree by the bedroom window.

I started a peacock block which had problems and went into the UFO basket... But I want to see if I can salvage it and combine it somehow with the fans from this upcoming RR.  You can see some thoughts on modifying it on Block Talk With Gerry.


I'm choosing traditional peacock colors to use in my RR fans.

3/13/2012

Finished peacock design

The next step after playing around with the cutout pieces is actually using a pencil and paper and here is what I have ended up with... Since it's a small block (6") and I want the tail to be the focal point the best way to do that is to make the head smaller...  I've mentioned this before..  When you you have two elements competing for attention.. You can either make one larger OR one smaller.. It would be impossible to make the tail any larger so the obvious solution was to make the head smaller.
This is a very handy tip to stick in youe bag of tricks... I chose to put him in a tree because the lovely peacock visitor I had  was always in our apple tree if he wasn't preening in front of the slider....

I mentioned yesterday I had a specific cord in mind and I allowed an ample space for it in the design..  I've had it forever and it's a woven cording with a gold thread.  To me it has kind of a rustic quality and I have used it often in my work...  it's a favorite of mine...  I also want to use gold bugle beads and braids and maybe give a try on the back using a woven design... maybe!
And some great gold metal leaves...


So if you read my blog yesterday on using cutouts you can see how I got from cutouts to an actual design...  Since this is quite a complex design it will be perfect example to show you step-by-step how easy it is to transfer to my block with my cut-away transfer method. 

Remember this will be ALL gold but as I often repeat designs I like in different ways, this will be one that has to be done in peacock colors some day...
Related Posts Plugin for WordPress, Blogger...

Popular Posts