Showing posts with label bags. Show all posts

11/10/2017

Progress on glass cases

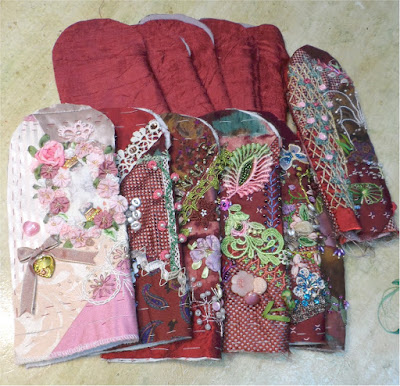
I have all the cutting done for 6 more eye glass cases and sides are sewn.  Now all I have to do is attach the lining and the rest is hand work....what I call "fiddle work"- something mindless I can do while watching TV.  These are going to be gorgeous.  I found at least 8-10 more suitable blocks if I want to make more.


Because of all the embellishment they were
tricky to cut and difficult to cut around a pinned pattern so I laid the embellished block on a towel and traced the pattern on the back.  It was much more accurate.  I also basted all the seams by hand to be sure no beads, etc. were going to be caught in my machine sewing.  All went well.  Amazing there were very few beads to remove....less than a dozen total.

The pattern for my spider bag came and I was amazed at all the pattern pieces.  I think I would be wise to spend some time reading the instructions before I start and also organize the pieces...  This is not a quicky project...and I didn't really want it to be.  This one has been so long incubating that I want to savor it for a good while...

11/06/2017

Last BoHo Bag

I meant to post about this bag in 2016 but it was a gift and then I forgot about putting it up... But I even had trouble finding any pictures this morning when I wanted to write about it....

One of my granddaughters had admired my BoHo bag   and I decided to make her one for her graduation in the spring of 2016.  Her favorite color at that time was purple and I wanted it to be fancy but still practical for someone her age.


I chose this pattern because of the extra side pockets but didn't pay that much attention to the shape of the handle and how it was attached.  First mistake.


Second mistake was my choice of materials...I wanted it to be opulent.  I had my heart set on several velvets and satin for the lining... right?  Slip and slide all the way and in addition I chose very heavy structural lace.  So bulk at the seams was a problem all the way also.  It all was so dark that it was hard to photograph.


This is the pocket on the backside.  The lace shows up better in this shot.
But as you can see from this inside shot that with all the bulk, the slippery fabrics, and the curved design of the handle it was definitely a challenge... 

But it was pretty spectacular when finished...most definitely one of a kind.  I might make this bag pattern  again but I would take it to a leather shop and have a leather handle made and sewn on there.


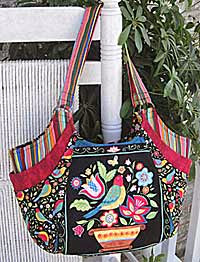
Now for my spider bag I have chosen this pattern called "Quattro bag" and it is readily available on line.I ordered it this morning.    It has similar side pockets but you can see how differently the handles are attached.

This will adapt itself very nicely to BoHo crazy quilting...  The bag itself will be black and embellished in color... I have tons of wonderful black stuff left from the suffragette quilt and I hope to make a dent in that stash.

Also I'm hoping I remember the lessons from the previous bag.

5/15/2016

On a scale of 10, this is a 12!

This spectacular piece of crazy quilting was done by Jo in NZ in a round robin some years back.  Without a doubt Jo is the best stitcher  I have ever seen.  I have saved it for something special. 
Something that would really showcase it and this velvet bag/tote is my choice.  I have been working on it for a while and it is ready for the lining and handle.

 The back side of the bag is much plainer but the wide black lace shows up better in this shot. There is still more lace and embellishment to be added but it is coming along.

It is large....more of a tote.  I don't change my purses.  Once I have a purse that I like I use it until it wears out.  But I love totes and use them all the time...This is an especially nice pattern that I bought at the Houston quilt show a couple years ago.  I love the outside pockets.. I think it suits itself very well to CQ and will use it again.

2/11/2014

A bit about bags

 Every time I go to town to see my mother I spend about 1 1/2 hours behind the wheel... Obviously I'm not stitching but lately on the way back and forth I'm been thinking about another bag... Although I love my boho bag there are things I would do differently.  It was the third try on my chatelaine that I got it all together.

The size was OK but I love the shape of this replica of an old carpet bag but the handle is wimpy.  Isn't it gorgeous?


I love the shape and size and bigger handles on this slouchy bag but I don't like the way it collapses in the center when closed...


And of course what is not to love about this boho bag.
which I found on Pinterest...  to be really practical I'll have NO lace or trim on the bottom because I really use and abuse my bags.  My boho bag I have now has a suede leather bottom which HAS worked great! What I really want is to combine the best of all these bags which brings me to my little red everyday bag 


This has been my favorite bag of all time and I can just throw it in the wash.  I've often said that when it wears out I will cut it up for a pattern and make another just like it.  Of course it is far too small to hold an 10" hoop.


It is actually three sections with the handles attached to the outer sections.  The design and piecing is quite complex... Not counting the outside little pockets there were, as close as I could count, 22 separate pieces.  which in itself is great for crazy quilting.

So when I actually get around to making another bag I'll try to adapt a pattern from this bag....larger and a different shape.  Of course that means I will have to make two... The first will be a trial run which will not be quite right so I will have to make another to get it right...  Now as I'm driving I will have to start thinking about themes and colors...  Definitely black for one with maybe a magpie  and lots of rhinestones and glitz... sometimes the planning and problem solving is as much fun as the actual doing.


1/21/2013

CQJP2013 - Do I have a plan? and Kathy's boho bag.

I'm waiting  until I can get new cartridges for my printer so I can transfer the image... But other than that this block is done...  One of my students asked if I had a plan when I do a block... My answer is a definite yes AND no!!!!!  I knew I wanted a cottage theme, pastel colors and lots of lace...beyond that much  it is all spontaneous....  moving and testing materials  in my stash....  I used the bees because I had a little bee skep charm I wanted to use....but after the bees were on I decided I didn't like the charm so a skep was embroidered lower left... It was the finishing touch...


Kathy, one of the stitchers at my house, came today and showed me her finished boho bag and it is fabulous... She finished it with elegant detail and has every right to be proud of it.... As a relatively new CQer her work is extraordinary...

11/04/2012

BoHo Bag, Great Book and Tool Woman!

Kathy is one of the ladies who's been coming on Wednesdays to stitch with me and she finished the flap on her BoHo bag and it is truly lovely.  She is a very precise stitcher and the work on this is extraordinary for someone new to crazy quilting..  She has chosen  elegant fabric to coordinate with it and I'm anxious for her to assemble it..


 She also brought a book to share with me and I will share with you... For me it is especially timely because I'll soon start stitching on my lace cottage block again and also  in the mood to do a series of cottage buttons.

It's the flower beds that are so interesting.. In this particular one notice how the artist has used red to move your eye through the flowers and keep your eye in the foreground.  The mass  of white flowers actually pulls your eye to the figures..

There is much to learn from this book on how to handle masses of flowers in a stitched composition.
Wouldn't this painting make a precious center for a block?  Notice how the bunch of pink snapdragons (lower left) point to her and she is framed by the door.  These elements do not happen by accident.

The entire book is filled with photos exploring the whole era of cottage garden paintings.


There are many paintings where there are specific color themes to a bed....like this lavender and yellow bed... I especially like the placement of the daisies lower left and all the yellow achillea pointing to the center and the stone wall carrying the eye across and another mass of flowers framing the path.  Makes you want to stroll right in.... needs a bench tho!!!


And speaking of benches, here is my tool shop in the barn where I built all my benches.  I love power tools (well any tools) and can not think of a tool I do not have.  They know me well at Harbor Freight.  But each season it needs a good cleaning and sorting.  Last week my handy helper  came and we started..  This is the before picture... First we have to get the work benches cleaned off and all the spare lumber hauled out.

I think I'm just about done doing all this sort of thing and then I think of the obstacle course for Morris...oh yeah!  And I do want to build my coffin..

10/26/2011

Giveaway - BoHo Bag Kit.....

I finished my tutorial a couple weeks ago and forgot to post about it.... To celebrate I'm doing a giveaway for one of my BoHo bag kits.  Just leave a comment on this post and the drawing will be November 3rd....

This kit includes a  piece of high quality, home-decor focal fabric approx. 18 x 30"   plus:
•  12 coordinating pieces of   fabric large enough for 2-4 patches each and a variety of textures, sheens, colors, and patterns.
•   Various lengths of coordinating gimps and cording.
•   4 lengths of various fringes suitable for use on pocket or flap might including  2 chainettes, 1 tasseled, and 1 bullion
•   1 piece of fancy beaded fringe suitable for use on pocket or flap.
•   1 long piece of coordinating fabric suitable for a handle or for extra pieces.
•   AND a surprise piece of lace or two  .

Not only did I finish the tutorial for my kind of bag but Pat Winter just published her book on BoHo Fever...which is available in print or digital version at http://www.magcloud.com/browse/issue/288760/follow 


And I have about 1/2 dozen kits available on my Esty site... http://www.etsy.com/shop/olderrose

10/06/2011

Tutorial almost finished

 The tutorial   is almost finished and you can access the page   http://olderrose.blogspot.com/p/boho-bag-tutorial.html  I have about 6-8 more photos to add and the text for adding flap...  I hope to have it done, spell checked and edited by the weekend.

 It has been a struggle as my old computer is so slow and I am constantly having to shut it down and reboot it when it freezes up, the blogger page editor is giving me fits adding photos, and my ISP is having problems.  I feel like I'm in labor and giving birth to this tutorial.  Susie has sent great text and photos which I included...


9/03/2011

How I handled my handle!!

I was lucky enough to have found this lovely soft suede belt to have for a handle on my bag and I could just stitch across the bottom and there was not worry about having raw edges...

 But I realized if  I were making a cloth handle (as I probably will on my next bag) that again there would be extra bulk and/or raw edges... So this is how I covered the straight seam on my suede handle and I could do the same with a cloth handle...


After I stitched it with a raw edge I layered a small round doily, a crocheted medallion and used a spectacular button to attach... the lace trim on the inside of the bag covers the button stitching.


And it turned out to be the  perfect finishing touch.  That metal button is about 1 x 1 1/2" beauty I've had for years and years and it was always just too big for anything...  It was one of three so on my next time I will use the last one on one side of the bag and a mismatch beauty on the other side...


As an alternative you could do it all with buttons... Just use a couple buttons on the lower part and THEN attach   lace and large fancy button. where the arrow is and the lower buttons would be covered and a stitch or two in the lace would keep any raw edges hidden...

Is this clever or what..?  Sometimes I even amaze myself....

9/01/2011

Dealing with all the trims and bulk - Tutorial

The biggest challenge, as I see it, with the BoHo bags is dealing with the bulk at seams... bulk of the crazy quilting and the bulk of the trims. And if, like me, you want to use the richness of tapestry and decor fabrics, the challenge is even greater...

So I knew immediately I didn't want to add the trims to the seams as I sewed them. And I even didn't want to add them one at a time on top of each other...  If I stacked them directly on top of each of as I went it would be about 3/4" thick...  I needed to "feather" them out. So here is how I solved the problem for me....

First I selected the fringes I wanted to use and laid them out in the order I wanted to stack them..  .I cut a piece of ribbon or bias strip a little longer that than I needed to trim a pocket, flap or edge.   At the top of my choices of fringes is a piece of grosgrain ribbon 1 3/8" wide. 


Then I sewed the first fringe (the long black chainette) along the bottom edge of the ribbon.


The I added the taupe cotton fringe to the ribbon.... slightly higher than the top of the black chainette fringe.


Next came the heavy (and the bulkiest) bullion trim...again just a tad higher than the taupe fringe.


Finally I added the tasseled fringe.  You can see at the arrow that it is just a tad higher than the bullion fringe..


Now you can pick up the ribbon and attach it where you want on your bag...  Your fringes are all perfectly aligned and the bulk is at a minimum.  Once attached you  can add a layer of decorative braid (see arrow) to cover the ribbon or bias.

And you know I really love you because when I was not happy with my assembly pictures.... I TOOK MY BAG APART to get better pictures and then put it back together.  I'll put them up next.  Susie is doing her assembly this weekend and I'll add her pictures.  DH and I are playing also in a bridge tournament this weekend and don't you know I'll flaunt my bag..

8/23/2011

We interrupt this tutorial to bring you this important message!

There are kits for sale on my esty site with lots of goodies for making one of these bags.  But be aware I will be adding 10 more kits this weekend so waiting a few days will give you a better selection.
But don't wait too long because I have a limited amount of fabric cut...

I really acquired all that fabric thinking one day I would use it all but now realize it isn't even possible for me to live that long...


Remember when DH was giving me a hard time about not letting Susie out of the barn....well here's what she was doing! Sorting through bags and bags of fabric and cutting up the choices pieces suitable for bags. Then going through even more fabric and cutting up squares for coordinating fabric..

And what was I doing while Susie was doing all that work.  I was sorting through the piles of squares she cut and putting it all together with a focal fabric for a kit.  Of course she was slaving over a rotary cutter and I was sitting on a stool with a cup of coffee. Well owning the barn does has it perks...  After she went home then I started cutting gimp, braids, and fringes to finish them off.  And aren't they gorgeous?

Each kit includes a piece of high quality, focal fabric approx. 18 x 30" (unless otherwise stated.)...either tapestry, home decor or brocade plus:

 
• 9-11 coordinating pieces of high quality fabric large enough for 2-4 patches each and a variety of textures, sheens, colors, and patterns.

• Various lengths of coordinating gimps and cording.

• 4-5 lengths of various fringes suitable for use on pocket or flap might include fringes such as chainette, tasseled, and brush.

• 1 piece of fancy beaded fringe suitable for use on pocket or flap.

• 1 long piece of coordinating fabric suitable for a handle or for extra pieces.

• AND a surprise piece of lace or two as I pack your box.

8/22/2011

Input from Susie

Susie sent me these photos today of the steps she took after the patches were fused to the foundation..  Step one: sewing around each patch to secure it.. Step two: adding lace to the sides of the seams.  Step three: adding gimp, braid, etc. to cover the edges of patches and lace.

When I get the tutorial all done these photos will be added...  Susie also added and I quote her:

"The other thing you should add to the tutorial is "Gerry's Rule for Victorian Carpet Bag Design" -- When you think you're done .... add more. It really did work for me. Especially after I decided that fancy stitched seams were difficult and time wasters - just adding laces on BOTH sides of the seams made the fancy stitched seams unnecessary....... adding another color trim or ribbon on top of that, improved the look. I kept her 'rule' in my mind and I think it made my bag better."


8/21/2011

"Step 2 - Avoiding Bulky Seams."

These are heavy fabrics and there's no way around extra thickness if you want to use tapestries and  brocades..  Trying to do traditional seams would make for bulkiness difficult to deal with.   So we opted for NO seam allowances at all to deal with...   Being crazy quilters we opted to try something crazy...

I had some of that thin fusible stuff "heat and bond" and Susie brought something similar called Misty Fuse which she had just bought at a quilt show so we tried both... To protect my ironing board I put down a large piece of baking parchment paper which nothing sticks to and then the 16x16" foundation fabric.. On top of the foundation fabric I put a 16x16" piece of Misty Fuse and covered it all with more parchment paper and ironed... Once the parchment paper is peeled off the Misty Fuse is bonded to the foundation fabric but still has enough fusible surface to add more to it...

Then we laid the foundation (fusible side up ) and began cutting patches to put on it.   We used chalk and a straight edge to mark the shape we wanted for a patch...  It was easy to feel the patch underneath so we could put the ruler on the fabric for the next patch....mark with chalk and then cut it out with scissors and lay it in place until we had the foundation covered with patches which abutted against each other..  Since all the seams will be embellished there was a goodly margin for error...


If you look closely you can see the chalk marks on the corner patches as I just about have this side covered.  I'm thinking at this point I need to make the large left tapestry piece smaller by making another patch... gold I think!!  The chalk worked great as we could just brush it off.


Then we carefully moved the foundation covered with patches back to the ironing board....covered it with a sheet of parchment paper and ironed it slowly on the top side until the patches fused to the foundation and for good measure ironed on the back side also...  Now we had a piece covered with patches and perfectly smooth and no bulky seam allowances to deal with.

At this point both Susie and I advise you to take it to your sewing machine and sew along the edges of the patches to make them really secure.... 


 Of course also at this point it would have been an opportune time to stop and tidy up our work area but we were so excited with the way it was shaping up that we stopped for nothing.  Occasionally DH came out to the barn to see if we were still alive and took pictures of us..

Now we could  begin adding ribbon, gimp and lace to all the seams... BUT the next one I make I will use my sewing machine to cover all the seams with ribbons and then I can put gimp or trim on top of the ribbon and just sew by hand to the ribbon without going through all the layers of fabric. Doing the ribbon step would really only take a little extra time and I think the time would be worth it in the long run...

Since this is the side for the pocket I'm not putting a lot of trim in the middle.. The green line marks a very long seam covered with ribbon..  At the upper end I added trim on top of the ribbon and you can see how nice that looks.


This is Susie's pocket.. She chose to use the tapestry for the bag and do a crazy quilt pocket... We both used the same technique of abutting the patches to eliminate bulk.

After all the trim, ribbon, and laces were sewn on each section of the bag...you can see the back on the left... Then I ironed on a piece of Allie's fusible tricot as the last step before assembly. It was still soft enough to feel like a bag but the tricot was just the right thing to give it enough body.  I love that stuff.

Next installment... Step 3 Assembly and other miscellaneous tips...
Related Posts Plugin for WordPress, Blogger...

Popular Posts