Years ago I wanted a pretty floral garden smock. I tried one on and, even though the sign said "One Size Fits All", I couldn't button it so I was obviously not an "all".... So since I couldn't find a pattern I liked with a square neckline I just made my own that fit...in fact I made several... When I used to travel speaking at garden shows and garden events, these smocks were great whether I was on stage or working our booth... Looking nice and being comfortable (meaning braless) at the same time is a good thing...
So many people commented on my smocks that I decided to make a few (later a lot) to sell... except I made them in three sizes.... aA (almost All), A (All), and AA (Ample All)... Even though there was a sign saying "Don't you hate it when it says "one size fits all" and you're not an all" and explaining my sizing system, I was amazed how many times I had to explain it after they read it.... They were probably "Alls" and never had a problem.. Each smock was one-of-kind, had layered pockets, and each smock had vintage buttons and no two buttons were alike.
But there inevitably was a woman who wanted the smock that wasn't her size and complained that I should have each material in all sizes and didn't get the concept of one-of-a-kind... Then there were the women who liked the material on one smock and the buttons on another and would I switch them... And even if they were an "all" their arms weren't. and some wanted sleeves shortened and others wanted sleeves let out..
But I can't complain because I sold a lot of them before I got bored of making them and I had a standard answer ready for difficult customers.... "You just keep shopping, dear, and I'm sure you'll find something much better in another booth... " I find smiling and gritting my teeth at the same time very difficult....
3/30/2010
Topaz feeling MUCH better today!!!
Momma Topas is feeling much better today and, yes, that is TWO little butts you see....and they are about an hour old when I took this photo... The one on the left is much smaller and very thin but seems to be getting right in there for the magic elixer. I will watch it closely and may have to give it supplemental bottle feed....
And you can tell by the look on Topaz's face that she's saying "Well thank God, that is over with!" She has such a lovely face and is the tamest of my sheep. I do love my animals.
My chickens are getting old and don't lay that many eggs but they are so beautiful scratching in the garden that I consider them "yard art." Only one more ewe to go but I expect her to be late...
My lucky day.....
When I sign up for a DYOB round robin I always check out the blocks when they are posted and see which I would choose if I were first in the rotation... This RR Cathy L. had chosen vintage valentines that had belonged to her mother and immediately I like the little one with the girl with the cookie and chef's hat knowing full well it might be gone by the time the blocks were sent to me.
So I was delighted when I was third in the rotation and it was still available.. Every once in a while I need a bit of just pure whimsy and this will be it...
I gathered ribbons, lace, beads etc. last night and I wandered around the the thrift store for a long time yesterday looking for the perfect piece of ribbing for this block.... Can you guess what for??? Wait and see.....
3/28/2010
Home is Where the Heart Is!
I'm finished with Cobi's block for the Stumpwork RR.... Cobi wanted "romantic". I just had to name this block "Home is Where the Heart Is" and there is a little gold heart on the side of the nest... I had gotten kinda carried away with leaves (all Susan Elliott's fault) using floss leaves, silk ribbon leaves and then I added silk organza leaves and wasn't sure about that many leaves so I set the block aside for a few days... I was right so I ripped out all the silk organza leaves today and now I'm happy...
I was going to plump out the nest with some of my sheep's wool but decided since this is going through customs in 4 different countries that I didn't want anything that would set off any alarms...so I used just quilt batting. I missed catching the reflections on the cottage button....sorry!
The home theme is kinda fun... I could see adding a bee skep as another home to this block and maybe a squirrel or owl in a tree or spiders on a web....my mind just carries on by itself but I'll just have to let this one go now..... Sometime it is hard to let a block go!!!
Below is the entire block and I did use a bit more than my allotted 1/4 but that happens sometimes... I have all my stumpwork books out now and want to do something using a different stumpwork technique on the next block..... getting the 3D effect is fun!.
Alliance Quilt - progress
Well, it was time to stop and put this on the bulletin board and make decisions... Of course I wish I had started with a smaller block to allow for a border large enough that I could have worked text into it but since that's not to be, I'm just forging ahead. Also wish I'd made a lot less seams...
Last night I played around with sizes and placement of the cell phone and photos. I ended up with this size cell phone which is larger than I had first planned... It needed to be large enough to relate to the fan... It will be beaded on a hoop so when I do put it on I can fuss with placement.
Then there's seams which are NOT my forte... I've done entire blocks without an embellished seam. Then I used motifs as a reward... "Do two seams Gerry and then you can do a motif!" But since there will be few motifs on this blocks besides the focal points, the seams on this block are important and I will do them all first.
1. The block is large and the focal point (fan, phone, and photos) are large so I needed bold seams.
2. I wanted layered seams so they will a point of interest in themselves.
3. I'll intersperse black in a lot of the seams as a way to move the eye around the block and hold the block together.
So I made this seam first and it is my "benchmark" for size for other seams...
I keep referring to it as I start another seams... I often go to Lauri's site as I not only love her whimsical blocks.... even her seams are playful and fun.... But I'm making headway...
I'm happier with some of the seams than others but determined not to start ripping seams out as I would never make the deadline.. I will put this aside for a few days to finish Cobi's stumpwork block... I felt I had overpowered it with leaves and blossoms and wanted to take a break from it and see if I need to rip some out... But I want to mail it Monday so it's time to decide on that also.... decisions, decisions, decisions.........
Poor Topaz
3/27/2010
Ruby's "Little Red"
Born yesterday morning..... This little guy is about as sweet as they come and very deep burgundy... I love the darker color some of them have when born... I know I've mentioned this before that these are a heritage breed and one of the oldest breeds in America having been introduced as a gift from the ruler of Tunsia to Thomas Jefferson....
The breed is Tunis and is often referred to as the Rompin' Redheads. Once nearly extinct, they are now not in danger as people began to recognize the value of older breeds. Rarely seen in the Northwest, they are mainly raised in the Southeast as they are a very heat tolerant, disease resistant breed...
Momma Ruby and Little Red enjoying a nap in the spring sunshine...
3/23/2010
Photographing Blocks
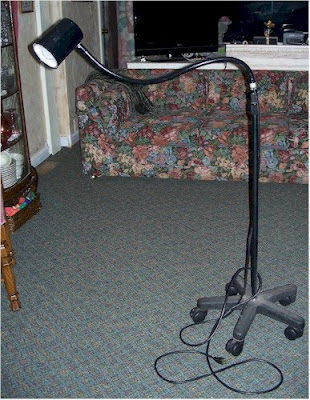
This is my favorite lamp I use for photographing. It actually came from my OB/GYN when he was modernizing his equipment years ago. When I use it I have flashbacks of being flat on my back with my feet in those dreaded stirrups and hearing his sonorous voice..."Nurse, move the light!" And this was the light! It is great though because it is extremely adjustable and movable. The base is cast iron and the casters swivel.
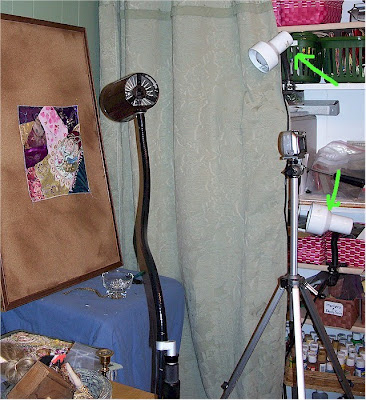
I have just a very tiny space set up in a storeroom/closet for photographing. There is a tiny table about 18" square, a cork board, 3 lights and a tripod.... everything from thrift stores including the tripod. It doesn't take up much room so I can leave it set up all the time.
There is my tall lamp and I have two smaller lamps clipped to shelves on the right. They all just have a regular 60 watt bulb in them. I have my tripod set up BEHIND the lights... about 3' from the block..
Then I pin my block to the cork board. Most of what I do are tips from a photographer friend who shot products for catalogs...
1. I always photograph at night... or in this room whereI can use shades or curtains to darken the room. An overhead light fixture floods the area with light and you lose control. I also use NO flash as it does the same thing... flood the area with light..
2. I turn all the overhead lighting off so there is no ambient light. Then I use adjust the three spot lights to try to eliminate any reflections from shiny items on the block....sequins, jewels etc. I have additional lights if needed but I find that three seem to work just fine for needlework. I used more lights and reflectors when I used to photograph dolls because they were three dimensional and there were more shadows to control.
3. Rather than use a macro lens and get close to the block... I stay back about 3 feet and zoom in... I find I get a sharper image, more detail, and better color...
4. I always use the tripod...I can't hold the camera steady enough for close shots. I have just an inexpensive Kodak digital camera from Costco. I did just get a better camera on e-bay but haven't used it yet.
The whole set up is very low tech and amateurish but it works for me..... I will try to answers any questions if I haven't explained it well enough... I'm sure others have their own methods but this is what works for me...
3/21/2010
Updates on puppy #8 and door
Well my dear friend Simone (who is much younger and much stronger) came and helped me rescue the door from the rose bush.... It's not as great as the other door but it will do...And this is no ordinary rose bush... It is Alba Maxima and I had placed the door behind it when I planted it as a very small rose to give it some protection from wind and deer...
Now the rose looks like this when blooming.... It is about 12' across and at least 9' tall and you can smell it 100 yards away. But it had engulfed the door and it took some time to get enough of the rose pruned away to get the door out.
My first plan had been to hide the door in the tractor shed until I could do something with it but then I figured it was poetic justice for himself (who had been so smug about getting rid of my other door) to come home from his trip to find another door on saw horses magically appear!!! So tacky of me but so gratifying....
Puppy #8 at 6 weeks and now at 7 weeks... Notice that the ears have gone up in that week and isn't he adorable? I thought I was going to get to see him today but it didn't work out...but soon
3/18/2010
Momma Pearl and lamb
I could tell Pitiful Pearl was ready. She was pacing, pawing the ground, going down, getting up etc. and I just sat with her telling her it would be over soon and indeed very soon her water broke... On the right the lamb had just landed on the straw and was still in the birth sac... I held my breath until I finally saw a little wiggle of life. Momma Pearl started at the head for the all-over clean up....
3/16/2010
Grand Morning!!
Molly and I had a grand morning... We had our walk, fixed the pasture gates, transplanted daffodils and even moved a rose... But I use the cordless drill in the pasture and when the charge runs down it's a message from my garden good witch to quit...... in fact Molly came straight into the house and jumped on the bed....which is her message that it's time for a nap....
Just a word about daffs tho....The clump on the left is from one daffodil.....the kind of daffodils poets talk about when they mention "fields of daffodils" In catalogs they're sold for naturalizing... They do seed and multiply.. and from one clump I get about 100 bulblets about the size of a green onion.. I can divide them in the spring like this and it may take a couple years but they will all bloom. I have given buckets of them away this spring and I hope to get some moved every day....
In addition I remembered to dig a sucker from my Harison Rose which is in the back of the garden where I never get to see it... This is the wild, once-blooming rose you see on roadsides and abandoned farms across the county... The barn and house have collapsed and the rose survives.... It forms a huge, thorny thicket and is impossible to propagate from cuttings... I went out with pruners and a shovel to dig some suckers but had forgotten how thorny it was... Dug one and will do more tomorrow when I take heavy gloves. I want some closer to the house so I can enjoy them.... Here I come Molly!!!!!!
3/14/2010
The peacocks
While the photoshop is fun for quick design work, when I have specific shapes and elements in mind, it is back to the pencil and paper...
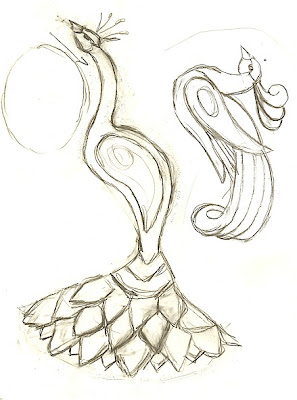
Such is the case for the peacocks for the 2010 challenge block. I intentially chose peacock colors for this landscape block... Peacocks will be the focal point and the success of the block depends on the them so I spent a lot of time with a pencil and even more with the eraser. But I have the designs now.. I wanted them stylized and the neck of the peacock to echo the shape of the silkie as they are close together. I wanted the tail to be fan shaped (January) rather than long and flowing. Finally I wanted the wings shaped so I could do them in a paisley design... The standing peacock will be done in sections as I use small hoops.
Since the whole purpose of the challenge block is to try new things, I look for every opportunity to try something different. I'm playing with the whole flowing art nouveau thing and also anything goldwork...
I love the way Lauri B. fills in with chain stitching and I am going to do that with the resting peacock... I will also show how I use a cut-away technique to transfer designs when I can't trace or use transfer papers...
Labels:
bead embroidery,
birds,
challenge,
crazy quilting,
technique
Goldfinches, daffodils and memory lane..
If I have to choose "fun or formal", I choose fun every time... It only the rarest of occasions that I use "good" china anymore. These yellow plates are vintage and I've collected them over the years. Almost every one is a slightly different color. Cathy K. has the same ones and she got hers as a wedding gift in 1974... Some of mine say buttercup federalist on the back and some say lemon federalist.
The tablecloth, candles, candle sticks, napkins are all thrift stores finds. The white salad dishes and goblets are from the dollar store....my all-time-favorite place to shop for dishes and glasses... They're usually "seconds" of name brands.
The rest of the place setting is "memory lane". When we did travel we didn't bring home souvenirs as such. I allowed myself one nice addition for the table from each trip. So when I set a table many memories return... The gold and clear glass bread plates were from an antique store in NZ.. The butter knives were from a market in Istanbul. The dessert forks were from Paris... The salt cellars from England. But my all-time-favorites are the cut-crystal knife rests I purchased in Amsterdam... Every time I use these special things I can remember that trip, the shop and even the weather at the time...
The one constant is my sterling silverware which I treasure because I bought it a setting at a time when I was still in high school... That was close to sixty years ago and a place setting was about $15 at the time and I was making fifty cents an hour working after school and Saturdays..
At a dinner 2 weeks ago one of the guests was allergic to wheat so I started looking at recipes for flourless chocolate. Most were baked in a water-bath and had 7-8 eggs but this recipe was so simple and easy. AND it was so delicious that I made it again for the dinner party last night.... I served it with fresh raspberries and a dollop of ice cream.... It's very "fudgy and rich"
Flourless Chocolate Cake
Gourmet November 1997
yield: Makes one 8-inch cake
Can be prepared in 45 minutes or less.
Ingredients
4 ounces fine-quality bittersweet chocolate (not unsweetened) (I just used chocolate chips...)
1 stick (1/2 cup) unsalted butter
3/4 cup sugar
3 large eggs
1/2 cup unsweetened cocoa powder plus additional for sprinkling
Preparation
Preheat oven to 375°F and butter an 8-inch round baking pan. Line bottom with a round of wax paper and butter paper.
Chop chocolate into small pieces. In a double boiler or metal bowl set over a saucepan of barely simmering water melt chocolate with butter, stirring, until smooth. Remove top of double boiler or bowl from heat and whisk sugar into chocolate mixture. Add eggs and whisk well. Sift 1/2 cup cocoa powder over chocolate mixture and whisk until just combined. Pour batter into pan and bake in middle of oven 25 minutes, or until top has formed a thin crust. Cool cake in pan on a rack 5 minutes and invert onto a serving plate.
Dust cake with additional cocoa powder and serve with sorbet if desired. (Cake keeps, after being cooled completely, in an airtight container, 1 week.)
http://www.epicurious.com/recipes/food/views/Flourless-Chocolate-Cake-14478#ixzz0iA3ddQC4
3/12/2010
Updates:
1. No lambs yet....I can only conclude that when I put Andy in with the girls in October they were not as eager to have him as he was to have them.... BUT they all are very pregnant so I just wait and watch.
Delicious list making
On occasion my HWCH is out of town for a week or more... Next week is one of those occasions....for 6 days.. I spend the week before making the list of things I want to do with ALL the extra time....For me extra time comes about for 3 reasons
1. I don't have to cook... I've already stocked up on frozen dinners for one.
2. I don't have to listen and make intelligent conversation which seems to take enormous amounts of time.
3. I can set up card tables everywhere and have several projects (aka messes) going at once. Without stopping to clean up or move things, I can go from project to project as the spirit or muse moves me...
Then there's the list..... It includes the funnest things possible... this time working on Cobi's stumpwork, piecing the alliance quilt entry, designing and stitching peacocks and some texture work on challenge block.... And since I need to dye some lace for the peacocks I might as well dye lace for the spider block and dye the BJP blocks.
Then there's the "have-to-dos" for the list like fix the gates to the small pastures, clean out tub drain, pay bills...etc.. None fun and certainly not negotiable.. Finally falling the bottom of the list are things that are negotiable ...like alterations, cleaning out refrigerator, etc... (nothing is mouldy yet.) Maybe if I can get DH to sit in the kitchen when he returns I can make intelligent conversation AND he can help me clean out the refrigerator...
And of course I will begin the search for the other door!!!!!
3/10/2010
Rita's encrusted block...
Since this block has to get all the way to Finland I was anxious to get it into the mail on Friday and I'm going to make it... I saved the bunny for last and put it into an art nouveau thicket. I had planned to try a couple new leaf treatments but the space was just too small... The stumpwork bunny was worked on felt like I do my birds... and his bum was padded a bit... But this bluebird was stitched directly on the block as it was an very smooth open space...
I also changed the color of the ribbon the bird was holding.. I just couldn't get the crystal rain drops to sparkle for the camera...
I have an aversion to long, strong seams that cut across a block from side to side as they just draw the eye across the block and off the other side... I always try to break the seam into sections visually and move the eye back into the block... I hope you can see the difference in the long seam treatment on the left and then on the right after I added the butterfly and button to break up the seam...
I used a lot of strong directional elements in this block to keep the eye moving around the block.. Even the daisies are arranged in a diagonal triangular shape to move the eye up through that patch....
3/09/2010
No Door, No More
I had an lovely, rustic, weathered door from the old milking side of the barn.(which later became the tea room).. It had to have been 80 years old and weighed more than 100 pounds... I had it on saw horses and walked by it many times a day... It was like a creative puzzle..."What to do with this fabulous, weathered old door?" It had been sitting there for about 20 years and I thought about it every single day... I thought of 100s of things to do with the old door as yard art but just not that perfect vision...
And every spring when HWCH prowled the garden for things to haul away, he wanted to haul away that door which he considered an eyesore rather than a treasure... Monday he caught me at a moment when I was particularly overwhelmed with all that needed to be done and about to go AGAIN to a radiologist for more steroids in my shoulder..and I said "Okay, if you save the hinges, you can take the door!"
So then when I came home from the doctor's the next day I went to the barn and passed NO DOOR on saw horses. I realized at that moment what an important talisman that door was to me. I went into the barn and sat on a bale of hay and cried....not just sniffles....I wailed. I wailed because my shoulder hurt. I wailed because I'm not young and strong anymore. I wailed because I don't have the energy and time to do all I want to do. I wailed for my lost door and because in all those years I did not take even one picture of my beloved door...
But when I was done wailing I knew in my heart the door truly was too heavy and big for me to handle any more and how great a treasure was it really if I let it sit there 20 years? I do need to work on getting rid all the old wheels, farm tools, and odd iron pieces (aka junk) I have tucked (hidden) everywhere. I need to be more realistic on what I can do and can't do anymore...and I need to find another old door......I might have another one hidden behind the lath area.... Not as good, but still an old weathered door... Then I'll hire me another "handy man" and do something with it... and I hung the rusty old hinges from the other door in my kitchen...
Puppy #8
Puppy #8 (aka Morris) and I are still communicating. It is now 5 weeks old and I can go see it at 6 weeks... I am still making calls though and would like to have a choice if possible. I do have a line on another puppy.
LouAnne asked about the breeder. It is Paula Bechler, Tirion Pembroke Welsh Corgis. She lives in Post Falls Idaho and was recommended by Claudette Longoria who is in charge of Corgi Rescue for our area. We have gotten two adult rescue corgis, including our new Molly, through her...
Over the years we have taken 5 other rescue dogs of other breeds but once we found Corgis we knew it was the breed that fitted us perfectly.... But this will probably be my last dog and I want it as a puppy so we can grow old together......
3/08/2010
Goldfinch - April BJP
While I was waiting for Rita's CQ RR blocks to arrive I was able to get a good start on my bird for the Bead Journal Project for April. All I have left to do is the background and I have some really odd, but nice, peachy matte beads for that. I have no idea where I got them...in some grab bag or whatever but they will work great on this block...
This goldfinch is from the same drawing I did for the Daffodil CQ block, just reversed. It was interesting to work up the same design with two different mediums. I think I'll do the same with the bluebird/morning glory drawing.
I have the birds chosen for the first 6 months but the list for the last six months changes every day or so... This week the Rufous-sided Towhees arrived and now I want them on the list. They are wildly funny to watch as they can scratch for seeds with BOTH feet at the same time..
3/07/2010
Rita's encrusted RR block
Now I get to the best part...the bunny!!! It will be in a thicket of sorts and I want to try doing leaves two ways I haven't done before.. The raised-leaf stitch on Kerry's site and the feather-stitch leaf on Janet's site.
I did add little crystal beads to the raindrops which helped a lot... and, now that I see it on the computer, I will probably add more beads and stitches to "ground" the daisies on the lower left... And I want to do one of Janet's bluebird with bullions by the lettering. And a little extra surprise or two......
My goal is to get it in the mail to Ritva in Finland by Thursday... I just might make it since I have lots of time sitting in waiting room at doctor's this week. Yuk!
3/06/2010
More bird garden progress photos
Remember this photo of the dreaded house the day I arrived... This (southeast corner) was the second area to be mulched and planted and here are a few photos over the years of this area... Among other things in this area there are wild roses, native plums, elderberry, bird cherry, mountain ash, junipers, pyracantha, black walnut, 3 spruce, 1 pine, willows, Clavey's Dwarf Honeysuckle (one of my very favorite shrubs) and species clematis...
This was a small floorless tack shed that was in terrible condition. I used the wood from the old corral to make a floor and gradually took off the side walls and added railings. After each wall was removed I expected it to collapse but it has lasted all these years... You can barely see it in the last photo in the progression and is a favorite shady spot on hot sunny days... In this area are lots of species roses, 1 spruce, several large maples. junipers, species clematis, and dozens of bird cherry trees.
This was the last area to be mulched and planted... I sacrificed a body part here....left index finger My husband always tells people his wife was not so skillful with the skill saw. Behind this area is where the forest is planted (5,246 trees). In this area is a flowering quince, a small-fruited crab apple, a long hedge of Clavey's dwarf honeysuckle shrubs, 1 acorn tree, bird cherry trees, lots of hip-producing species and Alba roses, honeysuckle vines and species clematis.
This is just 3 of 7 "zones" I planted... Besides the shrubs and trees mentioned are many, many drought-tolerant perennials... I wish I could say that this rose bower is still in good shape and standing. Last year we had 10 feet of snow and it collapsed. We were so busy keeping snow off the roofs of the buildings that this was not on the "to save" list.... Now it is a huge mound of lumber, roses and vines... Someone else will have to deal with it after I'm gone....
See Installment 3 below...
3/05/2010
Let the Mulching Begin
My March bead journal project is the Red-breasted Nuthatch. We also have Pygmy Nuthatches.It's a spritely tiny bird and one of my favorites to watch at the feeder. Also this is the third installment of the saga of my garden for the birds..
Let the Mulching Begin
As mentioned earlier Spokane is semi-arid with 12-14” of moisture for the entire year and most of that is in the winter… It is not uncommon for us to go 80-90 days without rain during the summer. So if I wanted to have a bird garden without supplemental watering I simply had to mulch. My first impulse was to rush about planting here and there… a waste of time, energy and money. I decided to focus on 200-300 square feet each year and just put blinders on to the rest of the area…
So an area was covered with carpet or plastic and then about 4-6” of shredded cedar bark. My husband would put the bark out in piles and then I would rake it out, cut holes and plant small seedlings and run a drip to it that I could turn on at night. Each year I added another area while the earlier ones became established and then I moved the drip to the new area.
This picture I took last fall from the back side of that same area.. I will have to take a new picture this spring. Some of the things planted for birds in just this area include wild roses, hawthorn tree, crab apple trees, junipers. apple tree, pine trees. pyracantha, elderberry, mulberry, bird cherry trees...just to name a few
As mentioned earlier Spokane is semi-arid with 12-14” of moisture for the entire year and most of that is in the winter… It is not uncommon for us to go 80-90 days without rain during the summer. So if I wanted to have a bird garden without supplemental watering I simply had to mulch. My first impulse was to rush about planting here and there… a waste of time, energy and money. I decided to focus on 200-300 square feet each year and just put blinders on to the rest of the area…
Then what to use? Without a doubt my favorite ground cover material is old carpet….fairly easy to come by if you put the word out. Because of high landfill fees, one carpet installer was glad to give me the old carpet as he installed new carpet. … I did require it in larger pieces than he usually cut as he removed it. I was especially happy to get brown/gray carpet but settled for any color… (photo also shows organic fertilizer – deer droppings) If I didn't have enough carpet I used rolls of heavy black plastic, which I perforated with a pitchfork so the ground could breathe. With either the carpet or plastic it had to be covered with another layer.
At the time I was doing this there was an embargo on imported lumber so cedar mills nearby were operating full tilt. Shredded cedar bark was perfect for me as it knitted together and never rotted… Landscapers didn’t want it and the mills were anxious to dispose of it so it was incredibly cheap and I bought it by the dump truck loads. I credit my Garden Witch with this fortuitous chain of events because once the embargo was lifted a few years later, the mills quit running and shredded cedar bark was unavailable at any price. I ordered piles of bark like this every year for six years before I had the garden covered...
So an area was covered with carpet or plastic and then about 4-6” of shredded cedar bark. My husband would put the bark out in piles and then I would rake it out, cut holes and plant small seedlings and run a drip to it that I could turn on at night. Each year I added another area while the earlier ones became established and then I moved the drip to the new area.
Pictures are of the very first area I planted by the drive as it progressed over the years... It is now bird heaven. It is this critical step of mulching that has kept the garden thriving for 30 years. The original carpet or plastic are intact and the bark is still in place plus years of leaves falling has added to the mulch beautifully
This was after it was beginning to take hold...
This picture I took last fall from the back side of that same area.. I will have to take a new picture this spring. Some of the things planted for birds in just this area include wild roses, hawthorn tree, crab apple trees, junipers. apple tree, pine trees. pyracantha, elderberry, mulberry, bird cherry trees...just to name a few
Labels:
Bead Journal Project,
garden,
Gerry's Journal,
installments
Bin Control
Ahhh! Seems like only yesterday...... well maybe the day before that I was so smug about slashing my stash into one bin..... Well it so happened I had to pass my favorite thrift store on my way to the doctor yesterday...
Bought just a few treasures...The ties are not a big problem as they go right into my Alliance quilt bag. The patterned one is a silk Bill Blass and has all the perfect colors for that project..so they take up no bin space... Found a pair of "sun" earrings...no problem... On the lower right is a chiffon blouse, which when beaded, will be perfect for my "Garden Good Witch" gown.. Again no bin problem as it goes into witch bag.
But the lovely black and beige is an entire dress. It coordinates beautifully with a whole collection of browns, blacks, and rusts that I am saving.... But a bin problem because of the size... I will have to be strong and cut it up.... The puffy white top makes fabulous flowers and I can dye it.. Had some red like it once and shared it with Cathy... I want all of it...
Years ago when we were first married my husband pronounced that he was limiting his wine intake to one glass a day... He has stuck to it for the most part but over the years I noticed that he kept buying bigger wine glasses... I've decided to follow his lead and the next time I am out I'm going to buy a BIGGER BIN!!!
Two post day...read on!
Subscribe to:
Posts (Atom)
Popular Posts
-
Pigtails and Quilts is having a "Crazy Quilts are Quilts Too" celebrating crazy quilting and I'm pleased to be participatin...
-
Remember the soutache jewelry from the other day... Well I have a huge hug and thank you for Jocelyne Ausseil who found this fantastic tuto...
-
Marilyn Nepper in Canada really got busy on her computer and found some great sites with even greater instructions... She even found ...
-
Addendum: Here are a couple websites with tutorials... http://historicalsewing.com/pleated-trim-jazz-your-victorian-neckline https...