12/22/2016

From great-great- grandmother to.....


I started this piece in 2010 when I ran across this picture of my grandmother  and my granddaughter at the same age and realized how much the world had changed for a young woman.  My granddaughter had college, travel and a chance to make decisions about the future.  At the same age her great-great-grandmother Margaret had to quit school as her father had arranged a marriage for her to a farmer 20 years her senior. Her mother had died when she was very young and her father thought he was providing a secure future for her. She had 4 children in rapid succession found farm life with a stern German immigrant unbearable.

In her day one of the few ways young women had to communicate was with a fan… The  difference between their lives was as great as the difference between the fan language and the cell phone.  Thus the inspiration of this piece of needlework.
I waited until my granddaughter had finally settled and has her own home to give her this for Christmas.

I actually disassembled a cell phone to put the numbers on this piece so you can  see how even cell phones have changed since 2010.  The text message on the phone roughly translates   

Dear great-great granddaughter Madi,
 
Your life is so awesome.  Between you
and me, you are so lucky.  You go girl. 
But “TGAL”think globally, act locally
as even the smallest things you do affect everyone.
From the bottom of my heart I love you.
Love,
Great great grandmother Margaret…
 
I wanted the colors to make a transition from somber and dark to vibrant and light. I stitched the  opposing corners first and the hand pieced the transition colors.


If you didn't notice, take a second look and check out the variety of fans I created and I   had some great seams on this piece.. You can see at this point of construction that I put down ribbons and trim over seams and then embellish them.

12/18/2016

What to do with tips and tutorials

 
This tiny fan ornament is only about 3" across at its widest point... impossible to cut and sew such tiny pieces so I devised a easy was to do it...
This was for the Needlework Guild Christmas ornament exchange about 7-8 years ago... I ran across this tutorial while looking for something else and realized that these instructions REALLY needed editing and clarification. It wasn't even labeled as a tutorial....  

Lisa Boni said I should gather up all my tips and tutorials and put them in a book and I find I have over 100 posts that would fall into these categories..  No book but I will start going back through the blog and organize and update these and make an index....

These are the old instructions and   really need  more pictures and explanation and maybe someone could use it for 2017...  So sometime soon I will redo it and add a pattern.  This would make a great mini workshop for CQ beginners.

Rather than cut out tiny fan pieces I drew the fan on muslin and did it "flip & stitch" working from the back and trimming as I went.... much easier... I  embellished with beads, added SRE and lace...
I also ended up with a nice pile of "crumbs" of these fabrics

12/08/2016

Gnocchi triumph and dismal Downton Abbey

For years and years I've tried various gnocchi (little potato dumplings) recipes and they have always turned out gummy, dense, and rubbery... practically inedible but I keep trying because good gnocchi is a culinary delight.  Fluffy, tender, and delicious.... they should be   cloud-like, holding their shape just long enough to dissolve on your tongue—

   I mentioned last post I was going to try beet gnocchi...  So last night I searched the internet for tips on gnocchi... First what potato ...definitely divided opinions between russets and Yukon gold.  Mute point since I only had Yukon Gold. Egg or no eggs.  Recipes varied...2 eggs, 1 egg, 1 egg yolk or no egg... But one site recommended the 1 yolk for beginners so decided to start there...  The most informative site covered everything.

Recipes were also divided on whether to bake or boil potatoes..  My recipe called for baking and then cooling to peel.  But I remembered Cristina said it was most important to work with them hot.  I roasted the beets, peeled and put them in the food processor.  All the beet gnocchi recipes called for a 2-1   ratio of potatoes put through a ricer and   beets.

Here I'm ready to roll out the long tubes to cut the little individual dumplings..  I really felt I needed more flour at this point but I was paranoid about adding too much.  Next time I will add a bit more flour at this point to have a firmer dough.. But the color is gorgeous.

I cut them, dropped them in boiling water until they rose to the top, and then sautéed them in brown butter... and they were definitely "cloud-like" and  delicious.  Also the color was so pretty with the fish.   The shape needs working on but next time with a little extra flour I can solve that problem...  No more gummy, dense, rubbery gnocchi.  The coleslaw was a happy accident... I only had half a small head of leftover cabbage so added  a leftover piece of celeriac and they were perfect together with some mandarin orange and baby kale added.

Everyone has always urged me to watch Downton Abbey, telling me that I would just love it... So last month I started and managed to get through the first 8 episodes but the cast went from one disaster and crisis to another and I found it terribly depressing.. Just when I thought their lives couldn't get worse, the war started.. That was it!!!I knew I could never get through all the seasons... so I skipped to the last 3 episodes in the last season and got to the happy stuff...requited love, marriages and babies.. But I do admit that Maggie Smith was a treasure... I will continue the recipe site though.
This cartoon really summed it up...and I'm back to the food channel.

12/06/2016

Culinary tidbits and a squash bomb!!!!

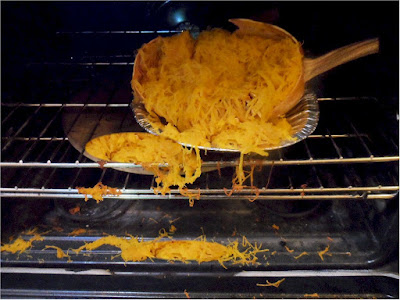
I hate trying to peel or cut up a squash so for the last 60 years I have prepared squash the same way... baking it whole.  I stick the whole squash in the oven on a low temperature and when I can pierce the skin with a fork, I remove it, easily cut it in half and scoop out seeds and pulp... works like a charm... But yesterday I was roasting a squash in this manner and heard a big KABOOM and found this mess in my oven... I just shut the oven door and hoping the next time I open it the mess will have disappeared.
Obviously from now on I will wrap the squash in foil first. I had laundry baskets full of squash from the garden this year and I bake one every few days as a treat for the chickens...they just love it...


 The only TV I have is in my workroom and I have it on when I paint buttons so I really only listen to it....and it is mostly on the food channel and invariably I'm inspired to cook something different.  Just recently it was seedless red grapes which I love.  But a chef roasted them and served them with salmon and a cream sauce..... I had never thought to roast them but they were absolutely delicious. It made me think of other ways to use them and with roast pork came to mind first. But  Epicurious magazine has a whole web page on ways to use roasted grapes.  I will definitely try them on crostini with ricotta or goat cheese but what sounded the best was warm roasted red grapes on ice cream... I can almost taste the warm sweet grapes on cold ice cream......

In my freezer I have a lot of rockfish  from my son ...  It is a white fish and I usually serve it with roasted sweet potatoes but am always looking for an alternate side dish that is colorful and I want to try one I saw on TV yesterday.  It's a dish from northern Italy .... beet gnocchi with brown butter and sage.

I have to admit two things.... first I absolutely love gnocchi and second I fail miserably every time I make it.  My dear friend Cristina makes gnocchi that is light and fluffy and melts in your mouth.  Mine is more like gummy lumps of dough..  but I keep trying.  Cristina even gave me a lesson on gnocchi one Sunday and shared all her tips.  I blogged about it several years ago.

I love it when she sends me home with a bag of frozen gnocchi but she is wintering in California so I'm on my own.  This recipe calls for an egg and Cristina would laugh as she says only Americans put an egg in gnocchi..  I roasted the beets yesterday and think I will give it a try tomorrow.  Wish me luck....

12/02/2016

Merry Christmas

If you are doing a Christmas CQ project and need a friendly Santa, I just finished a very few one-of-a-kind that might be just what you need.  They are large...almost 2" and could even be made into an ornament.  Check them out https://www.etsy.com/shop/olderrose

With my peripheral vision and my super magnifying lamp I can still paint buttons for which I am so grateful.  I haven't had any luck trying to stitch under it.... I think the difference is just having to try to focus on such a tiny area and minimal movement.


In case you are interested I have added a coupon code for free shipping on orders of $24 or more in the US.

11/28/2016

Lace, lace, lace everywhere

 Well all the lace is cut, positioned and pinned in place.  All that remains is the sewing it by hand to the bobbinette (cotton tulle) which I figure will take probably most of December....unfortunately this is not a take along project.

Sleeves to the left.  It did make a dent in my supply of laces but not enough for me not to be thinking of other lace projects when I get this done.


I found some cool lace bags that used lace scraps not big
enough for garment construction.


It's not that this lace obsession is anything new.  My kitchen is lace free but every other room is festooned with lace everywhere and I never tire of it.....  Here are just a few examples.

11/24/2016

The future for my curtains.....

I have been collecting photos of garments constructed of lace.  This was very popular in Victorian times for dresses, blouses and jackets.  When I refer to trying for a "structured" look, this is what I mean.  The laces are balanced, repeated and symmetrical.

I just love the little ruffle on the cap of this sleeve and am going to add that to my sleeves tomorrow.


Often the laces were combined with delicate cottons and I may use that later if I start running out of laces....


And not only delicate laces were used...many were very strong and bold laces.  I have a fairly goodly amount of these kind of laces.


 I just don't see myself running out of laces because I haven't even considered the table linens with lace.  I actually have this table cloth and it never occurred to me to use it.  I do still use this one and do iron it.  I have it in two sizes though and could probably part with one.


I also have this tablecloth..  I'd never cut it up to make bloomers but it would be a beautiful jacket.  I haven't used it in years and probably never will again and how many people would want to iron it..?


But what I want to use some day  and do have  are my bedroom curtains.  I just love them and there are yards and yards of lace in them...very nice lace indeed..  As long as we live here I could never bear to cut them up but occasionally when I look at them, this is what I see...


A dressing gown.  I grew up in the era of Myna Loy, Rita Heyward, etc. when they wore   elegant dressing gowns and lounged on a chaise drinking their morning tea, taking phone calls and planning their day....  I could see myself wearing my curtains made into a dressing gown such as this... yes indeed..  maybe in a senior home but elegantly dressed...I don't think they have chaise lounges in senior units..I will have to watch for one at a thrift store and put it in the barn...


This exquisite dressing gown is from around 1900 and part of an exhibit on lingerie.


Here are a couple more from that era...

 
Oh how I can just picture myself in my dressing gown (old curtains) on my lounge.


.

Observation and progress on lace jacket

Not knowing exactly where to start, I opted for starting at the bottom and am using an approximately 1/4" running stitch.  I left the tulle pinned to the freezer paper pattern to ensure it kept the shape.   I leave it laying flat on the table as I stitch and move the table -not the piece- as I stitch... easily done working on a card table.

I was worried it would be difficult stitching the lace to the tulle without catching the paper as I stitched. BUT IT HAS NOT BEEN A PROBLEM AT ALL!!!! I have been able to run the stitches through all layers of the lace and tulle with ease.  When the needle hits the paper it glides right over it..  probably because the freezer paper has a coating on it... Anyway it is working beautifully. 

As I said in the beginning I wanted this first project to be more structured (more Victorian)  than random (BoHo) with the laces and luckily I have enough laces to do that.  I have another pattern to make another jacket and I want it to be VERY random.  But I am loving this look so far.  The laces are just so beautiful.

From the back the stitching is virtually invisible on the tulle.
Repeatedly I say thank you, thank you, thank you to Shirlee for giving this tulle... it is perfect.


Unintentionally I was keeping the laces pretty close in hue and never realized it until I added  this piece to the curve in the armhole.  Not only did it stand out as very different in color, I had to chuckle as the placement made it look like an underarm stain.

Even though I am only stitching on the back so far, I have the front sections laid out on another table and rearrange pieces every time I walk by... moving and adding and removing.  At the moment there still are too many awkward spots on the fronts so I will just keep fussing with it.. Today I will also set up a third card table and start the same process with the sleeves.

Wherever there are raw cut edges of lace that I can't conceal I use narrow pieces of lace to embellish the juncture.  I can see the stitching will be easy and mindless and will go rather quickly.  I had initially thought this project to take months but now I am thinking weeks.

By far the slowest and most time consuming part is laying out the laces...but the funnest part also.... how can playing with lace NOT be fun.

This project is also perfect because I really don't have to see the stitches at all.  I stitch instinctively following the shapes of the laces.  Very easy on the eye.

11/22/2016

Lace Garment Construction

I did cut out all parts in freezer paper and how have an approximate idea of where I want to use what laces and how.  This will be the back.  I like using the square piece as I like the straight edges.  I wasn't liking  the look of too many round doilies overlapping.  So far nothing is stitched or even pinned but I hope to get started today....and where to start????


This is one section of the front with a rough layout.  I am not only trying to contrast designs but texture as well..


On the sleeve I want to use mostly very wide lace edgings because I have so many of those and they were too heavy for CQ work.. The biggest problem is when I get an idea where I want to use a piece and it doesn't fit.. Hard to let go and change directions... No matter how hard I try....if it doesn't fit, it will never fit.


And as I am working I keep thinking about alternatives to the cotton tulle as a ground.  Poked around in the barn this morning and found two possibilities.  The top is from an old wedding dress but is sturdy enough and subtle enough that it might work.  The bottom is from a lace curtain and I have used it often as a ground when making lace journal covers and it worked beautifully.   I have a established route when hitting a thrift store..... office supplies, dishes, aprons, linens, lamps, clothing etc.  but now I'm going to add curtains to the list because I think I will be making more things from recycled lace.


I posted a thing on Facebook the other day on the benefit of walking in the woods and Morris and I are trying to do it as often as possible as long as the weather is so nice.  Even though he was just there the day before, he still has to smell every blade of grass.  I love to remember planting these trees in 1995 and they were only 6" seedlings (all 5247).  I remember how excited I was at each milestone...when they reached my knees, were taller than me, the first pine cone etc.


This year has broken all records for the amount of rain.. Ordinarily this time of year the pine needles crunch under my step but this year they are soft and spongy and mushrooms are everywhere.

My recent bone scan showed more thinning of the bone in my hips and spine so I'm amping up my walking and saw that dancing is a great weight bearing exercise... so I have been putting honky tonk radio on Pandora and dancing all over the house.  I have to put Morris outside as he finds the sight of me dancing very stressful and barks nonstop...

11/20/2016

Cotton Tulle and laces....

I am committed and on my way.... First I knew I had to have some type of ground fabric under the lace.  I considered nylon tulle or a sheer cotton of some type.  I didn't have a clue what would work best but I knew that tambour artist, Shirlee Fassell would be able to tell me.  Sure enough she told me what I needed was cotton tulle or better known as bobbinette.  It was what is used for lace garments in the haute couture  fashion industry.  But as I searched for cotton tulle on the internet I soon discovered that there was only ONE source (Mood Designer Fabrics) and it is $39.99 a yard plus shipping.  In fact there is only one factory in Europe that even makes it.  Dharma used to carry it but does not have a current source.

Mary Corbet on Needles 'n Thread wrote a fascinating article about it and what makes it so unique - "Cotton Tulle - there's a big difference." According to Mary with cotton tulle the interlocking cotton threads that make each hexagon create  a strong (very strong) tulle suitable for all kinds of fine needlework techniques. According to Mary the inexpensive, widely-available nylon tulle on the market today does not stand up well to embroidery and other needlework techniques.    I love Mary's site and I always go there when I want reliable information on any technique.

Luckily for me Shirlee Fassell had a piece she was never going to use and sent it to me and I am so grateful.  I have not found any information on how to construct a lace garment and so I am making it up as I go along.  Do I have a plan... well yes sorta but it is subject to change at any moment...

First I picked this pattern... Butterick 5789..  It has simple lines and I like the irregular hemline.  I used this same pattern without the sleeve for my Houston vest and it comes in  large sizes.


Then I cut the pattern full size out of freezer paper and covered it with a layer of my precious cotton tulle.

I think I will just barely have enough tulle for this project and will lay it out carefully... I may have to piece some of it together.  Shirlee had a source which told her it is usually used in two layers with the grains in opposite directions but I don't have enough for that.

Now the fun part starts and I think the most time consuming as I am feeling my way here... I can see right away the large doily at the top is too large and I'll cut it in half and use it on the front.  I was just going to lay out the back first...but now I will cut all pieces and work on them simultaneously. I'll have to set up more card tables.


Some laces still will need to be antiqued.  I want to include narrower laces as well as I have a nice collection of those  and just don't want all doilies...  Stay tuned as this is going to take a while...
Related Posts Plugin for WordPress, Blogger...

Popular Posts