 Karrin's stumpwork block: Remember my saying I needed to add a strong vertical element on the right to balance all the vertical elements on the left. I decided to do that with a bird house. The birdhouse was stitched on felt and shaped around a very firm sponge so it extends about 3/8". The vine of the climbing rose is long bullions and the pole is dimensional also. Now to do my whimsical surprise and finish some detail work.
7/02/2010
WIP on Karrin's and Ritva's blocks
Karrin's stumpwork block: Remember my saying I needed to add a strong vertical element on the right to balance all the vertical elements on the left. I decided to do that with a bird house. The birdhouse was stitched on felt and shaped around a very firm sponge so it extends about 3/8". The vine of the climbing rose is long bullions and the pole is dimensional also. Now to do my whimsical surprise and finish some detail work.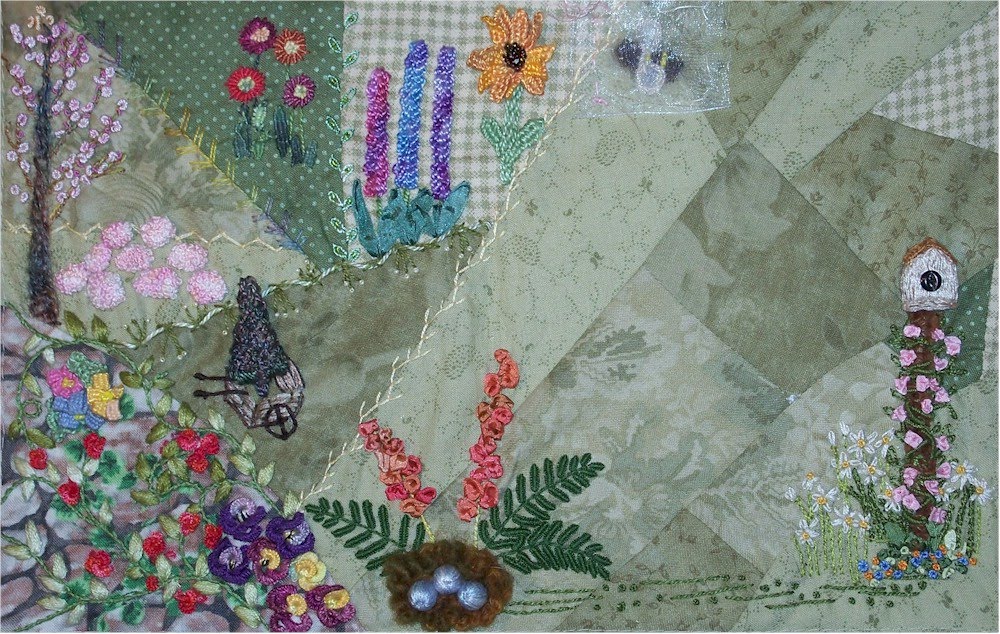


6/29/2010
Header tutorial --- last post in tutorial
Yesterday I mentioned Photoshop 7.. If you can find someone with a even an earlier version that they would give you, it would be even better. Each new version gets more complex... The program I use is at least 20 years old and quite simple...
Several have asked how I do my headers and it just so happens I recently decided (again) that I might update my website so I was working on one and also I just did a header for my son's blog... I will show steps for both..THIS IS REALLY JUST CUT AND PASTE. I did it on the computer but it can be done just as easily on paper and scanned onto a cd... Check out the scrapbook dept of hobby stores... They have endless fun things that you can either use for "cut and paste" or scan into your computer...
Occasionally I use the palette tools to sketch a plan for a block but two of the tools I use all the time... One is an eraser which make any area you erase transparent.... The other tool is actually called a "Smear" and looked like a finger... But it blends and blurs colors together. Great for touching up and blending where you butt things together...
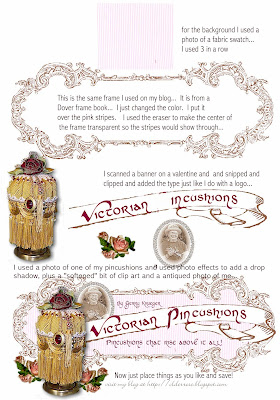 Click to read text: The last step was just to tuck things here and there... Snip and tuck!!
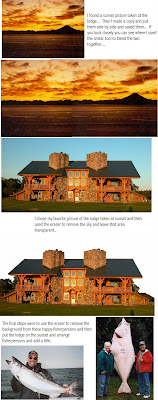 Click to read text:
Several have asked how I do my headers and it just so happens I recently decided (again) that I might update my website so I was working on one and also I just did a header for my son's blog... I will show steps for both..THIS IS REALLY JUST CUT AND PASTE. I did it on the computer but it can be done just as easily on paper and scanned onto a cd... Check out the scrapbook dept of hobby stores... They have endless fun things that you can either use for "cut and paste" or scan into your computer...
Occasionally I use the palette tools to sketch a plan for a block but two of the tools I use all the time... One is an eraser which make any area you erase transparent.... The other tool is actually called a "Smear" and looked like a finger... But it blends and blurs colors together. Great for touching up and blending where you butt things together...

 Click to read text: The last step was just to tuck things here and there... Snip and tuck!!
 Click to read text:
So you can use your own photos to make your header without any clipart at all. Snip and tuck!! You can see this header full size at http://deepcreekfishingclub.blogspot.com/
 If you actually do this "cut and paste" I would recommend taking it to good copy shop and get it copied on photo quality paper and also put on a CD. In the days before computers we did everything that way... So there you are....end of tutorial.... Please let me know if you found it informative?
 If you actually do this "cut and paste" I would recommend taking it to good copy shop and get it copied on photo quality paper and also put on a CD. In the days before computers we did everything that way... So there you are....end of tutorial.... Please let me know if you found it informative?
 6/28/2010
Logo Design Tutorial -part 3
 Before I start on anything else... I repeat....... you can do all this by cut and paste if you do not have a program such as photoshop..... BUT Photoshop 7 (New Version 8 is out) is still available at Amazon for $42.99 or less... It is the old version and perfectly good for anything I would ever want to do... So if you are thinking of exploring this, do buy now as they will be gone soon and it's a real bargain as the New Version 8 is much more expensive....
 While you are buying it get "Photoshop 7 for Dummies." for as little as $4.28.... I learned my program with a "Dummies" book doing one chapter at a time and practicing...
So for less than $50 you can get software and manual that will you can use creatively forever.
 Now that I've covered finding a type font you like, try combining several different ones as I did in Ati's logo... Each word is a different font... "Ati's" is Amazone, "little" is Wretched and "world" is Mordred. You can even have 2 or more fonts in one word... Just play, play, play around with it...
And I've also added a decorative element..See if you recognize it as we go on..
 I just can't recommend Dover publications highly enough and most now come with CDs to put it right on your computer. But when you look at their copyright free art keep in mind that it can be used in parts and try to visualize the parts separately.
For example... I just used part of this illustration... one I put a black frame around


With this one I used different parts in different ways and different directions.

 With this one I cut out more and more and turned it until it ended on Ati's logo...
 Do the same with colors pieces like this rose motif... Using parts changes it entirely and makes it look less like clip art. (to me anyway)
Finally even the most fundamental photo programs allow you a lot of options and photoshop even more.
 #1 is the original and the others are at least one special effect or more... #2 has a soft glow added. #4 is antiqued #6 is antiqued and a soft glow added. A grainy texture is added to #3. etc. etc.
And remember SNIP AND TUCK.... any decorative element needs to be tucked into the lettering and design.......
Several readers asked about how I did my header so I will add one more post in a few days to show that.
6/27/2010
Cathy K.'s Art Nouveau 1 block
 Painted a dragonfly button using Adirondack Inks..... there's a lot of gold on the button but it doesn't show because of the reflection.....It's off to Hideko in Japan tomorrow...
6/26/2010
Big week for Morris
 Getting a picture of Morris isn't easy... When I approach with a camera he immediately rushes up to put his nose on the lens...I wanted a profile so I tried to catch him unaware... well almost!!!
This has been an eventful week... Morris graduated from Puppy Kindergarten and was the star of the class. Our next class level starts in Sept... And then one day this week he fell in the pond and was a total mess ....he won't go near it now.
At least once or twice a year we get a visit from skunks trying to dig under our house... We get a Dept. of Wildlife live-animal trap and bait it with sardines... Every dog we've had has succumbed to temptation ONCE!
Today it was Morris.... but since he was trapped he decided he might as well eat the sardines....and followed that by eating the paper bowl..

Subscribe to:
Posts (Atom)

Popular Posts
-
 Pigtails and Quilts is having a "Crazy Quilts are Quilts Too" celebrating crazy quilting and I'm pleased to be participatin...
 -
 Remember the soutache jewelry from the other day... Well I have a huge hug and thank you for Jocelyne Ausseil who found this fantastic tuto...
 -
.jpg) Marilyn Nepper in Canada really got busy on her computer and found some great sites with even greater instructions... She even found ...
Marilyn Nepper in Canada really got busy on her computer and found some great sites with even greater instructions... She even found ... -
 Addendum: Here are a couple websites with tutorials... http://historicalsewing.com/pleated-trim-jazz-your-victorian-neckline https...