Button painting tutorial

2/26/2016

My jaws are tight....

 
I had a friend once who used that expression when she was upset about a situation that was better ignored than confronted... and this week my jaws have been tight.

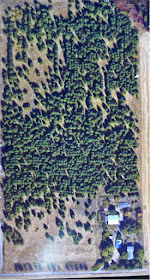
Twenty six years ago I planted over 5000 trees and have this 20 acre absolutely joyous forest... I walk in it most every day with the dogs and every day it is different.....the light, the smell, the wildlife, etc.

But all the snow is gone now and most if this week I have been picking up trash....yes! trash in my lovely forest.


I took this aerial photo of my forest from the  Google maps on the internet.  I check every few months as I love to watch it change.. You can see our house, barn etc. lower right.  The open space lower left were the sheep pastures.


And this Google's aerial photo is my neighbor's farm.   If it looks like this from a plane or satellite you can imagine what it is like close up.  Whenever we have a big wind storm lots of it blows into my forest.  So all this week I have been "forest cleaning" with tight jaws.


2/23/2016

Latest organizational solution.....

The only problem with crazy quilting is that it requires soooooooooo much stash and such a wide variety....and the long you do it the more stuff you accumulate.  I do like to be organized and love shallow drawers, bins and label but I am still constantly trying to get better organized.

When I have several projects going I keep them in ziplock bags for various parts and all go into a extra large ziplock and I was storing them   in wicker baskets which I could stack.. But I was still having to go through layers when I am working on several projects at once.  But now I think I have a good solution.  I buy these bulletin boards at the thrift stores when I find them...  I have been using them to block needlework and as a mini design walls...
But I have designated a board for a each project and when all the bags for that project on a board   it's easy to find just what I'm looking for.... and the boards stack against the wall taking up practically no floor space.  And since they are two-sided I can still use the back side for blocking.


Lately I have had some great solutions for keeping organized.... First was combining a revolving shoe rack with a floor lamp base to keep all my threads on rings... a system I admired at Judith Montano's and thought so clever. (although she has hers hanging on a wall which I do not have)  Now I did another for all my ribbons and love, love, love it.


The next one that really worked is keeping my ziplock bags organized in beverage carriers.  It is easy to sort them by height.  This works so marvelous that I wouldn't even look for another solution.  I've added another carrier and keep anything on a roll in it. 


My favorite and most beautiful are my bento boxes... sometimes called wedding boxes.  I got the first one at a thrift store and loved it so much I found two more on ebay.  Mine are just plastic so were only $10-12  apiece.  Again each set of boxes is for a specific project.  I keep threads in one tray, beads in one tray, and laces and trims in one tray.  When I want to clear the table I can do it easily and also move between projects easily with little mess.

I really like having several things going at once.  Sometimes I run our of ideas on a project or get tired of it and it helps to go to something else and come back refreshed with new enthusiasm. 

2/21/2016

The unbelievable beauty of thread


I belong to a couple Facebook  Crazy Quilt Groups (crazy quilt divas and crazy quilt international) and a new member, Marianne Hoeksema, posted her blocks recently and I just love them because of the all over stitching.  This style is seldom  done by American crazy quilters so I knew she had to be European or Australian.. and sure enough she was from the Netherlands.

I am always so caught up with my laces, trims, and other whimsy, I forget just what a wonderful medium that just thread is. 

When I did my rainbow vest to wear to Houston I only used thread and knew that at some time I wanted to explore this more and maybe the  CQJP2017 will be the perfect opportunity.


In CQJP2012 a stitcher from Austria used just thread and I kept photos of all her blocks... Her name was Claudia Weinwurm and she used to blog but hasn't for a couple years.  She did all types of embroidery but it was these "under the sea" blocks that are my favorites. 

You can still see more of her work on her blog but don't wait too long because inactive  blogs tend to disappear...


It was this all-over texture created with just thread that fascinates me and bring me to my favorite thread artist..  an Australian wildlife fiber artist Annemieke Mein...


She does lots of butterflies and other insects but it is her birds and frogs that I especially love.  Her works are huge and she uses a sewing machine but it is the thread that creates the magic.

There is a lot about her on the internet and she does have a gorgeous book if you are interested in seeing more.


2/18/2016

Finishing "Ala Allie"

There was a time that (like many other stitchers) when I was finishing a set of blocks I was content with adding a simple sashing, border and binding.  But since I have followed Allie Aller for the last few years I could never do that anymore.

Making a incredible focal piece is just a beginning for Allie.  Everything she adds to finish it not only coordinates with the piece, it enhances it and the entire project becomes grander with each addition and most important, it is all in harmony. 

 Her current piece of work has a wonderful floral piece as the center to which she added an embellished CQ border.  That  might be enough for an ordinary person...not Allie. She added another CQ border which would have been extraordinary by itself....not Allie.  She is now adding hundreds of leaves which will require additional hours to the finishing.  When Allie has a vision she never considers the extra work involved.  I so admire the way she finishes everything that now every time I am about to finish something I have conversations with Allie in my head.

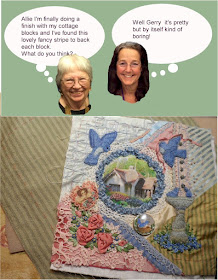
The cottage blocks I'm finishing into books is a case in point:


And I think the embellished backings will work beautifully with the cottage blocks especially since most of the blocks have a similar stripe in them... Now I just need to do 13 more...   Thank for the advice Allie!!!


2/14/2016

Getting back on track...................


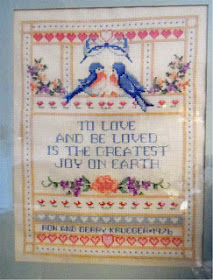
For those who weren't following or can't remember, my inspiration was this sampler I stitched when my husband and I were married in 1976.  I wanted to do a CQ to commemorate our 40th which is coming up this fall.  It was a difficult piece to carry about and in the last months of caring for my mother it was set aside.


I had this vintage tablecloth which had this lovely crocheted border but the linen in the center was stained and had hole.  So I decided  to cover it with a  foundation for this piece using vintage hankies..


I had gotten this far with it before I got sidetracked.  Two bluebirds morphed into 8 bluebirds.  I still have the charms and beads to add and lots of foliage to finish. But the end is in sight.


I had wanted from the beginning to back it with a soft blue moirĂ© taffeta which proved almost  impossible to find.  When I visited Susie W in January 2015 we scoured the garment district and fabric stores with no luck.  I did find a piece of blue silk the right color but I had my heart set on the taffeta.  I finally found a piece on line and used the silk on the corset blocks...

The camera greatly exaggerates the pattern of the moirĂ©.  It is really very subtle.  I had wanted to add some SRE in the indentation in the sides but again it is awkward to work on with a hoop and difficult to carry about at this stage of completion.

So I pinned the piece to the taffeta and basted around the indentation. I used the quilter tape so I didn't have to mark a line where to baste.  I did put a tailor's tack on one corner of the quilt and taffeta so when I reapply the quilt it will fit correctly..


When I remove the quilt I have the basted area marked and it will be easy to put in a hoop, carry about and add just a touch of SRE.  I would really like to have it finished and enter it in the fair this fall.  I have never entered a piece in the fair but this has special memories with every stitch...  Happy Valentine's Day...


2/13/2016

Thrift store tips for today!

 Don't forget to check the aisles with draperies, pillow shams and other bedding.  Not only do I find great cotton sheets for foundation fabric, I find yummy fancies in draperies and shams.

This was a drape and even though it is not, it has the look, feel and weight of a fine silk duponii and is the perfect color for backing the cottage blocks.


The cottage blocks were CQJP2014 and have been languishing.. I originally intended to make books of them then decided to make a quilt, then a book and then a quilt etc.  But finally it is a book again... for sure!  I got the pieces cut yesterday and made the images for the backing.  Plan to embellish backing with SRE and proverbs about home.

Update on thrift store shoe rack...  It is going to work great for my extra paints.
You see the arrow pointing to the black racks on a side table where I had been keeping them and all the space  beneath was wasted.  Now I can move the side table out and slide the shoe rack/paint caddy into place.  I will keep extra bushes and supplies in the bottom basket.  It wasn't tippy but I felt it needed a little more weight on the bottom.  So I added a barbell weight from a collection of thrift store weights I keep in the barn to hold down tarps etc.

The side table is actually one of my several wheeled bedside tables and my favorite one to use as a impromptu mobile ironing surface so I am glad to have it available again.

When we walked in the forest yesterday a heavy fog was moving in from the north when we started and completely enveloped us by the time we got to the house.  Usually the dogs romp about the forest, sniffing and peeing everywhere....but when the fog is heavy they stay close and creep along quietly.
AND when I got up this morning DH gave me a big hug and says "How's fubsy this morning?"  Grrrrrrrrrrrr....but the hug was really nice.


2/11/2016

My new name...


This posts is odds and ends.  First here are the rest of the goodies I got on Tues..  Some really nice laces...especially the red one.  It's hard to get a good red when you dye and I want to redo the Sendai block and this doily is perfect.  Also the little sparkly bird earrings are adorable for $1.50. 


Next DH belongs to a vocabulary website and they send him a word a day.  Yesterday the word was "fubsy" - English slang for short and stout...  Guess what???  It tickles him to call me fubsy but the humor of it is wearing thin quickly ...  There were four of us sitting at lunch today....all "fubsys"

It is with great difficulty that the song birds get any feed....  The mice, rabbits, chickens, squirrels,  turkeys and even the deer  all raid the feeders.  Now the great huge turkeys have taken to getting on top of the feeders. 

Then they can bend and stretch until they reach the seed... Soon though the turkeys will disappear to the forest to nest and lay their eggs.

The large nest you see in the tree behind the turkey in the first picture is a red-winged blackbird nest.  I watched them patiently build it as the wind was whipping the branches about. 


Right now my biggest problem is toteability which spell check says is not a word.  But when you want a project to carry in your sewing bag... it has to be "tote"able... right? The dream on cream blocks do not travel well.  I have several other projects in various states of completion but all need some prep work of some kind.  DH will be gone most of the next 3 days and I can make a huge mess and spend uninterrupted time getting the prep work done.

2/10/2016

February CQJP finished

Finished this cedar waxwing last night and will take a break from CQJP to reorganize and get other projects underway.. upcoming birds will be hummingbird, robin on nest, barn owl and swallow.


Hit the thrift shops yesterday and found a few treasures including another revolving shoe rack...What wonderful space savers and organizers they are.  This one is much nicer than the other one I used for thread and ribbon.  I will fix this one for paint bottles.  Who would ever use it for shoes??????

2/06/2016

So far so good.......

So far so good with Plan A..  Getting ready to position the waxwing and do more gold stuff. 


Last night's dinner.  Duck crepes with a plum sauce.  Happy Hubby!

2/04/2016

Having a "Ducky Day"

Cooking covers every emotion for me.  When I'm happy I cook up a storm and when I'm REALLY depressed I cook up even a bigger storm..  Along with my Morris book and tambourine I want to be buried in an apron and red shoes. 

Several years ago I decided to make a doll in my own image and here it is. I actually had a mirror on the table as I sculpted the face... The head is sculpted from paperclay... I love wearing red and probably have more red coats and red shoes than any normal person should have. So of course a doll in my own image had to have red shoes...
 
And today I am having a "ducky day."  I have duck parts brining in the frig, duck fatty bits rendering on the stove and  a duck carcass in the oven making broth for French onion soup.  I'm thinking of fixing the old greenhouse so I can raise a few ducks and geese this summer.  We had geese before and the coyotes got them so have to have something secure.
 
 I baked a plum tart first thing this morning and also found a recipe for "Uncle Bubba's Seafood Pot Pie" with a puff pastry crust...which I will try this week end.  It has crab (I will use halibut) shrimp, scallops and oysters.  (I will leave out the oysters) 
 
Here's a close up of the gourmet cake......not going to win any blue ribbon at the fair!!!!

2/02/2016

Fast, easy and painless piecing

(I combined  previous posts into this one.) I know many people love piecing blocks but for me it is a tedious chore at  best.  So whenever I am doing a batch I do a couple extra.  Since I have the whole mess out, it not that hard to do a couple more.  I keep a bag of the extras and sometimes I use them when I join a round robin or give them to a student to get them going...  I just want to get the blocks done as soon as I'm able and get to the fun part...

I've tried the Martha Green's crumb method,  Allie's curve method, and Judith Montano method's of piecing.  But I always go back to just paper piecing and mostly use the same pattern over and over... This time  I'm using  Sharon Boggin's block pattern - #28.  This means every single block is #28.  Once you rotate the blocks and embellish, no one ever notices that they are all the same pattern...  Believe me!!!! I  enlarged it a bit so I will have an 8" square block when done.  If want some advice on choosing a paper pattern I posted some here.

I don't even pay any attention to what colors are going to go where on a block when cutting.  Once I have my pile of fabrics I just start stacking and cutting at random ... trying to get as many different fabrics per patch as possible...  Then I will sorta deal them out at random, making any necessary adjustments.  Of course this works the best when you have a large selection of fabric like I did this time..


If you did a good job gathering fabrics which  are harmonious, it is nearly impossible to mess up from that point on.  If you look at your fabrics in a pile and like them, toss them around and still like them, they are going to look good on a block no matter what you do... This the "pile test".  I do this with trims with students even before they pick fabric because it you assemble a pile of trims that work together, you can work backwards and pick the fabric last..

Now I had several choices.. I could make blocks one each month, or in smaller batches or do all 12 at once.  Doing them all at once will give you a more consistent look if you plan to use them together.. I chose all at once because piecing is not my favorite and I wanted it over with.  Here is how I go about it.

Stach &  Wack:  I just stack random fabrics from the pile five at a time and cut.    Because I  am piecing 14 blocks I cut 14 assorted  fabric of each pattern piece.. no plan.   You can see the pile of patches on the left. I put up two card tables and laid out 14 squares of card stock paper.
Note: the card stock sheets act as a tray


Then I took a pile of each pattern piece and just randomly put it on a square in the right position. Trying not to put two of the same fabric adjacent to each other.


Until I had them all out... Then I stepped back and tweeked a few here and there.  I try to balance out color, value, and patterns at this point...I'm not too fussy.  I had a lot of   patches from paisley ties and I wanted some on each block..  This goes VERY fast because I try to not overthink this at this point...  Any goofs I make at this point can be dealt with when I start embellishing.

The pieces of card stock act like trays and I can just pile them up and head to the sewing machine.


I set a small folding table (old TV tray table) next to the sewing machine, put a towel and my little travel steam iron on it so I can press  seams without getting up.  And off I go with the pieces already on the paper trays  next to the machine.  I stitch all the 1s and 2s,, press...add all 3s press and so on


Within no time I have them 14 done.
Although I pressed seams as I went along, at this point they need a good press and put on a foundation but the piecing is done for the entire year..


These are very rich blocks in this winter pastel palette.  Lots of silk, taffetas, and velvets. Most of the silk patterned patches are from a day we hit a thrift store with an overstock of ties that were only 49 cents a piece.