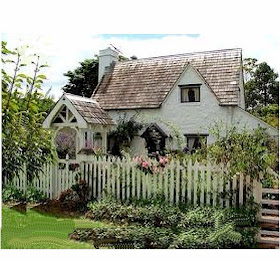
Actually you can do this with copies of an image and cut and paste then scan... (What we used to do in the old days before computers) OMG that dates me for sure. When I learned these tricks 35 years ago and it was all cut and paste with real photos and copies)
This is a precious cottage but if I cut it out in a circle I lose most of the foreground and some of the cottage... so here is how I solved that problem.. This works best with foliage, skies,water, etc.
I cut/copied off a sliver on each side of the photo. As you can see they are very narrow bits
Now the problem with this cottage in a circle is if I am able to get the arbor (which I adore) in the circle I will lose a lot of the cottage and I would have no foreground..
 So I cut/copied a silver just on the left and on the bottom to get more foreground and then when added, it looked like this. A more square shape.
And when I cut the circle I get this... I wait until I get the final circle shape cut to do the "blending" of the seam.
By copy/cutting slivers from both sides I can change the shape enough to get the cottage in a circle. One added twist to this one. Once I had the silver on the left cut out I flipped the image so it would look like the other side of the tree...
Again I will have to do a little more blending on the right but I do have a more square shape suitable for a circle...
And here is the result... I know most of you will think I AM crazy to take the time to fiddle with these photos and not give up and look for another shape or another photo..
But I love the photo editing which is a hobby by itself and indeed you are right, I AM more than a little crazy... You can watch for these cottages in my CQJP series and I hope you at least enjoy what goes on behind the screen (oops I should say scene) ....so to speak...
Later I will demonstrate doing some of the same technique with colored pencils just on the fabric or photo itself.... no photoshop.


This is great to know. I have been hoping someone would demonstrate a little of how they use photoshop in their work. I would also love to see how you work with words in photoshop to imbed in your blocks (if you do that).
ReplyDeleteThanks so much for explaining this. It was very helpful.
Maureen in Maryland
I wish I were more adept at using my very old version of Paint Shop Pro. I learned to do a couple of things that I needed for a project and then never went back to the tuts. And I have a version of Photoshop that my girlfriend gave me because they got a newer version before they even istalled this one. But I'm just not sure I'm willing to put in all the time required to learn how to use it. For now, I'd rather be stitching.
ReplyDeletePS. I Love the roof on the first cottage. Reminds me of Fable Cottage in Victoria, BC. I would love to live in a "hobbit" house - I've seen a couple of very neat homes made of ferro-cement with lots of curves in walls and such. Maybe in my next life....
It's interesting to see your process. All the cottages look wonderful in their transformations.
ReplyDeleteHi Gerry, not sure what version of PS you are using, but if you hit J - that is the shortcut for the bandaid tool, which is a great tool for touching up photos, and would work wonders on the bush in your last photo. You can choose to sample an area by holding alt and clicking within an area on your bush that would be a good source to add some replacement material with, and the program actually blends the edges together for you. In newer versions of photoshop, you don't even have to hold alt, it does the thinking for you, but I'm guessing you have an older version. Also, if you have a version that is so old that the bandaid tool is not present, hitting S for the clone stamp tool will work similarly but it will not automatically blend the edges for you, so it takes a little more work. Same deal, hold alt and click to define the source you are cloning from. Apologies if you are already familiar with all this, but I thought I would pass it on!
ReplyDeleteThis is a GREAT idea for circles!! Thanks for walking me through it.
ReplyDelete