Button painting tutorial

8/29/2010

Okay..Let's paint roses!

Now I've uploaded the tutorial in sections and you should be able to click to enlarge and print the sections you want.. hopefully..... I'll work on this some more this evening.... If you can't enlarge and print let me know.. My goal was to condense the tutorial part (part 3) to one printable work sheet to use as a guide.

Part 1.

Part. 2

Part 3.


These are examples of some rose buttons I painted and also some rejects of pins I used to paint. I included them because I wanted you to look closely and see all the dots (especially white dots) I added at the end... These dots add light and interest to the composition..

When you're done, spray your button with about 6 thin coats of a clear acrylic coating. I use Kryon's Crystal Clear. Then I put a little "Antique Gold" Rub n Buff on the edge of the button for a finishing touch. If I'm going to bead around the button I do it BEFORE I trim the felt. If you're not going to bead just trim the felt very close and taper cut under edge of button....
Remember blob...nub/knot....and concentric lines!!!!
Just keep going around the nub and build your rose and remember to keep dipping in different parts of your "streaky puddle."
If you try this please give me feedback so I can make necessary changes to the tutorial before I finalize it... Thanks... Gerry

8/27/2010

My work area is completely moveable...

I live in a small house and a room for sewing or crafting is just not an option so I work in the living/dining area and EVERYTHING is on wheels... I've shown this work area before which I use for crazy quilting and if we entertain or need the space, it all rolls into the laundry room.. It occupies a space of about 4x4'. The main star of this setup is the used hospital/home-care bedside table which I love... I increased the size of the table top by adding a larger piece of wood...and I'm thinking I might have to enlarge that just a bit... It's always full but I know if I had a 10' table, it would always be full also.. More space-more clutter. I used another one of these tables for my sewing machine and today I set up another one..

Before when I painted buttons I had paints and buttons covering our only eating area for days at a time. So since I am going to be painting lots of buttons to sell I set up this bedside table I found recently at a thrift store...


First I screwed 3 trays to the back to hold bottles of paint... I have lots of bottles of paints but I just pull what I need for the project I'm working on.
Then I screwed a measuring cup from my large laundry soap container to the table... Then another of the same measuring cup nests right into it and there is no spilled water.

This is one of the nicer tables and has a drawer which holds brushes, sanding block, whisk broom and pens.. I can just wheel it out when I want to paint and wheel it all back when finished and always be ready to go...
Since the buttons are only 1" in diameter, the work table is perfect for painting the buttons for my Etsy shop.. ...One nice thing about these tables is that, if necessary, I can raise them high enough to work comfortably standing up...

The tables could be prettier so maybe one of these days I will paint them ....watch for them to show up in my "If it's Ugly" section ...maybe this winter... Here's how I did the cabinet...

8/26/2010

I only said this was easy not quick.

I only said this was easy not quick. Don't laugh, I mean this literally. I generally do buttons over several days and several at a time because it's just as time consuming for ten as it is for one.. If you try to hurry the process you will never be happy with the results. Relax and do it in steps...You are not creating artistic wonders here just little buttons...Have fun!

In this part I'm going to discuss paints and techniques and the last part I will demonstrate roses that ANYONE can do.....in fact a couple ways.... Ever wonder why almost all the buttons for sale have roses painted on them? It's because roses are the easiest thing to paint on buttons..

Step 1. Prepare the button which we have covered.

Step 2. Doing the "base coat" for roses or birds or cottages or whatever..... This is when your button will look the absolute worst and when most people want to quit... I forbid you to become discouraged at the base coat stage... everything is blotchy, flat and really looks ugly....but it is a critical stage. Also at this point it is often best to dab in some background color for foliage etc.

Thin your paints...I use just water and cheap paint. Work in layers and let dry between layers. The end product will look much better if you use three thin layers rather than one thick layer of paint... Also after the base coat I let the button dry several hours, even overnight... You are working on a hard non-absorbent surface.... If you work over paint that is not completely dry (even if it feels dry) it can sometimes lift right off the surface... So speaking from experience I take my time between steps...

Step 3. Doing the detail over the base coat... The nice thing about acrylics is they're very forgiving and mistakes can be painted right over. If you make a mistake it best not to try to rub it off....just let it dry... Then you can paint over it or gently scrape it off with the tip of a exacto knife.


Here I smudged a red dot so I will let it dry and then paint over it...

The nice thing about working small is the lack of detail... so by using lots and lots of dots and general shapes you can fool about any one's eye.....


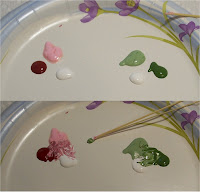
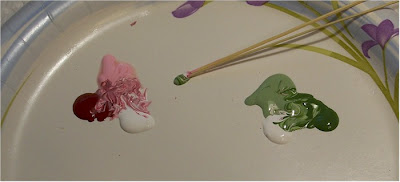
Here is the way I mix paints to use on the buttons and I highly recommend this technique.. For example: In a triangle I put a dab of a light green, a dark green and white with some space in the center of the little triangle... Then I take a straw from my whisk broom and make a puddle of the three colors in the middle of the triangle...DO NOT MIX WELL... leave it streaky... so every time you dip your brush you get a slightly different mix and never the same mix so you have a very painterly look with little effort or color knowledge.... Cheating? maybe....

You can use your spotter or liner for the dots. If you just lay your spotter or angular shader on it's side you can get a nice leaf shape... If you lay it on it's side and pull, you get a nice comma shape. The liner is super for lines, stems and long commas or eyebrow shapes... When you are working with a liner I find it easier to pull the line toward me even if it means turning your button upside down...

If you are unfamiliar with brushes I recommend you take some time practicing with each brush...especially making dots... I make more dots than anything else in painting my buttons... You need to develop a VERY light touch to make tiny dots. This is not artistic talent ...just practice. Being able to make tiny dots is the key to success... So play with your brushes and make 100 tiny tiny dots..... I'll also cover in the next part the final finishing touches.. and we paint!!!!!

8/25/2010

The Big Giveaway.....official prizes and rules...


PRIZE # 1.... One of my "Rise Above it All" pincushions.... This one is blue velvet and lavishly embellished with a vintage brooch and beads, jewels and trims....... plus a tiny locket... It is 8" tall with a weighted silver base. It will never get lost in your stash.

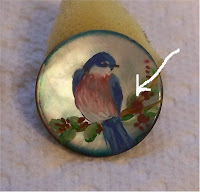
PRIZE #2..... Keeping with the blue theme, a trio of bluebirds hand-painted my me... Since these are antique mother-of-pearl buttons they are especially luminous and reflect every light source in the room..... thus are very difficult to photograph.. They are only 1" in diameter and have a metal shank in back... Although difficult to tell in the photo they are edged with gold...


Leave a comment on this post and you will be entered in the give-away. You can make a request for either one of the prizes or be willing to accept either... It goes without saying I would love it if you became a follower and visited often. Also make sure I have an email address to contact you - some of you don't have blogs or a published email, and I can't award a prize if I can't contact you!! If you don't specify which prize, I'll just randomly assign you to one of the prizes.

If you mention my blog and the give-away - and post a picture on your blog, you get another entry. Just let me know on this post that you've linked (I will check it out and add you to my blog list) and which prize drawing you'd like to be entered in for your second entry. That's it - maximum two entries per person.

DEADLINE - Tuesday, August 31 at midnight, Pacific Standard Time. I'll go through everything and announced the winners the next day... I figure that is about the time for my 700th post..... I really hope this all works and I'm especially thankful for advice from Pat Winter, Cathy Kizerian, and Kerry Leslie who always have great giveaways.... Help me out here and tell your friends....

Update: The headache and vision problems (blurred and double) seem to be abating and my ribs only hurt when I breathe....

8/24/2010

Button Painting -Part 2 - Post # 695


I've done this tutorial twice before but now that we can add pages to our blog I'm updating it and when finished I will put it all on it's own page..

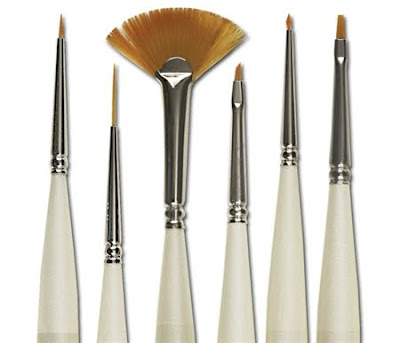
BRUSHES: You'll never have any great amount of success unless you have really tiny brushes... It is confusing to stand in front of the brush section of an art or hobby store because there are so many sizes and styles. I don't recommend buying a set like on the left because you just won't use all of them and you'd be better off buying extra of the brushes that you will use all the time.
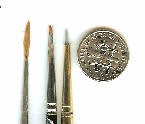
Lots of sites and stores sell sets of mini-brushes with 6-15 types in a set but I only use three types.... All are 10/0 which means ten zeros.... brushes smaller than that are hard to find....

1. Liner...a long thin brush.... My favorite is American Painter 4350 10/0 but any 10/0 liner will do... A liner is indispensable for fine detail on stems, feathers, flowers, etc.
2. Spotter...a small round with a delicate point..... My favorite is American Painter 4650 10/0 Since you are working so small it is really cheating with dots for lots of the detail... And that is what a "Spotter" is made for.... making dots... If you make enough dots your work will be fantastic....

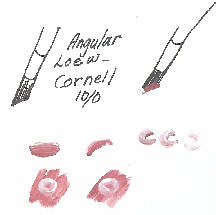
3. Angular Shader... A favorite with tole painters, this brush requires a little practice to use to your best advantage... You could get along just fine with just a liner and a spotter but I recommend at least trying an angular brush.... My favorite is Loew Cornell Angular 7400 10/0 as it's great for leaves and flower petals....
If you dip the angular brush in pink and then dip just the very tip in white and pull it sideways or in an arch, you get the same effect as you do an an ombre ribbon...a two-tone effect. If you make a C and then a backward C together you end up with something that looks like a little donut...great for rose centers and rose buds...
Thank heavens these brushes are not that expensive because being so small they do not last that long if you do much painting... I do not buy expensive brushes because they need to be replaced quite often.
Personally I just buy my brushes at Michaels (our local big chain craft store) when they have a sale... But sometimes the selection at a hobby store is limited or out of stock and if you don't have access to a hobby or art store here are some online options..
1. VERY inexpensive source for my favorite liner and spotter...... http://pearlpaint.com/shop-Brush-SH-4000series-American-Painter_7810_78115.html These are so cheap buy 2 or 3 of each..

2. For some reason tiny angular brushes are a little harder to find...but my favorite is available at
http://www.in2art.com/art-supplies/loewcornell-goldentaklon-artistbrushes They also carry perfectly fine 10/0 liners and spotters.
PAINTS: To start I'd recommend white, yellow, royal blue, dark and light green, dark pink or burgundy and a medium pink and a dark brown. With these few colors you can paint most anything... I just buy inexpensive acrylics at the craft store and often find bags of them at thrift stores.
Next actual painting plus painting a rose...it takes absolutely NO artistic talent to paint tiny roses...it's all cheating ..believe me.. I will show you..
P.S. Great tip: the next time you are at a $ store or a box store pick up a whisk broom... Those little straws are great for mixing small amounts of paint and getting tiny bits from the bottom of the bottle...

8/23/2010

My pincushion hangups... post # 694

Well I read through all the comments and decided on doing two prizes for my 700th post.. I'll post the sign-up day as soon as I photograph the prizes... One will be a pincushion and the second will be a selection of bird buttons.... I will do the rose giveaway in the spring for those interested... These are pincushions that were sold so I will have to see what I have...I'm trying to put some on Etsy also...


I did sell them on a website for a while but I hated the packing and shipping... Once I took them to an art fair and arranged them all on lace tableclothes... They were gorgeous... Even though the table was littered with signs saying "DO NOT TOUCH!!!!" ...guess what...? After all that work I wanted to check everyone's hands to see if they were clean... Then there are cushions I get attached to because it's a special jewel or fabric... Then if some bitchy person wanted to buy it I would snatch it back and say it was spoken for... I wanted only nice people to have my pincushions...


Occasionally I get to do one for a bride with her dress fabric and that is extra special fun. I've used veil fabric, dress fabric and even did one that had the bride's garter as trim..... All have a vintage locket attached as well as layers and layers of trims..


The inspiration for my pincushions that "rise above it all" came from this ad years and years ago in the old Victoria magazine before it went defunct and came back to life... My pincushions were constantly lost amid sewing clutter and I thought this was a great idea and set to work making just like I wanted it. I ended up having the wooden inner core especially cut and all the fabric is lined... I did intend to sell them but more and more I just wanted a whole wall of them.... I will try the Esty venture but people will have to promise to wash their hands before handling their cushion and also to be a very kind person indeed......

Button Painting and recovery update #693

You can paint on any smooth surfaced button...glass, plastic etc. I prefer mother of pearl buttons because I love their luminosity. 3/4 to 1" are the best size but 11/4-1 1/2" are the easiest to start with. I also prefer a little thicker button with a self shank or metal shank but they are difficult to find and often expensive. For a long time I used ones with holes and filled the holes with a white filler from the hardware store. Now I have a goodly supply of antique ones I use exclusively which are marvelous but difficult to find. Notice the rose painted on the red button and likewise roses painted on black buttons are stunning...

No matter how loud I yell and jump up and down saying prepping the button is absolutely critical for the optimum result... people ignore that first step.... I can instantly recognize who has ignored this prepping as their paints are globby on the surface of the buttons... Yuk, Yuk, Yuk......

First glue the button to a scrap of felt. This felt gives you a handle so you do not touch the button itself. You don't want the oil from your fingers to get on the button....

Sometimes I bead around the button and you need the felt and sometime I remove the felt and put a gold edging on the button. If you want to bead around the button after painting you can really secure the felt with glue at this point..but if you are just using the felt as a holder, glue lightly so you can remove it....Once dry fill any holes in button with any white putty from the hardware store.


Now for the most important prep steps. Sand the button lightly with extra fine sandpaper and then you have two options:

1. Brush a very thin layer of blue wash ( acrylic paint mixed with water) over the button.

2. Lately I have been using a wash of alcohol inks because they are more transparent..

Either wash must dry or cure. I leave it sit overnight. The sanding and the wash coat gives the button a tooth or surface that makes painting so much smoother and easier and it is thin enough to let the luminosity of the button shine through.

Your button should look like this at this point and you can trim the felt closer for beading when the actual painting is done!

Below is a picture of all the buttons I prepped ahead of time for the workshops at the retreat... That indicates how important I feel this step is... I will be prepping buttons for the CQ Adventure classes and also will put this on a separate page as I continue this tutorial onto the painting phase...

Update: I've done no stitching as I had planned... On top of the terrible headache the pain medication leaves me tired and dopey and I am having double vision which Dr. says will go away as I heal.. So I am prepping some buttons and other light tasks to keep busy plus sleeping a lot... And as you suspected Morris is giving me lots of loving care and doggy kisses on my glasses and forehead.

8/20/2010

The Hiawatha Trail

Cyclists come from all over the world to ride this trail... It is 15 miles long and a long 2% downgrade as it is a old railroad bed... When this picture was taken we were just approaching tree line elevation. and the arrow shows where we started....


We had a gorgeous day and the weather was only about 80 degrees and a slight breeze... The scenery was like this at every turn ...spectacular.


Here I am heading into one of nine tunnels on my vintage one-speed Schwinn bike..


And here is one I made it through intact.


We crossed 11 trestles like this one we were just approaching... They were breathtakingly beautiful to ride across.

Here is the view looking down from the trestle to the river on the valley floor. Not the best for anyone with a problem with heights..
Today as I sit with ice pack attached to my head I have a whole new perspective to the phrase... "the light at the end of the tunnel!"


Special thanks to all who posted "get well" wishes as I intend to do that very thing...
and luckily it was my left hand that was damaged so I can stitch while I recover...

DH and granddaughter about to enjoy a huckleberry malt in Wallace, Idaho on the way home.


8/19/2010

Update - post #692

First I WAS wearing a helmet... I hit the wall with such force it cracked and punctured the helmet. AND I did have a light... but it is so weird in total darkness and the wobbly light... well the light wasn't wobbly ...my bike riding is which made the light wobbly...... (the tunnel is over a mile long) that I became disorientated.. Without the helmet I'm sure I would be dead.
Anyway the doctor did a CT scan and x-rayed my ribs... I have a concussion and 2 broken ribs and hurt in every part of my body... am going to take a pain pill and go to bed... Oh and on the way home an eighteen-year-old ran a red light and plowed into my husband's truck... Have had better days....

Change in plans on Arlene's block - post#691

After I made my last post about using a Australian Red-breasted parakeet (left)on Arlene's block, she left me this post... "would you mind if I make a suggestion regarding the bird, we have more lorikeets up here in Townsville than parakeets and they are just as lovely." and she was right as here is a picture of one... Don't you love the blue head and red bill...? So a lorikeet it is....

Yesterday we took DG on the Hiawatha bike trail..It starts in Montana and ends in Idaho...15 miles long but all downhill with a 2% grade...easy even for me... It's an old rail bed and has 9 tunnels and 7 huge trestles. It was one of the tunnels that was my undoing.. They are dark and you need a light on your bike...

Unfortunately one of the tunnel walls jumped right in front of me and I hit it so hard it made a big hole in the front of my bike helmet and then it threw me back and I hit back of my head on the cement... I also managed to bruise and scrape one elbow and one leg, the handlebars bruised my ribs and I sprained the finger and thumb on my left hand.. Since I still have a massive head pain this morning we are heading into the doctor. It only proves that someone who is so uncoordinated she falls down when she is standing still, should not be on a bike....

8/17/2010

Work begins on Arlene's stumpwork block....post #690

This is Arlene's block as I received it from Cobi... I'm the last to work on it so I can pretty much do whatever and not worry about using more my share of space . Cobi added the red flower upper left and the delightful colorful garland lower right....both adding much needed color to this very blue and white block...... As I was studying it yesterday I will share some of my thoughts with you...


First the single polka dot upper right has to go so will add lace to repeat the lace that Cobi added and some interest there as well.


Secondly there are two large motifs, Diane's calla lilies and Karrin's pansies, and both are about the same weight visually.. and both are in the lower portion of the block which makes it bottom heavy. Since things should be done in odd numbers, a third motif of the same weight is called for and I will put it in the odd space left to be on the upper left (see circle) which will balance out the block.

Finally the block needs color, color, color.... and Cobi's additions are wonderful. I will pick up where she left off and use colors from from Diane's Edmar seam and Karrin's pansies. And how you say am I going to do that....? Well this is my summer of birds.. I have this and two other blocks before I quit RRs until January and I want to do a bird on each.... A bluebird would be an obvious but I wanted more color and I've done so many bluebirds lately...


So I went in search of colorful birds, specifically colorful birds in Australia where Arlene lives... Much to my delight I found the perfect bird.... a Scarlet-chested Parakeet... I will have to change it's sitting position so it fits that space and I want it to relate to Cobi's stumpwork flower and also be a directional element moving the eye around the block.... Follow along as the fun begins on Arlene's block


8/16/2010

The whole block is complete! Post #689

I finished today during the mid-day heat..(in the 90s today).. My first inclination was to do the background and then applique the owl and then I changed my mind and appliqued the owl first... I should have followed my first inclination...

I didn't get the owl on quite straight and it made doing the background harder...and it was all a little off kilter but luckily Margreet left plenty of extra fabric around the stitching area and I was able to change the basting lines so all ended well.. Having extra fabric around the block is a great idea...

As you can see I did use a lot of the background shape from the owl rack and I also used the iron brace decor for ideas also... I love the iron piece and will use it as inspiration again in the future. I have to admit I did miss doing seams but the two previous stitchers didn't do seams so as I stongly believe in being a "team stitcher" I followed suit... Believe it or not I am really getting into seams and looking forward to the seams-only RR.


While browsing I came across this great Art Nouveau owl tile... Isn't it a beauty?? All the while I was finishing up this block I had Arlene's stumpwork block out and trying to figure out what to do... I did come up with one great idea and I will share that tomorrow.. After the Art Nouveau designs and the stumpwork I am ready to get back to some regular CQ......

8/15/2010

Thistles and my CQ jacket!

I have two pastures (out of nine) that are infested badly with Canadian thistle. In our county we have weed police and if you don't keep up with noxious weed removal, they hire someone to do it for you and send you the bill... So it's 92 degrees and I'm out there on my tractor since 6am plowing under the thistle and eating dirt and grumbling... Why didn't I do this the other day when it was cooler? Oh yes, my tractor wasn't running... Anyway I occupied my mind while engulfed in dust trying to decide how I was going to treat myself after this odious task... and coming in looking like this!


Stitching time is a given but it had to be more and I settled on fabric fondling... PLUS I bought a foot bath/massager at the thrift store the other day.. Fabric fondling during a foot massage would be the thing indeed. Actually a G&T might be appropriate also... A triple treater.....


Ever since I found this Europa Salzburg jacket pattern I have been mulling over color options... This will be CQ and I always think pink but I NEVER wear pink...then maybe blue to go with demin casual.. But in the end after falling in love with Margreet's block I settled on earthy greens.. I plan to incorporate the "seams only" DYB blocks coming up so a decision had to be made... The silk print on the right is my inspiration piece... I need another dark green or two but this is a great start...