I used a 3 ply DMC gold thread on a spool... It did have a tendency to separate at the end but made a nice chain... I will use it again.
I also found a long braid of gold cord which I had salvaged from something... As you can see it's a bit wavy after I took it apart but it's a nice weight and manipulates nicely. I am using it on the bells.
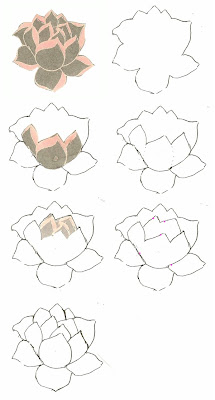
 Now on the subject of transfers...... I use applying the design on the back when I am using black or doing something with an ornate design or with a lot of curves. But by far and away my favorite way (and quickest way) to transfer a design on something I can mark on is my "cut away transfer" technique which I use OFTEN and I already did a tutorial about it. I use a light box (or window) when I can but usually the thickness of the fabric plus the foundation make that impossible....so my version of cut away evolved.... It is amazing once you get the hang of it and, yes Cathy L., you could even use it to position those fairys' eyes. You can transfer most anything in 3-5 steps...
Kerry emailed me that she wants her goldwork piece to be romantic with "aged" colors along with the gold. So while I was working on Janet's block last night I was thinking and planning for Kerry's block.. What I have in mind is very detailed and will be perfect for demonstrating again the "cut away" technique.
I wish you could all just gather around the table and watch because frankly doing tutorials is a pain... I do some work, take a picture, do some work, take a picture...etc. etc. Then I have to edit all the photos and annotate them... so I'm whinging and hoping my efforts are appreciated. It will probably be at least a week before Kathy's blocks get here from Canada...


That's exactly what I've been doing for the last five days! Do some work, take a picture, do some work then photoshop etc etc. I'm getting closer but still not done.
ReplyDeleteIt's fun watching your goldwork come to life. And that chain added just the weight you needed. It's looking good Ger!
Dear Gerry: Oh, please know that I read every word you write on the internet and treasure all the tutorials you do. My dearest hope is to someday get to meet you in person, but for now I am always in your audience and appreciate all you do. (Actually, I think you may never sleep, you get so much done , Love, Amy in LA
ReplyDeleteWell, I've seen your cutaway transfer technique but I'm too thick-headed to figure out how to break down the pattern into steps. (I couldn't figure out how those pictures of flat broken down boxes would look put together on the basic skills tests in school either).
ReplyDeleteI'm sitting at the table and ready to learn. I do appreciate the time it takes for a tutorial. I'm not good at those either.
I received Karen's blocks today so will have to think about what to do now that I've read her booklet. I'll update my blog when I get started and try my experiments.
I would so love to be your cq buddy and sit at your table but its not in the cards. So I read your tutorials and refer to them often. Thanks for making the effort.
ReplyDelete