 But after the thrill of the suffrage quilt being accepted in Houston I began thinking I may finish it as one piece (See possibility at left) so the project sat on the shelf until last winter. But after waffling back and forth I knew I book/books would be best as I wanted to leave them to granddaughters. It was pure vanity wanting to enter them in a competition and I knew I would be sorry down the road.
 The Morris book was 16 blocks counting the covers and I did them back to back so there were 8 pages. All the pages were facing each other and they were so heavily embellished that it didn't work well. I knew that this time I wanted each page to be backed so the embellishments on the cottage blocks would have some protection.
 So that meant that there would be 14 pages including covers...which would be too thick and unwieldy. The Morris book is over 2 inches thick with just 8 pages.
This meant 2 books instead of 1 which is fine as there will be one for each of the oldest granddaughters. I had already finished the CQJP 2015 into 2 books for the youngest granddaughters.
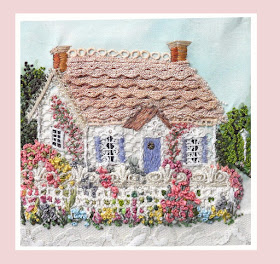
So right away I had to start another lace cottage for the second cover. It was much less complex than the first one but I liked it just as well.

Once that was done I started the blocks that would back each cottage page. I did different adages about home on each page and kept them quite simple.
I was really happy with the way they turned out. They not only protected the embellished pages, they added to the whole cottage theme.
Then began the long process of binding each page and edging each page. In one book each page was edged differently with lace and trims and in the other they were edged with all lace. The adage pages and the finishing of the cottage pages took months.
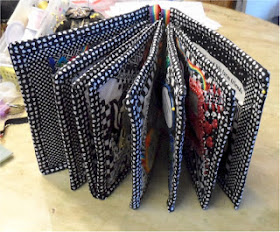
I knew for absolute certainty that when assembled I wanted the pages to open flat and began looking at alternative ways to assemble them. I have done several books finished with buttons holding the pages together but they do not open flat.
The Morris book is assembled in "signatures" with a spine and it opens fairly flat but I wanted to explore other methods.
To the left the top example is called a "French-Stitch" method based on a traditional book-binding technique. The reference showed doing it with cording but I chose to use multiple ribbons.
The second technique was using beads and ribbons. I will add some more rows when I find more beads the right size that a ribbon needle will pass through. If you look closely at the photo above you can see the ribbons and beads when the books are flat... I am really happy with the results of both methods.
 The "French-Stitch" method was a bit complicated and I learned too late that it is important to hold the piece facing the same direction when you start the next row.. My error is not that noticeable but I will know better next time. This method has a lot of possibilities combining various cordings with beads.
And I finished each book with some pictures of myself and a little bio about the importance of needlework throughout my life. I bought a good-sized lot of knitted lace on e-bay last winter for this project and used most of it... I love the look of it.
This is the book I used for information and inspiration and I never found anything better. I can highly recommend it.
This was my last really large project and could quit now and rest on my laurels (whatever my laurels are....) but I'm going to really try to complete as many of the CQJP 2016 as I can and assemble the anniversary hanky piece which is 90% done.


This is eye candy at its absolute best! Your granddaughters are going to treasure these special books. I enjoyed reading about how you put the pages together - something that has puzzled me for quite awhile.
ReplyDeleteGerry, I've always been in awe of your talent and after seeing this book I am so much more! Stunning! I wish I was young enough to be your grand daughter - what a treasure!
ReplyDeleteI always admire your creativity and special thanks because you always share related information how to make them. Your granddaughters are so lucky to have them.
ReplyDeleteGreat job!
Rengin
As always, your talent and generosity inspire me. The ribbon is just so perfect on the covers. And thanks for the bookbinding tips. I'll need something for the bird book (only 4 more pages to go) and the Anne Stokes one(s).
ReplyDeleteThank you for your tutorial on finishing the blocks & assembling the pages! I've enjoyed following your cottage designs over the months. As to stringing beads on ribbon, have you tried a Big Eye needle? They are quite long, maybe 4", & split longitudinally. It's sort of like two wires stuck together at each end & when you press the ends together, the center opens wide. Release the ends, & the needle closes over the ribbon or thick thread. Available in bead stores, they are great for loading beads onto ribbon, boucle, yarn & chenille. Looking forward to more of your projects,
ReplyDeleteAbsolutely beautiful! Your blog is one that I check often.
ReplyDeleteYour cottage journals are beautiful. Thank you for posting about how you did the binding. I took a look for the book you mentioned but it looks like it may be out of print. So I checked out my local library system and they have four copies :)
ReplyDeleteThese two books are absolutely beautiful and a such a wonderful keepsake for your grandchildren!! You are such an inspiration to all of us "stichers". What size are your blocks, pages, and what size are the finished books? Did you put any batting inside of the pages?
ReplyDeleteThank you for sharing your beautiful work? Cindy :-)